Reese’s Butterfinger Cheesecake Bars: The Ultimate No-Bake Treat
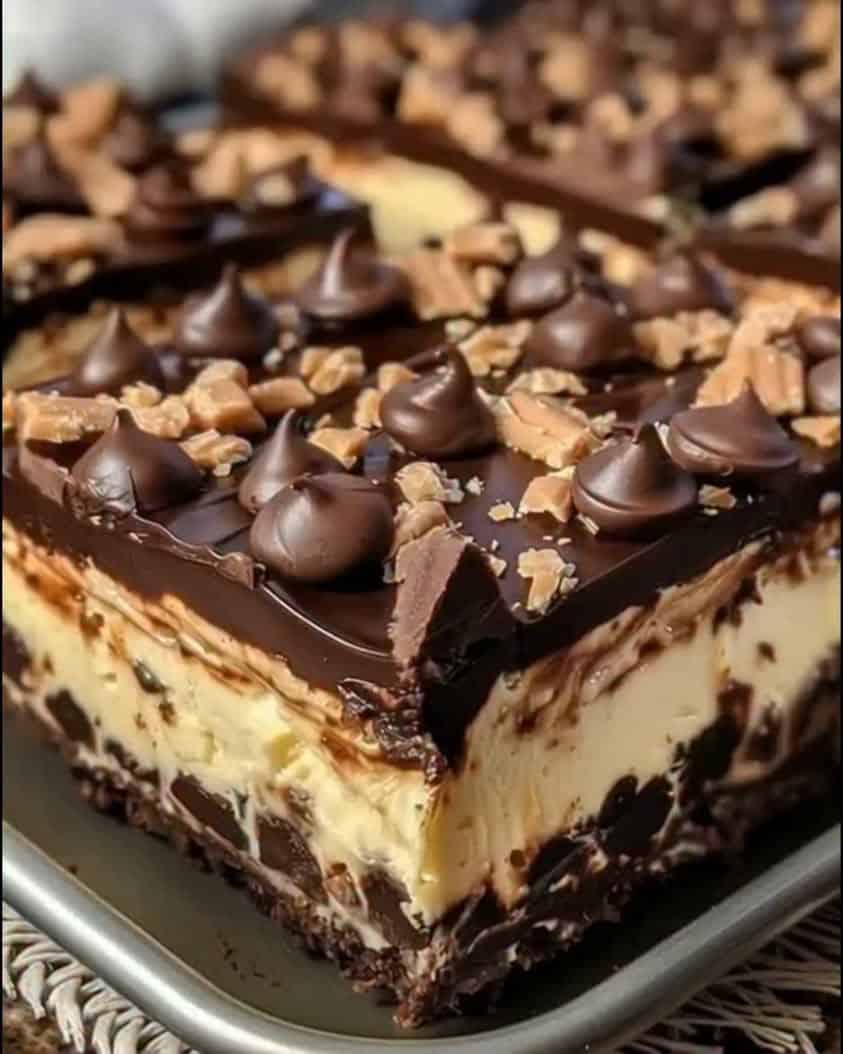
If you love the combination of chocolate and peanut butter, then these Reese’s Butterfinger Cheesecake Bars will quickly become your new favorite dessert. This no-bake recipe combines a crunchy graham cracker crust with a creamy peanut butter cheesecake filling, and it gets topped with crushed Butterfinger candy bars and a rich chocolate drizzle. Therefore, every single bite delivers a perfect balance of sweet, salty, creamy, and crunchy textures that candy lovers adore.
Moreover, this recipe requires absolutely no oven time, which means you can prepare it even during the hottest summer months without heating up your kitchen. Because the filling sets in the refrigerator rather than the oven, the process stays simple and stress-free from start to finish. Additionally, the combination of Reese’s peanut butter cups and Butterfinger candy creates a flavor profile that feels indulgent yet approachable for bakers of any skill level.
Furthermore, these Reese’s Butterfinger Cheesecake Bars work beautifully for potlucks, birthday parties, holiday gatherings, and casual weeknight desserts. Since the recipe yields sixteen generous bars, you can easily feed a crowd without spending hours in the kitchen. Meanwhile, the no-bake method means even beginners can achieve impressive results on their very first attempt, which makes this dessert a reliable go-to for anyone who wants a show-stopping treat with minimal effort.
Quick Recipe Highlights
- Flavor Profile: These bars deliver a bold peanut butter taste that blends seamlessly with rich chocolate and the caramel-like crunch of Butterfinger candy. The graham cracker crust adds a subtle sweetness that grounds the entire dessert. Consequently, every bite offers a satisfying contrast between creamy and crispy elements.
- Texture: The filling stays velvety smooth thanks to the whipped cream cheese and peanut butter combination. Meanwhile, the crushed Butterfinger pieces introduce a delightful crunch that keeps the texture interesting. The chocolate drizzle on top adds a slight snap when you bite into each bar.
- Aroma: The scent of peanut butter and chocolate fills the air as soon as you begin mixing the filling. Additionally, the buttery graham cracker crust releases a warm, comforting aroma. These aromas together create an inviting atmosphere that makes everyone eager to taste the finished dessert.
- Visual Appeal: The bars feature distinct layers that look impressive on any dessert table. The golden crust, creamy peanut butter filling, and colorful candy topping create a beautiful contrast. Then the glossy chocolate drizzle ties everything together for a polished presentation.
- Skill Level Needed: This recipe suits beginners perfectly because it requires no baking and minimal technical skill. You simply mix, layer, and chill the ingredients in sequence. Therefore, anyone who can operate a hand mixer can make these bars successfully.
- Special Equipment: You need a standard 9×9 inch baking pan and parchment paper for easy removal. A hand mixer or stand mixer helps create a smooth filling, though you can mix by hand with effort. Also, a food processor or rolling pin works well for crushing the candy and graham crackers.
Recipe Overview
- Difficulty Level: This recipe earns an easy rating because it involves no baking, no tempering, and no complex techniques. You combine simple ingredients in a bowl, press them into a pan, and let the refrigerator do the work. Since the steps flow logically from crust to filling to topping, even a first-time baker can follow along confidently. The only real requirement is patience while the bars chill and set properly.
- Category: These Reese’s Butterfinger Cheesecake Bars fall squarely into the dessert category as a no-bake bar treat. They work as a sweet ending to any meal, a snack, or a contribution to a dessert spread. Additionally, they bridge the gap between cheesecake and candy bar, which gives them broad appeal.
- Cuisine: This recipe draws from American dessert traditions, specifically the love affair Americans have with peanut butter and chocolate. The no-bake cheesecake concept became popular in the mid-twentieth century when home cooks sought easier alternatives to traditional baked cheesecake. Meanwhile, the addition of branded candy bars reflects modern American dessert culture. Consequently, this recipe represents a distinctly American fusion of convenience and indulgence.
- Cost: The ingredients cost roughly twelve to eighteen dollars depending on your region and whether you buy store brands. Cream cheese, peanut butter, and heavy cream make up the bulk of the cost. However, the candy bars and graham crackers add only a few dollars more. Overall, this recipe delivers excellent value for sixteen servings.
- Season: These bars shine brightest during summer when you want a cool dessert without turning on the oven. Additionally, they work well during the winter holidays when peanut butter and chocolate feel especially comforting. Because they require only refrigeration, you can make them year-round without seasonal restrictions.
- Occasion: Potlucks, bake sales, birthday parties, and holiday dinners all welcome these cheesecake bars. They also make a wonderful homemade gift during the holidays when layered in a decorative box. Meanwhile, a simple weeknight dinner at home becomes special when these bars appear for dessert.
Why You’ll Love This Recipe
The taste and texture of these Reese’s Butterfinger Cheesecake Bars set them apart from ordinary desserts. The creamy peanut butter filling melts in your mouth while the Butterfinger pieces deliver a satisfying crunch that keeps things exciting. Meanwhile, the chocolate drizzle adds a smooth richness that complements the salty peanut butter perfectly. Because the crust provides a buttery, slightly crumbly base, each bite offers a complete sensory experience. Consequently, you get a dessert that feels both nostalgic and refreshingly modern at the same time.
Convenience plays a massive role in why this recipe wins people over. You never need to preheat an oven, monitor baking times, or worry about cracks forming on the surface of a cheesecake. Instead, you mix the layers, press them into a pan, and let the refrigerator handle the rest. Since the entire active preparation takes only twenty-five minutes, you can whip up these bars on short notice. Therefore, this recipe fits perfectly into busy schedules without sacrificing quality or presentation.
Nutritionally speaking, these bars offer some benefits alongside their indulgent nature. Peanut butter provides protein and healthy fats that help you feel satisfied after one serving. Cream cheese contributes calcium and Vitamin D, which support bone health. While these bars certainly qualify as a treat rather than a health food, they contain more substance than many empty-calorie desserts. As a result, a single bar satisfies your sweet tooth effectively without encouraging overindulgence.
Social and entertaining value ranks high for this recipe because these bars always impress guests. The layered presentation looks professional, and the familiar candy flavors spark conversation and nostalgia. Moreover, serving homemade bars shows effort and care that store-bought desserts simply cannot match. Whether you bring them to a neighbor’s barbecue or serve them at a formal dinner party, these Reese’s Butterfinger Cheesecake Bars consistently earn compliments. Consequently, they have become a staple in many home bakers’ repertoires.
Cost-effectiveness and accessibility make this recipe appealing to budget-conscious cooks as well. All the ingredients come from standard grocery stores, and you can often find sales on cream cheese and candy bars around holidays. Because the recipe uses simple techniques, you avoid expensive specialty equipment or hard-to-find ingredients. Additionally, the ability to make sixteen servings from relatively inexpensive components means you get tremendous value per bar. Therefore, this dessert delivers maximum impact for minimal investment.
Historical Background and Cultural Significance
The origin story of these Reese’s Butterfinger Cheesecake Bars begins with two iconic American candy brands. Reese’s Peanut Butter Cups debuted in 1928 when H.B. Reese, a former dairy worker, created the chocolate and peanut butter confection in his basement. Meanwhile, Butterfinger arrived on the scene in 1923 from the Curtiss Candy Company, featuring a crispy, flaky peanut butter core coated in chocolate. Eventually, creative home bakers realized that combining these two beloved candies with cheesecake created something extraordinary. Therefore, this recipe represents a natural evolution of American dessert innovation.
Cultural importance surrounds peanut butter desserts in the United States because peanut butter holds a special place in American food identity. Unlike many countries where peanut butter serves primarily as a savory ingredient, Americans embraced it as a sweet staple. Consequently, peanut butter and chocolate became one of the most beloved flavor combinations in American cuisine. These Reese’s Butterfinger Cheesecake Bars celebrate that cultural love affair and bring it to life in a shareable, crowd-pleasing format.
The evolution of this recipe tracks alongside the rise of no-bake desserts in American home cooking. During the 1950s and 1960s, convenience foods and refrigeration became more accessible to average households. As a result, cooks began experimenting with no-bake cheesecakes, icebox cakes, and refrigerator pies. The addition of candy bars to these recipes followed naturally as brands like Reese’s and Butterfinger grew in popularity. Over time, the combination of cheesecake and candy evolved into the modern Reese’s Butterfinger Cheesecake Bars that we enjoy today.
Regional variations of this recipe exist across the United States, with some cooks adding caramel drizzle or using different candy bars. In the South, you might find versions that incorporate pecans or a brown butter crust. Meanwhile, West Coast bakers sometimes swap in dark chocolate for a less sweet finish. Regardless of these regional twists, the core concept remains the same: creamy cheesecake, crunchy candy, and a buttery crust. Therefore, this recipe adapts beautifully to local tastes while maintaining its essential character.
Ingredient Deep Dive
Cream cheese serves as the foundation of the filling and carries significant cultural weight in American cooking. This ingredient originated in Europe but became a staple in American kitchens during the late nineteenth century. Nutritionally, cream cheese provides calcium, phosphorus, and Vitamin A, along with protein and beneficial fats. When selecting cream cheese, choose full-fat blocks rather than whipped spreads because they set more firmly. Store cream cheese in the refrigerator for up to two weeks after opening, and always soften it at room temperature before mixing to avoid lumps.
Peanut butter brings the signature flavor to these Reese’s Butterfinger Cheesecake Bars and holds a legendary place in American food culture. Invented in the late 1800s, peanut butter became a household staple by the mid-twentieth century and now appears in countless sweet and savory recipes. Nutritionally, peanut butter delivers protein, healthy monounsaturated fats, Vitamin E, and magnesium. For the best results, choose a creamy commercial peanut butter like Jif or Skippy rather than natural varieties that separate. Store peanut butter in a cool, dark pantry for up to six months, and stir natural versions thoroughly before use.
Butterfinger candy bars provide the signature crunch and caramel-like flavor that makes this recipe unique. Introduced in 1923, Butterfinger became famous for its flaky, crisp peanut butter center coated in chocolate. While Butterfinger does not offer significant nutritional benefits, it contributes iron and small amounts of protein from the peanut butter center. When buying Butterfinger bars, choose fresh ones because stale candy loses its signature crunch. Store candy bars in a cool, dry place and crush them just before using to preserve texture.
Graham crackers form the crust and bring a nostalgic element that reminds many Americans of childhood. Invented in the 1820s by Sylvester Graham, these crackers became a popular dessert base in the early twentieth century. Graham crackers provide fiber, calcium, and iron, making them a slightly more nutritious crust option than some alternatives. Choose fresh, crisp crackers for the best texture, and store them in an airtight container to prevent softening. If you need a substitution, digestive biscuits or vanilla wafers work well.
Heavy whipping cream adds lightness and volume to the cheesecake filling. This ingredient has been used in desserts for centuries and remains a staple in both professional and home kitchens. Nutritionally, heavy cream provides Vitamin A, Vitamin D, and calcium, though it also contains significant fat. Select cream with at least thirty-six percent milk fat for proper whipping, and check the expiration date before purchasing. Store heavy cream in the coldest part of your refrigerator and use it within a week of opening for best results.
Powdered sugar sweetens the filling without adding graininess. Also known as confectioner’s sugar, this ingredient contains cornstarch to prevent clumping and dissolves easily into creamy mixtures. Powdered sugar offers no significant nutritional benefits beyond calories, but it plays an essential structural role in the filling. Choose a reliable brand and sift the sugar if it appears lumpy before adding it to the mixture. Store powdered sugar in an airtight container at room temperature for up to two years.
Unsalted butter binds the graham cracker crust and adds richness. Butter has been a dietary staple for thousands of years and remains central to Western baking traditions. It provides Vitamin A, Vitamin D, and Vitamin E along with saturated fat. Choose unsalted butter so you can control the sodium level in the crust, and store it in the refrigerator wrapped tightly to prevent absorbing odors. For a dairy-free alternative, use plant-based butter or coconut oil.
Common Mistakes to Avoid
- Using cold cream cheese leads to lumpy filling that never becomes smooth. Always soften cream cheese at room temperature for at least thirty minutes before mixing. Consequently, your filling will turn out silky and uniform.
- Overmixing the filling incorporates too much air and causes the bars to become fluffy rather than dense and creamy. Mix just until the ingredients combine fully. Therefore, stop mixing as soon as you see a smooth consistency.
- Skipping the parchment paper makes removing the bars from the pan nearly impossible without damaging them. Line your pan with parchment paper, leaving overhang on two sides. Then you can lift the entire block out cleanly for cutting.
- Not chilling long enough results in bars that slump and lose their shape when sliced. Refrigerate for at least four hours, though overnight chilling produces the best results. As a result, your bars will hold their shape beautifully.
- Crushing the Butterfinger pieces too finely eliminates the signature crunch that makes these bars special. Leave some larger pieces for texture contrast. Meanwhile, a few fine crumbs help distribute flavor throughout the filling.
- Using natural peanut butter with separated oil creates a greasy filling that never sets properly. Stick with conventional creamy peanut butter for consistent results. Therefore, your bars will firm up reliably every time.
- Pressing the crust too firmly makes it hard and difficult to cut. Press gently with the back of a measuring cup until the crumbs just hold together. Additionally, a lighter touch produces a more pleasant, crumbly texture.
- Adding too much chocolate drizzle creates a messy appearance and overwhelms the other flavors. Drizzle lightly in thin streams across the top. Consequently, the bars look elegant and taste balanced.
- Cutting the bars while they are still cold from the refrigerator causes cracking. Let the bars sit at room temperature for ten minutes before slicing. Then use a sharp knife wiped clean between cuts for neat edges.
- Storing the bars uncovered in the refrigerator dries out the filling and makes the crust soggy. Always cover the pan tightly with plastic wrap or transfer bars to an airtight container. As a result, they stay fresh and delicious for days.
Essential Techniques
Softening cream cheese properly ranks as the most important technique for achieving a smooth filling. Cold cream cheese resists blending and creates stubborn lumps that ruin the texture of your Reese’s Butterfinger Cheesecake Bars. To master this technique, leave cream cheese on the counter for thirty to sixty minutes until it presses easily with your finger. You can also microwave it in ten-second intervals if you are short on time, though room temperature softening yields the best results. Watch for a soft, pliable texture without any melting or separation as your visual cue for success.
Whip the heavy cream to stiff peaks to give the filling structure and stability. This technique matters because properly whipped cream prevents the bars from becoming dense or heavy. Start with cold cream and a cold bowl, then beat on medium speed until soft peaks form. Increase to high speed and continue until the cream holds stiff peaks that stand upright when you lift the beaters. Common pitfalls include overwhipping, which creates grainy butter, and underwhiping, which leaves the filling too loose. Look for a glossy, cloud-like texture that holds its shape as your visual cue.
Folding the whipped cream into the cream cheese mixture requires a gentle hand to preserve the air you worked to incorporate. This technique matters because aggressive stirring deflates the cream and produces a flat, dense filling. Use a rubber spatula to cut down through the center, sweep across the bottom, and fold over the top. Rotate the bowl a quarter turn after each fold and repeat until no streaks remain. Avoid stirring in circles or using a whisk, which destroys the air bubbles you need for a light texture.
Pressing the graham cracker crust evenly creates a stable base that supports the filling without crumbling. This technique matters because an uneven crust leads to bars that tilt or fall apart when sliced. Use the flat bottom of a measuring cup or glass to press the crumbs into an even layer across the pan. Apply moderate pressure so the crust holds together but does not become rock hard. Visual success looks like a uniform, compacted layer with no loose crumbs on top.
Pro Tips for Perfect Reese’s Butterfinger Cheesecake Bars
Chill your mixing bowl and beaters in the freezer for ten minutes before whipping the cream. This small step helps the cream reach stiff peaks faster and with more stability. Consequently, your filling will hold its shape better during chilling and slicing.
Use a food processor to crush the graham crackers for the most consistent crust texture. Pulse until you achieve fine, even crumbs rather than a mix of large and small pieces. As a result, the crust presses together smoothly and cuts cleanly.
Reserve a handful of Butterfinger pieces for the top garnish right before serving. Adding fresh candy pieces at the last minute restores the crunch that softens during chilling. Therefore, every bite delivers the texture contrast that makes these bars special.
Dip your knife in hot water and wipe it dry between each cut when slicing the bars. This technique prevents the filling from sticking and creates clean, professional-looking edges. Meanwhile, your bars will look bakery-quality on the serving platter.
Add a pinch of flaky sea salt to the chocolate drizzle before it sets. The salt enhances the peanut butter flavor and balances the sweetness beautifully. Consequently, the bars taste more complex and sophisticated.
Line your baking pan with parchment paper that extends over two opposite sides. This overhang creates handles that let you lift the entire slab out for easy cutting. Then you avoid scratching your pan and get perfectly uniform bars.
Let the assembled bars chill overnight if your schedule allows. The extra time allows the flavors to meld and the filling to set firmly. As a result, the bars taste even better the next day.
Toast the graham cracker crumbs in a dry skillet for two minutes before making the crust. This step deepens the flavor and adds a subtle nuttiness. Therefore, the crust contributes more than just structure to the overall taste.
Variations and Adaptations
Regional variations of these Reese’s Butterfinger Cheesecake Bars reflect local preferences across the United States. In the South, cooks often add a layer of caramel between the crust and filling for extra richness. Meanwhile, New England bakers sometimes substitute maple syrup for part of the powdered sugar to create a distinctively Northern flavor. On the West Coast, dark chocolate drizzle replaces milk chocolate for a less sweet finish. Additionally, some Midwestern versions incorporate crushed pretzels into the crust for a salty counterpoint. Therefore, you can adapt this recipe to reflect your own regional tastes.
Seasonal adaptations let you enjoy these bars year-round with subtle changes that match the time of year. During summer, add fresh raspberries or strawberries on top for a bright, fruity contrast. In the fall, swirl pumpkin puree into the filling for a holiday-inspired twist. Around the winter holidays, crushed peppermint candies replace some of the Butterfinger topping for a festive look. Meanwhile, spring calls for a lighter touch with lemon zest added to the filling. Consequently, this recipe stays fresh and exciting throughout every season.
Dietary modifications allow people with various restrictions to enjoy these bars. Use gluten-free graham crackers to make the recipe gluten-free without changing the taste. For a dairy-free version, substitute plant-based cream cheese, coconut cream, and dairy-free chocolate. Vegan bakers can use coconut whipped cream and vegan cream cheese for a completely plant-based dessert. Additionally, reduced-sugar versions work by using sugar-free powdered sweetener and dark chocolate with less sugar. As a result, nearly everyone can find a way to enjoy these cheesecake bars.
Flavor variations let you customize the taste while keeping the same basic structure. Swap the peanut butter for almond butter or cashew butter for a different nut profile. Replace Butterfinger with crushed pretzels and caramel for a salted caramel version. Add espresso powder to the filling for a mocha twist that pairs beautifully with chocolate. Meanwhile, a few drops of coconut extract transform the bars into a tropical treat. Therefore, you can create an entirely new dessert from the same recipe framework.
Texture modifications help you achieve your preferred mouthfeel. For a crunchier bar, add extra crushed Butterfinger to the filling itself rather than just the topping. A smoother version uses finely ground graham crackers and omits candy pieces from the filling. If you prefer a denser bar, skip the whipped cream and use extra cream cheese instead. Additionally, a creamier texture comes from adding a tablespoon of sour cream to the filling. Consequently, you can fine-tune the texture to suit your personal preference.
Presentation alternatives let you serve these bars in creative ways beyond the standard square cut. Layer the components in small glass jars for individual parfaits that look elegant at parties. Use a round springform pan to create a single cheesecake that you slice into wedges. Alternatively, shape the crust into mini muffin tins for bite-sized cheesecake cups. Meanwhile, a trifle bowl creates a stunning layered dessert for large gatherings. As a result, you can present the same flavors in formats that suit any occasion.
Serving and Presentation Guide
Plating techniques elevate these Reese’s Butterfinger Cheesecake Bars from simple treats to elegant desserts. Place each bar slightly off-center on a small dessert plate to create visual interest. Then drizzle a thin line of chocolate sauce beside the bar rather than over it for a restaurant-quality look. Add a small dollop of whipped cream on the side for contrast. Meanwhile, a dusting of cocoa powder on the plate rim adds a professional finishing touch. Consequently, your presentation will impress even the most discerning guests.
Garnishing ideas bring color, texture, and visual appeal to each serving. A whole mini Reese’s cup pressed gently into the top of each bar creates an eye-catching centerpiece. Alternatively, a few Butterfinger shards standing upright in the filling add height and drama. Fresh mint leaves provide a pop of green that contrasts beautifully with the chocolate and peanut butter tones. Additionally, a light drizzle of caramel sauce adds shine and richness. Therefore, you can customize the garnish to match your occasion and style.
Traditional accompaniments complement the flavors without competing for attention. A cold glass of milk ranks as the classic pairing for any peanut butter and chocolate dessert. Vanilla ice cream on the side adds creaminess and temperature contrast. Meanwhile, a cup of hot coffee cuts through the sweetness and enhances the chocolate notes. For a lighter option, serve fresh berries alongside the bars for a tart counterpoint. Consequently, these pairings make the dessert feel complete and satisfying.
Modern serving suggestions bring a contemporary twist to this classic treat. Crumbled bars over a bowl of vanilla Greek yogurt create a dessert-style breakfast or snack. Layered with pudding and whipped cream in a parfait glass, the bars become a sophisticated dinner party dessert. Alternatively, chop the bars into small pieces and serve them on a dessert charcuterie board with other sweets. Meanwhile, a warm peanut butter sauce drizzled tableside adds drama and warmth. As a result, you can reinvent these bars for any modern dining experience.
Temperature considerations affect how the bars taste and feel in your mouth. Serve these bars slightly chilled rather than ice cold for the best flavor release. Let them sit at room temperature for ten to fifteen minutes before serving. This brief rest softens the filling just enough to feel creamy without losing structure. Meanwhile, the crust retains its firm texture and the candy topping stays crunchy. Therefore, proper serving temperature makes a noticeable difference in your enjoyment.
Portion control tips help you serve these rich bars without overwhelming your guests. Cut the bars into sixteen equal pieces for standard servings, or cut them smaller for a dessert buffet. A sharp knife warmed under hot water creates clean cuts every time. Additionally, serving each bar on a small plate with a fork encourages mindful enjoyment. Because these bars are quite rich, smaller portions often satisfy guests completely. Consequently, you can stretch the recipe further without anyone feeling shortchanged.
Wine and Beverage Pairing
Wine pairings for these Reese’s Butterfinger Cheesecake Bars focus on sweetness and body to match the rich dessert. A tawny port offers caramel and nutty notes that echo the Butterfinger flavors beautifully. Cream sherry provides a similar effect with a smoother, sweeter profile that complements the peanut butter. Meanwhile, a late-harvest Riesling brings bright acidity that cuts through the richness without clashing. For chocolate lovers, a ruby port adds red fruit notes that enhance the chocolate drizzle. Therefore, choose a sweet wine with enough body to stand up to this indulgent dessert.
Non-alcoholic alternatives ensure everyone at your gathering can enjoy a complementary beverage. Cold whole milk remains the classic choice because its richness matches the creamy filling. Chocolate milk amplifies the chocolate elements and creates a kid-friendly pairing. Meanwhile, a salted caramel milkshake takes the indulgence to another level for special occasions. Sparkling apple cider offers effervescence that cleanses the palate between bites. As a result, you have plenty of alcohol-free options that pair beautifully with these bars.
Coffee and tea pairings bring warmth and depth that enhance the flavors in these cheesecake bars. A strong espresso cuts through the sweetness and highlights the chocolate notes. Cold brew coffee offers a smoother, less acidic option that works especially well in summer. Meanwhile, a vanilla chai latte adds spicy warmth that complements the peanut butter. For tea lovers, a bold English breakfast tea provides structure and a pleasant astringency. Consequently, coffee and tea drinkers alike will find a perfect match for this dessert.
Temperature considerations for beverages matter as much as the drink choice itself. Serve wine slightly chilled but not ice cold to allow the aromas to open up. Non-alcoholic milk-based drinks taste best ice cold for maximum refreshment. Meanwhile, coffee and tea should be hot but not scalding to avoid burning your tongue. For sparkling options, serve well chilled in a flute or coupe glass for a festive touch. Therefore, paying attention to temperature elevates the entire pairing experience.
Serving suggestions for beverages focus on presentation and convenience. Set up a small beverage station near the dessert table so guests can help themselves. Offer a variety of options in clear glass pitchers or carafes for visual appeal. Meanwhile, pre-pour wine into glasses and arrange them on a tray for easy service. For hot beverages, provide a thermal carafe to keep coffee and tea at the ideal temperature. As a result, your guests enjoy a seamless dessert experience from first bite to last sip.
Storage and Shelf Life
Storage methods for these Reese’s Butterfinger Cheesecake Bars determine how long they stay fresh and delicious. Place the cut bars in an airtight container with parchment paper between layers to prevent sticking. Alternatively, keep the bars in the original baking pan and cover tightly with plastic wrap. Then wrap the entire pan in aluminum foil for extra protection against refrigerator odors. Consequently, your bars stay fresh and maintain their texture for several days.
Temperature requirements for storage are straightforward because these bars belong in the refrigerator. The cream cheese and whipped cream filling requires consistent cold temperatures to remain safe and firm. Set your refrigerator to thirty-five to forty degrees Fahrenheit for optimal preservation. Avoid storing the bars in the door where temperatures fluctuate with frequent opening. Meanwhile, never leave these bars at room temperature for more than two hours. As a result, proper temperature control keeps your bars safe and delicious.
Container recommendations help you choose the best storage vessel for your bars. A glass baking dish with a fitted lid offers the best protection and keeps bars from drying out. Plastic containers with locking lids work well too, though they may absorb odors over time. For single bars, wrap each one tightly in plastic wrap and place them in a freezer bag. Meanwhile, avoid storing bars in open containers or on plates covered only with foil. Therefore, investing in a quality storage container protects your dessert investment.
Signs of spoilage help you know when to discard leftover bars rather than risk illness. A sour smell indicates that the dairy ingredients have gone bad. Visible mold, discoloration, or a slimy texture on the filling means the bars should be thrown away. Meanwhile, if the crust becomes excessively soggy and the filling separates, the bars have passed their prime. Additionally, any change in the taste or an unusual tanginess signals spoilage. Consequently, trust your senses and discard anything questionable.
Reheating instructions for these bars are simple because they taste best cold. However, if you prefer a softer texture, microwave a single bar for five to ten seconds. This brief warming softens the filling slightly without melting the entire bar. Alternatively, let the bars sit at room temperature for fifteen minutes before serving. Meanwhile, never reheat the entire batch at once, as this ruins the texture. As a result, individual warming gives you the perfect temperature for each serving.
Freezing guidelines allow you to extend the shelf life of these bars for up to three months. Wrap individual bars tightly in plastic wrap, then place them in a freezer-safe bag. Label the bag with the date so you know when to use them. When ready to enjoy, thaw the bars in the refrigerator overnight. Meanwhile, avoid thawing at room temperature, which can cause the filling to become too soft. Therefore, freezing offers a convenient way to enjoy these bars long after you make them.
Make Ahead Strategies
Prep timeline strategies help you plan ahead for parties and gatherings without last-minute stress. You can make the graham cracker crust up to two days in advance and store it covered in the refrigerator. Prepare the filling and topping on the day of assembly for the best texture, though you can crush the candy up to a week ahead. Meanwhile, assembling the entire recipe one to two days before serving works perfectly because the bars need time to chill anyway. Consequently, this recipe suits even the busiest hosts.
Storage between steps keeps components fresh if you need to pause during preparation. Store the prepared crust in the refrigerator covered with plastic wrap for up to forty-eight hours. Meanwhile, keep the whipped cream filling in an airtight container in the refrigerator for up to twenty-four hours. If the filling stiffens during storage, stir it gently to restore a spreadable consistency. For the candy topping, store crushed Butterfinger pieces in a sealed bag at room temperature. As a result, you can break the recipe into manageable stages.
Quality impact assessment reveals that these bars actually improve with overnight refrigeration. The flavors meld together, and the filling sets firmly for clean slicing. However, the candy topping loses some crunch after the first day, so add fresh pieces just before serving. Meanwhile, the crust maintains its texture well for up to three days in the refrigerator. Therefore, making these bars a day ahead enhances the flavor while maintaining most textural elements.
Assembly tips for make-ahead preparation ensure consistent results every time. Press the crust into the pan and chill it for thirty minutes before adding the filling. This step prevents the crust from shifting when you spread the filling on top. Meanwhile, spread the filling evenly with an offset spatula for a smooth surface. Add the candy topping and chocolate drizzle just before serving to preserve crunch and shine. Consequently, your make-ahead bars look and taste freshly made.
Reheating guidelines for make-ahead bars focus on bringing them to the ideal serving temperature. Remove the bars from the refrigerator fifteen minutes before serving. This brief rest softens the filling just enough for a creamy mouthfeel. Meanwhile, do not microwave the entire batch, as this melts the chocolate drizzle and softens the crust. For individual servings, a quick five-second microwave pulse works if you prefer a softer texture. As a result, your make-ahead bars serve beautifully with minimal last-minute effort.
Fresh element additions at serving time restore the vibrant flavors and textures that make these bars special. Sprinkle freshly crushed Butterfinger pieces over the top right before serving. Add a fresh chocolate drizzle for shine and visual appeal. Meanwhile, a few flakes of sea salt brighten the peanut butter flavor. If you made the bars more than a day ahead, consider adding a thin layer of fresh whipped cream before the candy topping. Therefore, these small touches make make-ahead bars taste freshly assembled.
Scaling Instructions
Halving the recipe works easily for smaller households or when you want just a few bars. Use a loaf pan instead of a square pan, and reduce all ingredients by half. The crust will be thinner, so press it gently to avoid breaking. Meanwhile, the filling layer will also be thinner, which means the bars set faster in the refrigerator. Consequently, you can enjoy these Reese’s Butterfinger Cheesecake Bars in a smaller batch without waste.
Doubling or tripling the recipe requires a larger pan and adjusted chilling times. Use a 9×13 inch pan for a double batch and a half sheet pan for a triple batch. The filling will be thicker in a 9×13 pan, so extend the chilling time by at least two hours. Meanwhile, a triple batch in a half sheet pan creates a thinner bar that sets more quickly. Therefore, scale the recipe based on your pan size and desired bar thickness.
Equipment adjustments for larger batches include using a stand mixer instead of a hand mixer. A stand mixer handles the increased volume of filling without straining the motor. For very large batches, you may need to mix the filling in two separate bowls to avoid overcrowding. Meanwhile, use a larger offset spatula to spread the filling evenly across a bigger pan. As a result, your scaled-up recipe comes together smoothly and efficiently.
PrintReese’s Butterfinger Cheesecake Bars
- Total Time: 1 hour
- Yield: 12
Description
Decadent cheesecake bars loaded with Reese’s peanut butter cups and crunchy Butterfinger pieces, all on a chocolate cookie crust. A perfect no-bake treat for peanut butter and chocolate lovers.
Ingredients
- 2 cups chocolate cookie crumbs (about 24 cookies)
- 6 tablespoons unsalted butter, melted
- 16 ounces cream cheese, softened
- 1/2 cup granulated sugar
- 1/4 cup brown sugar
- 2 large eggs
- 1/2 cup creamy peanut butter
- 1 teaspoon vanilla extract
- 1 cup Reese’s peanut butter cups, chopped
- 1 cup Butterfinger candy bars, chopped
- 1/2 cup heavy whipping cream
- 1 cup semi-sweet chocolate chips
- 1/4 cup peanut butter, for drizzle (optional)
Instructions
- Preheat oven to 325°F (163°C). Line a 9×13-inch baking pan with parchment paper, leaving overhang.
- In a medium bowl, combine chocolate cookie crumbs and melted butter. Press firmly into the bottom of the prepared pan. Bake for 10 minutes, then set aside to cool.
- In a large bowl, beat cream cheese, granulated sugar, and brown sugar until smooth. Add eggs one at a time, beating well after each addition. Mix in peanut butter and vanilla extract until fully incorporated.
- Fold in half of the chopped Reese’s and half of the chopped Butterfinger into the cheesecake batter.
- Pour batter over the cooled crust and spread evenly. Bake for 30-35 minutes, until the edges are set and the center is slightly jiggly.
- Remove from oven and let cool completely at room temperature, then refrigerate for at least 4 hours or overnight.
- For the topping, heat heavy whipping cream in a small saucepan until simmering. Pour over chocolate chips in a heatproof bowl and let sit for 1 minute, then stir until smooth. Spread over chilled cheesecake.
- Sprinkle remaining chopped Reese’s and Butterfinger over the chocolate topping. Drizzle with melted peanut butter if desired.
- Chill for another 30 minutes to set the topping. Lift bars out using parchment overhang and cut into squares. Serve cold.
Notes
You can customize the seasonings to taste. For a firmer texture, refrigerate overnight. Substitute milk chocolate chips for semi-sweet if preferred.
- Prep Time: 20 minutes
- Cook Time: 40 minutes
- Method: Dessert
- Cuisine: American