The Ultimate Greek Loaded Hummus Recipe for Your Next Gathering
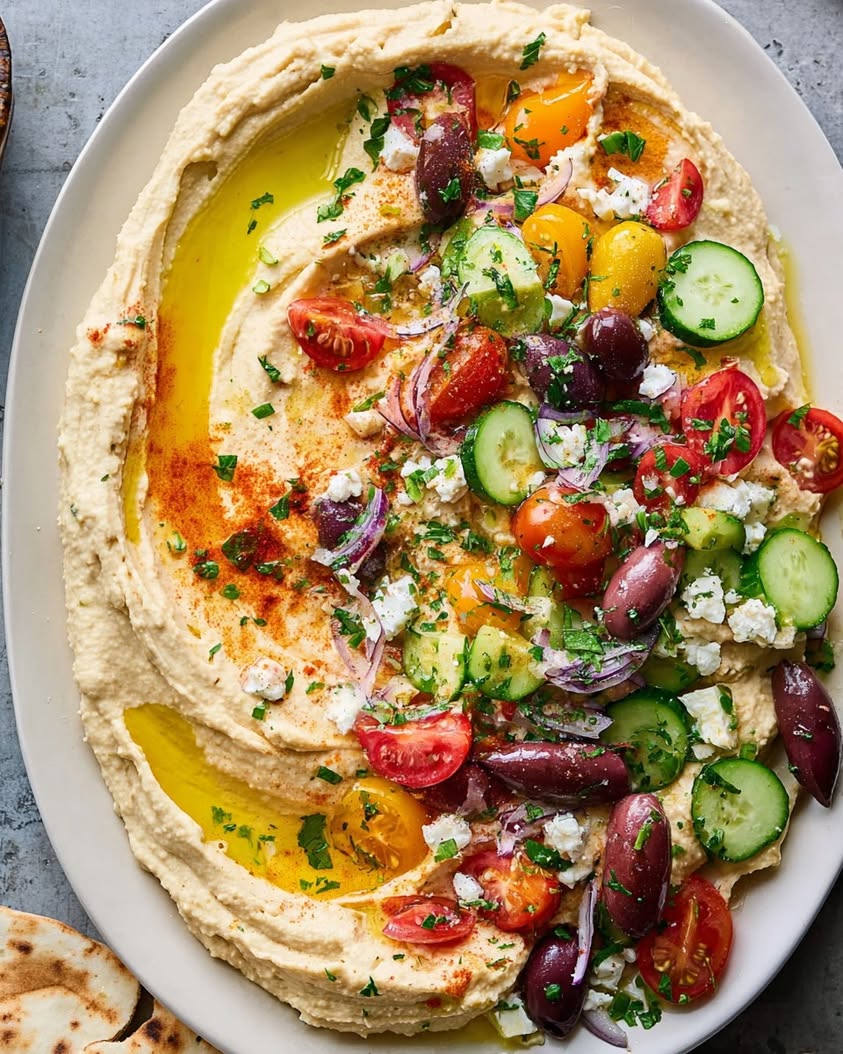
Imagine a creamy, dreamy bed of homemade hummus, lovingly swirled onto a large platter and then adorned with a treasure trove of vibrant toppings. This isn’t your average store-bought dip. This is The Ultimate Greek Loaded Hummus, a show-stopping appetizer that brings the bright, fresh flavors of the Mediterranean straight to your table. It starts with the silkiest, most flavorful hummus base, which is then generously piled high with juicy cherry tomatoes, crisp cucumbers, briny Kalamata olives, salty feta cheese, and a bounty of fresh herbs. Every single scoop delivers a perfect balance of textures and tastes, from the creamy chickpea base to the burst of flavor from each topping.
What makes this The Ultimate Greek Loaded Hummus Recipe so special is its incredible versatility and its undeniable visual appeal. It is the kind of dish that instantly elevates any gathering, whether you are hosting a casual game day, a sophisticated dinner party, or a simple family picnic. You can serve it as an appetizer with warm pita bread and crisp vegetables, or you can even use it as a flavorful spread for sandwiches and wraps. Furthermore, this recipe is surprisingly simple to prepare, making it an accessible yet impressive option for cooks of all skill levels. The joy of this dish lies not only in its delicious taste but also in the colorful, mosaic-like presentation that is sure to impress your guests before they even take their first bite.
As we delve into this culinary adventure, you will discover that this recipe is more than just a list of instructions. It is a celebration of fresh, wholesome ingredients and the rich culinary traditions of Greece. The base hummus is made from scratch, which allows you to control the flavor and achieve a creaminess that is simply unmatched. Moreover, the toppings are where you can truly let your creativity shine. I will guide you through each component, offering expert tips and variations to help you craft the perfect platter every time. Therefore, gather your ingredients, and let us begin creating a memorable dish that will have everyone asking for the recipe.
The beauty of The Ultimate Greek Loaded Hummus lies in its approachability. It is an easy recipe that yields extraordinary results, making it perfect for both novice cooks and seasoned chefs. The prep time is minimal, primarily involving the chopping of fresh vegetables and the assembly of the hummus in a food processor. The cook time refers to the quick simmering of the chickpeas, which helps to soften them further for an extra creamy texture. In total, you can have this spectacular dish ready in just about half an hour, leaving you plenty of time to relax and enjoy your company.
Quick Recipe Highlights
- Flavor Profile: This dish is a symphony of flavors, combining the nutty, earthy taste of chickpeas with the bright, acidic notes of lemon juice and the savory punch of garlic. The toppings add a delightful brininess from the olives and feta, a pop of sweetness from the tomatoes, and a refreshing coolness from the cucumber and herbs. It is a perfectly balanced flavor experience.
- Texture: The hummus itself is luxuriously smooth and creamy, providing a velvety base. This is then contrasted with the firm, juicy crunch of fresh vegetables, the soft, crumbly texture of feta cheese, and the satisfying pop of the olives. Each bite offers a wonderful variety of textures that keep your palate engaged.
- Aroma: You will be greeted by the fragrant aroma of garlic and toasted sesame seeds from the tahini as you blend the hummus. The finished dish is then elevated by the fresh, herbaceous scents of parsley, dill, and mint, which make the entire platter smell as vibrant and inviting as it looks.
- Visual Appeal: This loaded hummus is a true feast for the eyes. The creamy, pale beige hummus is a perfect canvas for a colorful array of toppings. The deep purple of the olives, the vibrant red of the tomatoes, the bright green of the herbs and cucumbers, and the stark white of the feta create a beautiful, appetizing mosaic that is guaranteed to be the centerpiece of your table.
- Skill Level Needed: This recipe requires only basic kitchen skills, such as chopping vegetables and using a food processor. There are no complex techniques involved, making it a foolproof dish that anyone can master. The most important step is to taste and adjust the seasoning of the hummus to your preference.
- Special Equipment: A quality food processor is the key piece of equipment for achieving an ultra-smooth hummus. You will also need a sharp knife and cutting board for preparing the toppings. A large, shallow serving platter or bowl is essential for creating the beautiful loaded presentation.
Recipe Overview
- Difficulty Level: The Easy difficulty rating is due to the straightforward nature of the recipe. It involves no complicated cooking methods, such as baking, roasting, or sautéing. The primary tasks are blending the hummus ingredients and assembling the toppings, making it an ideal recipe for a stress-free entertaining experience.
- Category: This dish perfectly fits into several categories, most notably as an appetizer or starter. It is also a fantastic choice for a party dip, a game-day snack, a light lunch, or even a vegetarian main course when served with a hearty salad and plenty of warm pita bread.
- Cuisine: This recipe is rooted in the vibrant culinary traditions of Greece and the broader Mediterranean region. It draws inspiration from classic Greek meze, which are small, shared dishes meant to be enjoyed with good company. The flavors are characteristic of the region, relying heavily on fresh produce, olive oil, and brined ingredients like feta and olives.
- Cost: The overall cost of this dish is very reasonable. The main ingredients, chickpeas, tahini, and lemons, are incredibly budget-friendly staples. While feta cheese and Kalamata olives can be slightly more expensive, they are used in moderation as toppings. The dish is an economical way to feed a crowd generously.
- Season: While this dip can be enjoyed year-round, it truly shines during the spring and summer months. This is when the tomatoes are at their most flavorful, the cucumbers are crisp, and fresh herbs are abundant. The light, fresh flavors are perfect for warm-weather gatherings and al fresco dining.
- Occasion: This loaded hummus is the ultimate crowd-pleaser for any occasion. It is perfect for casual get-togethers like sporting events and movie nights, as well as more formal events like holiday parties and dinner parties. It also travels well, making it a great choice for picnics, potlucks, and barbecues.
Why You’ll Love This Recipe
The first and foremost reason you will fall in love with this dish is its incredible taste and texture. The homemade hummus base is a revelation, far creamier and more flavorful than anything you can buy at the store. The secret lies in blending warm chickpeas with high-quality tahini, fresh lemon juice, and garlic until perfectly smooth. Then, the vibrant topping mixture adds a burst of freshness and a satisfying crunch, transforming a simple dip into a complete and memorable culinary experience that tantalizes the taste buds with every single scoop.
Beyond its incredible flavor, this recipe offers unmatched convenience for any home cook. It is a make-ahead wonder, as you can prepare the hummus and chop all of the vegetables a day in advance. When you are ready to serve, all you have to do is assemble the platter, which takes only minutes. This allows you to be a relaxed and present host, rather than being stuck in the kitchen while your guests are having fun. The ease of assembly is a huge benefit for stress-free entertaining, and the simple, fresh ingredients are easy to find at any grocery store.
From a nutritional standpoint, this loaded hummus is a fantastic choice for a healthy appetizer. The chickpeas are an excellent source of plant-based protein and dietary fiber, which help keep you feeling full and satisfied. Furthermore, the dish is packed with heart-healthy fats from the olive oil, tahini, olives, and feta. The abundance of fresh vegetables provides essential vitamins, minerals, and antioxidants. You can feel good about serving this nourishing and delicious dish to your family and friends, knowing it is a better alternative to many processed snacks and dips.
Additionally, this recipe is designed for social and entertaining value. It is a communal dish meant to be shared, and its impressive presentation is a fantastic icebreaker at any party. It takes center stage on the table and creates a focal point that brings people together as they gather around to scoop up the deliciousness. The vibrant colors and beautiful arrangement are guaranteed to spark conversation and admiration. Indeed, serving this dish makes a statement, showing your guests that you put time and care into providing them with a delicious and beautiful experience, which is the true essence of hospitality.
Finally, the cost-effectiveness of this recipe is a major draw for many home cooks. It relies on affordable, pantry-friendly staples like canned chickpeas and tahini, making it a very budget-conscious way to feed a crowd. The ingredients provide maximum flavor and visual impact without a high price tag, offering a truly great return on investment. This makes it an ideal option for those entertaining on a budget or anyone looking for a delicious way to incorporate more plant-based meals into their routine. Moreover, it is an accessible recipe that democratizes gourmet cooking, proving that simple, affordable ingredients can create spectacular results.
Historical Background and Cultural Significance
The story of hummus is a shared one, with roots that trace back centuries to the ancient lands of the Middle East and the Levant. Although the exact origin of the dish is a subject of friendly debate among several countries, including Lebanon, Israel, and Syria, its historical presence is undeniable. Early versions of hummus were likely a simple mix of mashed chickpeas, which are among the oldest cultivated legumes in the world. The addition of tahini, a paste made from toasted sesame seeds, and other ingredients evolved over time with the expansion of trade routes, creating the beloved dish we know today as a staple across the Mediterranean and Middle Eastern regions.
In Greek cuisine, hummus holds a special place within the tradition of “meze,” which is a selection of small dishes served to stimulate the appetite and encourage socializing. Similar to the Italian antipasto or the Spanish tapas, meze is all about sharing and community. Hummus, which is known as “revithosalata” in Greek, is a common and beloved component of this spread. It is typically enjoyed alongside other classics such as tzatziki, spanakopita, and olives. The Greek style, as presented in this loaded version, often incorporates Mediterranean ingredients that are native to the region, such as feta cheese, Kalamata olives, and oregano, creating a unique and distinctly Greek interpretation of the classic recipe.
The evolution of hummus from a simple peasant dish to a global phenomenon is a fascinating culinary journey. It began as a nutritious and filling meal for laborers and farmers, thanks to its base of affordable and hearty ingredients. However, the dish’s popularity gradually grew, spreading throughout the Middle East and into the Mediterranean. By the late 20th century, hummus had crossed the oceans and become a mainstream staple in Western diets, largely due to the growing awareness of its health benefits and the rising popularity of Middle Eastern cuisine. Today, it is a multi-billion dollar industry, available in a dizzying array of flavors and formats in supermarkets around the world.
Across the Mediterranean and the Middle East, hummus has evolved into countless regional variations. In some areas, it is served warm with ground meat or pine nuts on top. In others, it is spiced with cumin, paprika, or even chili peppers. In Turkey, it might be served with a generous swirl of melted butter. The Greek version often features a generous drizzle of extra virgin olive oil, a sprinkle of oregano, and, as this recipe showcases, a bountiful array of fresh toppings. This loaded style of serving hummus, as a platter or “hummus bowl,” is a more modern innovation that capitalizes on the growing trend of “loaded” appetizers and grain bowls, allowing for endless creativity and customization with a beautiful presentation.
Ingredient Deep Dive
Chickpeas, also known as garbanzo beans, are the heart and soul of this dish. They have a long and storied history, having been cultivated for over 7,000 years in the Middle East and Mediterranean regions. These humble legumes are a nutritional powerhouse, packed with plant-based protein, dietary fiber, iron, and folate. When selecting chickpeas, you have two main options: dried or canned. For the absolute best flavor and texture, simmering dried chickpeas from scratch is ideal, as it allows you to control their tenderness. However, high-quality canned chickpeas are an excellent and incredibly convenient shortcut that works wonderfully well in this recipe. The key is to drain and rinse them thoroughly to remove excess sodium and then warm them in simmering water for about 10 minutes, which makes them easier to blend into a velvety-smooth puree.
Tahini is another crucial component that provides the signature nutty and slightly bitter flavor that defines authentic hummus. This rich paste is made from hulled, toasted, and ground sesame seeds. Sesame seeds have been prized for thousands of years, since ancient times, and tahini has been a foundational ingredient in Middle Eastern cooking for centuries. Nutritionally, tahini is a great source of healthy unsaturated fats, calcium, and magnesium, making it a wonderful addition to a healthy diet. When purchasing tahini, you should look for a brand that is smooth and pourable, not overly thick or dry. The good quality tahini makes an enormous difference in the final result. If your tahini is very thick, you might need to add a little extra lemon juice or cold water to the hummus to achieve the desired consistency. Leftover tahini should be stirred well before each use, as the natural oils can separate and settle at the top of the jar.
Fresh lemon juice is an essential ingredient in a bright and balanced hummus. It does more than just add a tangy flavor, because the acidity helps to brighten the earthy flavors of the chickpeas and sesame, creating a perfect flavor balance. Lemons are a cornerstone of Mediterranean cuisine, and their juice is used to dress, marinate, and flavor a vast array of dishes. When selecting lemons, choose ones that feel heavy for their size, as this indicates they are full of juice. For the best flavor, roll the lemon on the counter a few times to release the juice before cutting. Freshly squeezed lemon juice is far superior to the bottled variety, which often has a flat and overly sour taste. To achieve the ideal creamy texture, some recipes even recommend adding a little ice-cold water along with the lemon juice while the hummus is blending, helping to whip air into the mixture and make it incredibly light and fluffy.
Kalamata olives are non-negotiable for giving this dish its unmistakably Greek character. These dark, almond-shaped olives are grown in the Kalamata region of Greece, where they are revered for their rich, fruity, and slightly wine-like flavor. They are typically preserved in red wine vinegar or olive oil, which gives them a wonderfully tangy and briny taste. Kalamata olives are a fantastic source of healthy monounsaturated fats and antioxidants. For this recipe, it is best to purchase them pitted to save time, though you may also need to check for any remaining pit fragments. Slice them in half lengthwise or leave them whole for a more rustic look. Beyond Kalamata olives, you could also experiment with other Greek varieties, such as green Halkidiki olives, for a different color and a milder flavor profile. They add a salty, savory pop that is crucial for balancing the creaminess of the hummus.
Feta cheese is the quintessential Greek cheese, and its salty, tangy, and crumbly texture adds a final touch of authenticity to this loaded hummus. True feta is made from sheep’s milk or a blend of sheep’s and goat’s milk, and it has a protected designation of origin (PDO) status in the European Union. It is prized for its distinctively creamy, tangy, and salty flavor. While feta is high in sodium and saturated fat, it is used in moderation here, providing a concentrated punch of flavor. When purchasing feta, look for one that is imported from Greece and sold in brine to ensure the best quality and flavor. To use, simply crumble it with your fingers over the top of the assembled hummus, or you can crumble it in a bowl beforehand and sprinkle it on evenly. For a richer, slightly creamier alternative, you could use a block of French feta or even a dollop of thick Greek yogurt as a substitute.
Common Mistakes to Avoid
- Using cold chickpeas in the blender can result in a grainy, thick hummus. The warmth from the simmering chickpeas is a crucial secret to creating a silky-smooth texture.Always blend the chickpeas warm to ensure the smoothest, creamiest hummus possible.
- Adding too much tahini can result in a bitter and overly thick hummus, while not using enough leaves it tasting flat and one-dimensional, lacking the essential nutty depth that defines great hummus. You should measure your tahini accurately and adjust to taste gradually.
- Not blending the hummus long enough is a common error. The food processor should run for at least two to three minutes, or until the mixture is completely smooth and fluffy. Avoid the temptation to rush this step, because a longer blend time is the key to that luxurious, airy texture.
- Overloading the food processor with all ingredients at once can prevent the blades from creating a proper vortex, which means the ingredients won’t be as smooth. Instead, puree the chickpeas and tahini first, then add the liquids while the processor is running.
- Adding too much garlic can easily overpower the other subtle flavors in the dish, making it bitter and pungent. You should start with one small clove and taste it, because you can always add more. A single, well-minced fresh clove is usually sufficient for a full batch.
- Using a poor-quality olive oil for the drizzle on top is a missed opportunity for flavor. This is where the oil’s flavor really shines, so use the best extra virgin olive oil you have. You should always use a high-quality, fruity olive oil for the final touch, as the flavor will be prominent.
- Chopping the toppings for the load into huge, chunky pieces can make it difficult to scoop and also compromise the delicate balance of flavors in each bite. The toppings should be cut into a small, uniform dice, ensuring that every forkful gets a little bit of everything.
- Assembling the loaded hummus too far in advance can lead to a soggy and unappealing platter. While the hummus base can be made a day or two ahead, the toppings should be added just before serving. This is important because the salt from the feta and olives can draw out moisture from the vegetables.
- Serving a loaded hummus with store-bought crackers that are too thick can overwhelm the delicate flavor of the dish. You should choose light, crisp pita chips or wedges of warm, soft pita bread for dipping so the bread complements the hummus rather than competing with it.
- Forgetting to taste and adjust the seasoning is a sure way to end up with a bland dip. The amount of salt needed will depend on the chickpeas, tahini, and feta, so it is essential to taste the finished hummus and add a pinch of salt or a squeeze of lemon juice as needed before adding the toppings.
Essential Techniques
Mastering The Ultimate Greek Loaded Hummus Recipe involves a few key techniques that are easy to learn but crucial for a perfect result. The most important technique is blending the hummus to the correct consistency. To achieve an ultra-smooth and creamy texture, the chickpeas must be warm and the blending process should be thorough. Start by processing the chickpeas, tahini, and garlic alone to create a thick paste. With the processor running, slowly drizzle in the lemon juice and cold water. This helps create an emulsion, whipping air into the hummus and making it light and fluffy. The process typically takes two to three minutes, and the end result should be a pale, silky puree that is almost mousse-like in texture.
Another essential technique is properly preparing and layering the toppings for the “loaded” aspect. Every vegetable and cheese should be chopped into a uniform, small dice, so each component is in perfect proportion to the others. This attention to detail not only improves the aesthetic appeal but also ensures that you get a bit of everything in every single bite. When assembling, the hummus should be spread evenly with a spatula or the back of a spoon. You can create a fun swirl on top, which makes a beautiful bed for the toppings and creates little wells for the olive oil to pool in. Following this, the toppings should be scattered generously over the entire surface, covering the hummus completely for a truly loaded and impressive look.
Finally, the technique of finishing the dish is what elevates it from good to great. This involves drizzling a good quality extra virgin olive oil over the top, allowing it to drip down into the swirls of the hummus. This adds a rich, fruity flavor that is the hallmark of Greek cooking. A sprinkle of good flaky sea salt and a pinch of sumac or dried oregano adds a final bit of color and a subtle, tangy kick. The garnish is not merely for decoration; it is a final layer of flavor that brings the entire dish together. Mastering these steps will allow you to create a loaded hummus that is not only visually stunning but also has a deep, complex, and balanced flavor profile that you will be proud to serve.
Pro Tips for Perfect Greek Loaded Hummus
To make your hummus exceptionally creamy, you should always peel the chickpeas if you have the time. Although this step is a bit tedious, it involves simply pinching each chickpea to remove the thin, papery skin. This is the ultimate secret of the best Middle Eastern restaurants and will yield an incredibly smooth, velvety texture that is unmatched. Alternatively, you can skip this step if you are short on time, but the resulting texture will be slightly less luxurious. This is a small effort that makes a big difference in the final quality.
For an even richer and more complex flavor in your hummus, you can fold in a spoonful of high-quality Greek yogurt. This not only adds a lovely tang, but it also contributes to a fluffier texture and a gorgeous, pale color. It is a traditional addition for some home cooks, and it provides a subtle note of creaminess that regular hummus doesn’t have. Just one or two tablespoons is enough to make a noticeable difference without overpowering the vegan nature of the base.
A crucial tip is to roast the garlic before blending it into the hummus. Roasting garlic mellows its sharp, pungent bite and transforms it into a sweet, nutty, and almost buttery ingredient. This is a game-changer for those who find raw garlic too intense. You can roast a whole head of garlic in the oven with a drizzle of olive oil for about 40 minutes, then squeeze out the soft, caramelized cloves to blend into the hummus. The resulting flavor is wonderfully subtle and sweet, adding a layer of complexity that is simply divine.
Do not be shy with the olive oil. Greek cuisine is known for its liberal use of high-quality extra virgin olive oil, and it is integral to this recipe. A generous drizzle on top serves as a final flavor component, and a little of it in the hummus itself ensures a rich and luxurious mouthfeel. I always recommend using a fruity, peppery Greek extra virgin olive oil for an authentic touch.
When you are ready to assemble, be sure to spread the hummus in a wide, shallow bowl or platter. This increases the surface area for the toppings and makes it the perfect vehicle for dipping. This is a better approach than using a deep, narrow bowl, which can limit the presentation and make it harder to get a proper scoop.
Finally, always taste your hummus for seasoning before you add the toppings. The chickpeas, tahini, and lemon juice all have varying levels of salt and acidity. A positive habit is to always taste and adjust with salt and lemon juice. You should season with confidence, but do so gradually, as it is difficult to correct an over-salted batch. Remember that the toppings will be adding more salt and brine, so err on the side of slightly under-salting the base. With this balance in mind, you are well on your way to a flawless result.
Variations and Adaptations
The regional variations of hummus are as diverse as the countries that lay claim to it. In this loaded version, our Greek style is defined by the use of feta, Kalamata olives, cucumbers, and oregano. However, you can take a cue from other cultures and add your own spin. For a Lebanese flavor, you could top the hummus with a generous swirl of olive oil, a sprinkle of sumac, and a handful of fresh mint leaves. In Israeli style, a mixture of sautéed ground lamb with pine nuts and a dusting of paprika is a traditional and hearty topping. The loaded concept is perfect for experimentation, so do not be afraid to explore the vibrant taste of the wider region.
This loaded hummus recipe is highly adaptable to the seasons, making it a perfect dish for any time of year. During the summer, take advantage of ripe, juicy heirloom tomatoes, fresh corn, and zucchini. In the spring, top it with fresh peas, radishes, and a pile of pea shoots. During the fall and winter, you can incorporate roasted butternut squash, caramelized onions, and sautéed mushrooms for a richer and earthier variation. You could even switch up the herbs according to the season, using fresh oregano in the summer and thyme or rosemary for a winter touch. No matter the season, this dish can be tailored to showcase the freshest produce available.
For those with dietary modifications, this recipe is incredibly friendly right out of the gate. It is naturally gluten-free, and without the feta, it is also vegan and dairy-free. The base hummus is completely plant-based, and you can easily make the entire platter vegan by simply substituting the feta with a high-quality vegan feta alternative. You can also add a spoonful of nutritional yeast to the hummus for a cheese-like flavor. The dish is naturally packed with protein and fiber, so it fits well into most healthy eating plans.
Flavor variations are endless, so you can tailor it to your specific preferences. If you enjoy a bit of heat, add a chopped serrano pepper or a sprinkle of red pepper flakes to the topping mix. For a smoky twist, you could blend a roasted red pepper or a pinch of smoked paprika into the hummus. You can also intensify the garlicky flavor by adding a clove of raw minced garlic to the toppings. For a sweet and savory version, a drizzle of honey and a handful of pomegranate seeds would be an excellent and delightful choice. Feel free to create your own unique flavor story for this versatile platter.
Serving and Presentation Guide
The best way to plate this loaded hummus is on a large, wide, and shallow platter. I prefer a beautiful ceramic or wood board that allows me to spread the hummus into a thick, even layer with a swirl on top. This presentation is not only elegant but also maximizes the surface area for the toppings and provides a perfect canvas for dipping. The edges of the hummus should be slightly higher, creating a natural border to keep the toppings contained. This is the perfect style for a gathering because it is all about sharing from the center of the table.
Garnishing is a wonderful opportunity to elevate your creation, so get creative with it. A classic approach is to first drizzle a generous amount of good extra virgin olive oil over the surface, letting it pool in the swirls. Next, scatter the diced cucumber, tomatoes, red onion, and herbs evenly. Then, sprinkle the crumbled feta and the halved Kalamata olives across the top. A final dusting of paprika or sumac and a bit of flaky sea salt will enhance the visual appeal and add a final flavor kick. The bright colors and fresh ingredients will naturally create a stunning and appetizing masterpiece.
Traditional accompaniments for this Greek dip are just as important as the dip itself. A basket of warm, soft pita bread cut into wedges is a must-have at a Greek table. For extra crispness, you can toast the pita wedges in the oven or grill until golden. Additionally, a fresh crunchy selection of vegetables is perfect for dipping. Think of thick-cut cucumber sticks, bell pepper strips, sugar snap peas, and whole radishes. These not only add a wonderful crunch and freshness but also make the platter even more abundant and appealing for your guests.
For a modern and elevated serving suggestion, you can serve this loaded hummus in individual small bowls or glasses for a beautiful, single-serve appetizer. This is a perfect option for more formal events or dinners where you want a beautiful, plated presentation. Create a layer of hummus at the bottom, followed by a layer of the toppings, and a final drizzle of olive oil. This deconstructed style is both stylish and functional, allowing your guests to enjoy the perfect ratio of ingredients in every elegant bite.
Temperature is a key consideration when serving this dish. The hummus is best enjoyed at room temperature, as this brings out its full flavor and silky texture, which is muted by cold refrigerator temperatures. To accommodate this, you should take the hummus out of the fridge and let it rest for about 30 minutes before you are ready to assemble and serve. The fresh toppings should be cold, but the combination of cool vegetables with the room-temperature hummus creates a perfect and delightful contrast.
Finally, proper portion control is important for your guests, so plan for about a quarter to a third of a cup of the loaded hummus per person as an appetizer. Since this dip is quite rich and filling, a standard recipe serving 8-10 people should be more than enough for a moderate-sized gathering. As it is served, the platter is perfect for grazing, and guests can come back for more of this delicious spread. This makes it an ideal appetizer to put out before a larger meal without filling your guests up too much.
Wine and Beverage Pairing
The fantastic news is that this loaded hummus is incredibly pairing-friendly, and it fits a wide variety of wines. A classic and safe choice is a crisp, dry white wine with vivid acidity. A Sauvignon Blanc, known for its herbaceous and grassy notes, is a wonderful companion to the bright flavors of the lemon and herbs. Similarly, an unoaked or lightly oaked Chardonnay can complement the creamy texture of the hummus without overpowering it. A Greek Assyrtiko from the island of Santorini is an excellent and authentic choice with its bone-dry minerality and citrus notes.
For those who prefer rosé, a dry Provençal rosé is a superb choice. Its light, fresh, and slightly fruity character is versatile enough to handle the savory, salty, and tangy components of this dish, and the pink color makes it a beautiful addition to your table. If you are in the mood for a light red wine, a Pinot Noir is a great option. Its delicate body, soft tannins, and light red fruit flavors will not compete with the hummus but will instead offer a subtle and pleasant contrast, particularly if you have added roasted vegetables or ground lamb to your platter.
For non-alcoholic alternatives, a sparkling water with a squeeze of fresh lemon or lime is a crisp and palate-cleansing choice. You can also make a refreshing Greek frappe, an iced coffee that is frothy and strong, which pairs surprisingly well with the Mediterranean flavors. Also, a good iced tea, especially one brewed with mint, can be a lovely and refreshing pairing that echoes the flavors in the dish.
A classic and beloved beer pairing for hummus is a Greek lager. The crisp, clean, and slightly malty character of a lager is excellent for washing down the rich, savory flavors of the chickpeas and feta. Very importantly, the cold, effervescent quality of the beer provides a wonderful contrast to the creamy, room-temperature dip. If you prefer something more complex, a witbier, with its hint of coriander and citrus peel, can be an unexpectedly delightful match.
The temperature of your beverage is essential, as you will want everything to be nicely chilled to provide a contrast with the room-temperature dip. Wines should be served at their recommended temperatures, typically around 45-50 degrees Fahrenheit for whites and rosés. Beers should be ice-cold. For the water, ensure it is chilled and with plenty of ice. Regardless of your choice, you should have the drinks ready before you bring out the dip so everyone can start enjoying their meal immediately.
Storage and Shelf Life
Storing your loaded Greek hummus is simple, but the approach differs depending on whether you have fully assembled it or have leftovers. If you have a fully assembled platter, the toppings are going to lose their freshness quickly. Therefore, it is best to store any leftovers immediately in an airtight container. While the hummus will be fine, the texture of the vegetables will degrade, and the feta may become soggy. Try to scrape off the toppings and store the hummus separately, in an airtight container, and the toppings in another container for the best results.
The hummus base has excellent keeping qualities and should be stored in an airtight container in the refrigerator. When stored properly, the hummus will remain at peak quality for a period of three to five days. The cold temperature will slow the growth of any bacteria, and the airtight seal will prevent it from drying out or absorbing any other odors from your refrigerator. Before placing it in the fridge, you can press a piece of plastic wrap directly onto the surface of the hummus to create a barrier against air, which prevents a skin from forming.
Regarding temperature requirements, the refrigerator is the right place for your leftover hummus. The ideal temperature inside your fridge should be below 40 degrees Fahrenheit. Do not leave Print
Greek Style Loaded Hummus
- Total Time: 15 minutes
- Yield: 6
Description
A creamy hummus base topped with fresh Greek ingredients like tomatoes, cucumber, olives, feta, and a drizzle of olive oil. Perfect for sharing as an appetizer or snack.
Ingredients
- 1 can (15 oz) chickpeas, drained and rinsed
- 1/4 cup tahini
- 3 tablespoons lemon juice
- 2 cloves garlic, minced
- 2 tablespoons olive oil, plus more for drizzling
- 1/2 teaspoon ground cumin
- Salt to taste
- 1/2 cup cherry tomatoes, halved
- 1/2 cup cucumber, diced
- 1/4 cup Kalamata olives, pitted and sliced
- 1/4 cup feta cheese, crumbled
- 1 tablespoon fresh dill, chopped
- 1 tablespoon fresh parsley, chopped
Instructions
- In a food processor, combine chickpeas, tahini, lemon juice, garlic, 2 tablespoons olive oil, cumin, and salt. Blend until smooth and creamy, adding a little water if needed.
- Spread the hummus onto a serving plate or shallow bowl, creating a swirl pattern with the back of a spoon.
- Top with cherry tomatoes, cucumber, olives, and feta cheese.
- Drizzle with olive oil and sprinkle with fresh dill and parsley. Serve with pita bread or vegetables.
Notes
You can customize the seasonings to taste. For extra tang, add more lemon juice or a splash of red wine vinegar.
- Prep Time: 15 minutes
- Cook Time: 0 minutes
- Method: Appetizer
- Cuisine: Greek