Mint Chocolate Chip Clusters: Easy Holiday Dessert Idea
If you need a show-stopping treat that comes together in minutes, these Mint Chocolate Chip Clusters are the answer. This easy holiday dessert idea combines smooth semisweet chocolate, cool peppermint extract, and crunchy chocolate chips into irresistible bite-sized mounds. You get all the festive flavor of a gourmet candy shop without any of the fuss. In fact, this recipe requires just four simple ingredients and one bowl, so anyone can make it with confidence.
The magic happens when melted chocolate meets a hint of mint. As you stir the mixture, the kitchen fills with a bright, refreshing aroma that instantly signals the season. Then you spoon the glossy mixture onto a lined tray, and the clusters set into shiny, crackly bites that look beautiful on any cookie platter. Because this Mint Chocolate Chip Clusters recipe needs no baking and no special equipment, it works beautifully for busy weeknights, last-minute gift exchanges, and holiday parties alike.
Moreover, these clusters deliver serious texture contrast. The outer chocolate shell snaps gently under your teeth, while the mini chocolate chips inside add a satisfying crunch. Meanwhile, the peppermint lingers just long enough to feel festive without overpowering the chocolate. Whether you serve them at a cookie swap or package them in small tins for neighbors, this easy holiday dessert idea earns rave reviews every single time. Keep reading to learn the exact steps, plus pro tips, variations, and storage advice for perfect results.
Quick Recipe Highlights
- Flavor Profile: Rich semisweet chocolate leads the flavor, followed by a clean, cooling peppermint finish. The mini chocolate chips reinforce the chocolate intensity and add a pleasant sweetness. Overall, the balance stays bright and festive rather than heavy.
- Texture: The clusters set into a firm, snappy shell with a slightly fudgy center. Mini chocolate chips deliver a gentle crunch in every bite. Because the mixture sets quickly, the texture stays consistent for days.
- Aroma: Peppermint extract releases a sharp, cooling scent as soon as you stir it into the warm chocolate. The aroma reads instantly as holiday candy. A subtle cocoa note rounds out the fragrance.
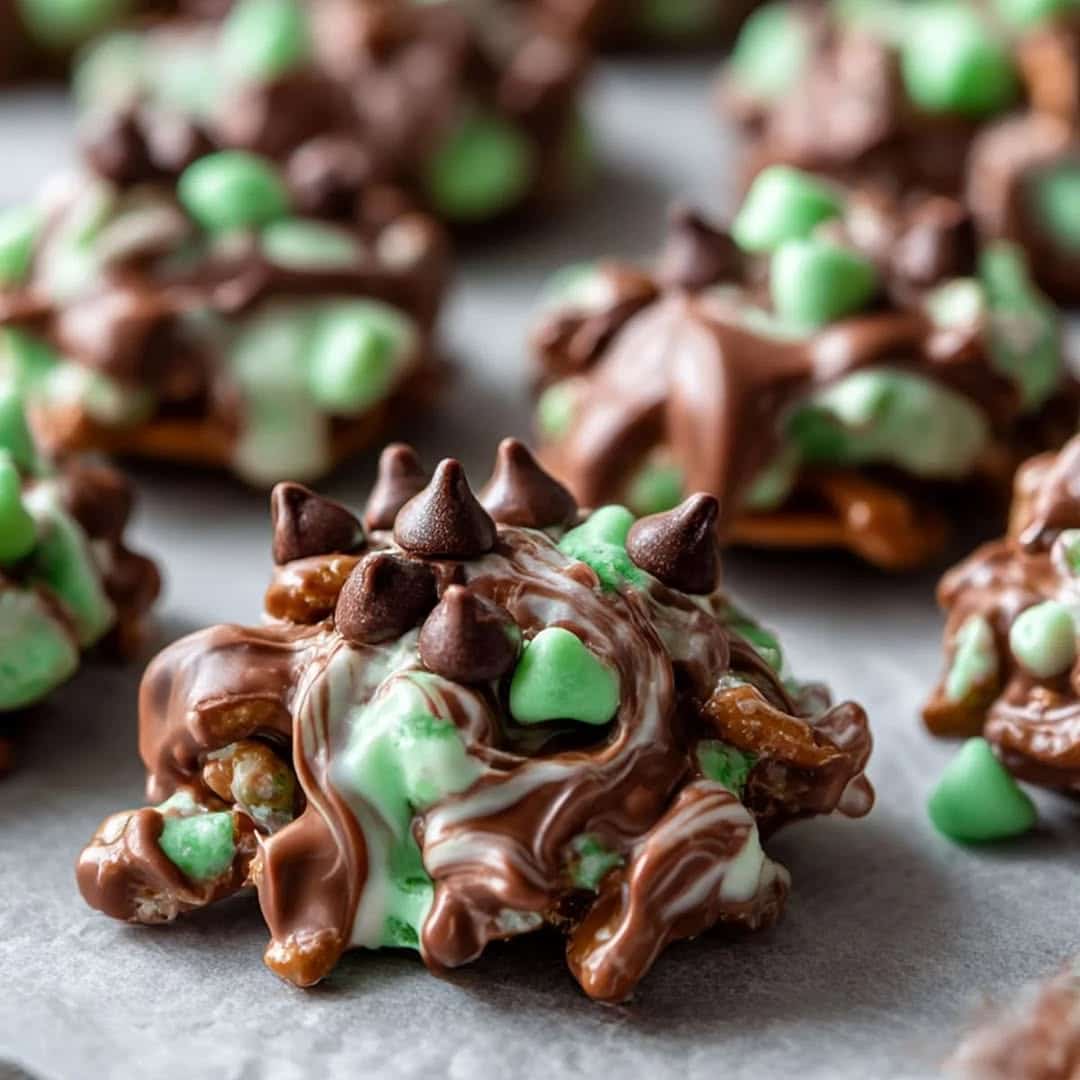
- Visual Appeal: The clusters shine with a deep brown gloss and flecks of chocolate chips throughout. You can finish them with a light drizzle or a sprinkle of crushed candy canes for contrast. Their uneven, rustic shape looks charming on a platter.
- Skill Level Needed: This recipe suits complete beginners because it needs no baking, tempering, or fancy tools. You simply melt, stir, and scoop. Patience while the chocolate sets is the only real requirement.
- Special Equipment: You need a microwave-safe bowl, a spatula, measuring cups, and a lined baking sheet. A small cookie scoop makes portioning faster and neater. Parchment paper prevents sticking and makes cleanup effortless.
Recipe Overview
- Difficulty Level: I rate this Mint Chocolate Chip Clusters recipe as easy because it involves one bowl and no oven. The technique centers on gentle melting, which anyone can master in a microwave. Since the clusters set at room temperature or in the fridge, the process stays forgiving from start to finish.
- Category: These clusters work as a holiday candy, a cookie-tray addition, and a homemade food gift. They also fit neatly into dessert buffets and party favors. Because they hold their shape well, they travel beautifully to potlucks and swaps.
- Cuisine: The recipe draws on classic American candy-making traditions, especially the beloved mint and chocolate pairing. Peppermint bark and chocolate mint candies have long anchored U.S. holiday tables. This cluster format simplifies those traditions into an approachable no-bake treat.
- Cost: The ingredient list stays short, so the total cost remains low. A bag of chocolate chips, mini chips, and peppermint extract costs only a few dollars at most grocery stores. Compared with boxed holiday chocolates, homemade clusters deliver far more value per serving.
- Season: These clusters shine brightest during November and December when peppermint feels festive. However, the recipe works year-round because the ingredients stay available. Many readers also make them for Valentine’s Day and St. Patrick’s Day thanks to the minty green accents.
- Occasion: Cookie exchanges, holiday parties, teacher gifts, and family gatherings all suit this easy holiday dessert idea. The clusters also make a smart addition to bake sales and gift baskets. Since they need no refrigeration, they fit seamlessly into buffet tables.
Why You’ll Love This Recipe
The taste and texture appeal of these Mint Chocolate Chip Clusters comes down to contrast. Semisweet chocolate provides depth without cloying sweetness, and the peppermint cuts through the richness with a cooling lift. Meanwhile, mini chocolate chips add crunch and reinforce the chocolate flavor in every bite. Because each cluster stays small, you get a complete flavor experience in two or three bites. This balance keeps people reaching for just one more.
Convenience sets this recipe apart from most holiday treats. You need no mixer, no oven, and no chilling overnight. The whole process takes about twenty minutes from start to finish, including setting time in the refrigerator. Additionally, the ingredients are pantry staples that you likely already own. That means you can whip up a batch on short notice when a party invitation arrives.
Nutritionally, portion control works in your favor here. Each cluster is a small, satisfying bite rather than a large slice of cake. Dark and semisweet chocolate also contain beneficial antioxidants from cocoa solids. While these clusters remain a treat, the small serving size makes them easy to fit into a balanced holiday spread. You can also adjust the sweetness by choosing a darker chocolate option.
Socially, this easy holiday dessert idea delivers real entertaining value. The clusters look handmade and thoughtful, yet they take almost no effort. Guests love the familiar mint chocolate combination, and kids adore the bite-sized format. Furthermore, the recipe scales easily, so you can feed a crowd without stress. Packaging a few clusters in a cellophane bag with a ribbon creates an instant gift.
Finally, cost-effectiveness makes this recipe a repeat performer. A single batch yields about twenty-four clusters from just four ingredients. Compared with artisan chocolates that cost several dollars each, homemade clusters deliver similar quality for pennies per piece. The recipe also reduces food waste because you make only what you need. Therefore, budget-conscious hosts and gift-givers both win.
Historical Background and Cultural Significance
The origin story of mint and chocolate pairing traces back to nineteenth-century European confectioners. Candy makers discovered that peppermint oil masked imperfections in early chocolate while adding a refreshing twist. By the early 1900s, American companies sold chocolate mints in tins and boxes, and the combination became a holiday staple. Over time, home cooks adapted the pairing into bark, fudge, and simple clusters like this one.
Culturally, mint chocolate signals celebration in the United States. Peppermint bark appears on holiday tables every December, and candy canes hang from trees nationwide. Because mint grows cool and bright on the palate, people associate it with winter comfort. These clusters carry that cultural weight while staying simple enough for weeknight making. As a result, they connect home bakers to a long candy-making heritage.
The evolution of this recipe reflects changing kitchen habits. Earlier candy recipes demanded double boilers, thermometers, and careful tempering. Modern home cooks favor microwave melting and no-bake formats, which reduce both mess and risk. This cluster recipe sits squarely in that modern tradition. It preserves the classic flavor while removing the barriers that once kept home cooks out of candy making.
Regional variations flourish across the country. In the Northeast, bakers often fold crushed peppermint candies into the mixture for extra crunch. Southern cooks sometimes add a pinch of sea salt to balance the sweetness. Meanwhile, West Coast versions lean toward dark chocolate and dairy-free chips. Each region puts its own stamp on the same beloved flavor combination.
Ingredient Deep Dive
Semisweet chocolate chips form the backbone of this recipe, and their history ties directly to American home baking. Chocolate chips debuted in the 1930s, and they quickly became a pantry staple. Nutritionally, semisweet chocolate contains cocoa solids rich in flavonoids, plus small amounts of iron and magnesium. When selecting chips, choose a brand you enjoy eating straight from the bag, because the cluster flavor depends on it. Store chips in a cool, dry pantry and keep them away from strong odors. If you prefer a substitute, chopped chocolate bars melt even more smoothly than chips.
Mini chocolate chips add texture and reinforce the chocolate flavor. These tiny chips disperse evenly through the melted mixture, so every cluster carries crunch. They also carry the same antioxidant benefits as larger chips, just in smaller doses. Look for fresh chips with a glossy finish and no white bloom. Keep them sealed at room temperature, and use them within a few months for the best snap. As a substitution, finely chop a chocolate bar into small pieces for a similar effect.
Peppermint extract delivers the signature cooling note, and its cultural roots run deep in holiday candy making. A little goes a long way, so measure carefully and taste as you go. Unlike artificial flavoring, pure peppermint extract offers a clean, bright finish. Choose a reputable brand with a strong mint aroma when you open the bottle. Store extract in a cool, dark cabinet, and check the expiration date before the holidays. If you lack extract, crushed peppermint candies make a reasonable substitute, though the texture will differ.
Parchment paper rounds out the equipment list, and it plays a quiet but crucial role. Its nonstick surface releases the clusters cleanly, so you never lose a piece to the tray. Additionally, it catches drips and makes cleanup quick. Choose a roll rated for oven use even though you will not bake, because heavier paper holds up better. Wax paper works in a pinch but can stick to warm chocolate. Silicone baking mats offer a reusable alternative that performs beautifully.
Common Mistakes to Avoid
- Overheating the chocolate causes a grainy, dull finish that never fully sets. Melt in short bursts and stir between each one. Stop as soon as the mixture turns smooth.
- Adding peppermint extract to scorching chocolate burns off the flavor and leaves a harsh taste. Let the chocolate cool for a minute first. Then stir in the extract gently.
- Skipping the parchment paper invites sticking and broken clusters. Always line your tray before you start. This step takes seconds and saves frustration.
- Stirring too aggressively whips air into the chocolate and creates a matte, crumbly texture. Fold the mixture calmly with a spatula. Gentle motion keeps the chocolate glossy.
- Using a wet bowl or spoon causes melted chocolate to seize into a stiff paste. Dry your tools completely before melting. Even a drop of water can ruin a batch.
- Making the clusters too large leads to slower setting and uneven bites. Aim for about one tablespoon per cluster. A small cookie scoop keeps sizes consistent.
- Rushing the setting stage in warm rooms produces soft, sticky candies. Place the tray in the refrigerator for fifteen minutes. Then store the finished clusters in a cool spot.
- Choosing low-quality chocolate dulls the entire flavor profile. Pick chips or bars you enjoy eating alone. Better chocolate means better clusters.
- Doubling the peppermint extract for extra flavor backfires and overwhelms the chocolate. Measure the extract exactly and taste the mixture before scooping. A little mint goes a long way.
- Stacking clusters before they fully set smears the gloss and ruins the shape. Wait until the surface feels firm to the touch. Then pack them gently in a single layer or with parchment between layers.
Essential Techniques
Gentle melting is the most important skill for these Mint Chocolate Chip Clusters. Heat the chocolate in thirty-second bursts and stir thoroughly between each one. This approach prevents scorching and keeps the cocoa butter stable for a glossy finish. When the mixture looks almost melted, let the residual heat finish the job. You succeed when the chocolate flows smoothly from the spatula with no lumps.
Proper flavor testing matters more than most bakers expect. After you stir in the peppermint extract, taste a small cooled spoonful before scooping. This step catches an overpowering mint note before you commit the whole batch. You can always add a drop more extract, but you cannot remove it. Trust your palate and adjust with care.
Consistent scooping creates a professional look on the platter. A small cookie scoop releases uniform mounds that set evenly and pack neatly into gift boxes. If you scoop by hand, aim for roughly one tablespoon of mixture per cluster. Wipe the scoop occasionally for cleaner release. Uniform clusters photograph better and portion more predictably.
The final technique is patient setting. Let the tray rest at room temperature for about ten minutes, then move it to the refrigerator. This two-step approach prevents condensation from forming on the chocolate. Visual cues matter here: the clusters look matte at the edges and feel firm at the center when ready. Rushing this stage risks dull spots and soft centers.
Pro Tips for Perfect Mint Chocolate Chip Clusters
Start with room-temperature ingredients so the chocolate melts evenly and the chips distribute smoothly. Cold chocolate can seize when heated too fast. Measure everything before you begin melting, since chocolate waits for no one. A quick setup keeps you calm and the process clean.
Use a very small pinch of fine sea salt in the melted chocolate. Salt sharpens the cocoa notes and keeps the sweetness in check. You will not taste salt directly; you will simply notice the chocolate tastes more like itself. Add it before the extract for even distribution.
Tap the tray gently on the counter after scooping to settle the clusters and remove air pockets. This small motion flattens the tops slightly and improves the shape. Then finish with a light sprinkle of flaky salt or crushed mints while the surface still shines. The toppings stay put once the chocolate sets.
Work quickly once the chocolate begins to thicken, because clusters set fast in a cool kitchen. If the bowl firms up, return it to the microwave for ten seconds and stir. Speed keeps the batch consistent from first scoop to last. Keep the lined tray within arm’s reach for efficiency.
Test one cluster in the refrigerator before finishing the batch. Check how long it takes to set and how the texture feels. This trial run lets you adjust the extract or salt if needed. Small adjustments now protect the full batch.
Rotate your storage plan to keep clusters at their best. Use small containers with parchment between layers, and keep them away from heat sources. Label the containers with the date for freshness tracking. This habit keeps gifts and party trays tasting fresh.
Photograph or display clusters on a cool surface so the chocolate does not soften under lights. Serve them in small paper cups for easy grabbing. These touches elevate the presentation without extra effort. Simple details make homemade candy feel special.
Variations and Adaptations
Regional variations offer endless ways to reinterpret this easy holiday dessert idea. New England bakers often add crushed peppermint candies to the melted chocolate for a double-mint punch. Southern versions sometimes include a spoonful of coconut oil for a softer bite and a tropical note. Meanwhile, Pacific Northwest cooks favor extra-dark chocolate for a less sweet profile. Each twist keeps the core mint chocolate identity intact while reflecting local tastes.
Seasonal adaptations help the recipe stay relevant all year. In spring, swap peppermint for a few drops of orange extract and top with candied zest. Summer batches benefit from a sprinkle of flaky sea salt for a beachy, salted-chocolate vibe. During fall, a pinch of cinnamon in the chocolate warms the flavor profile. Holiday season remains the classic moment, though the recipe never really goes out of style.
Dietary modifications expand who can enjoy these clusters. Vegan bakers can select dairy-free chocolate chips and vegan mini chips, and the rest of the recipe already fits. Gluten-free eaters need only verify their chocolate labels, since chocolate itself contains no gluten. For low-sugar diets, choose a reduced-sugar chocolate and scale back the mini chips. Each swap changes the texture slightly, so test a small batch first.
Flavor variations go far beyond mint. Try almond extract with toasted slivered almonds for a sophisticated spin. Espresso powder added to the chocolate creates a mocha cluster that pairs beautifully with coffee. Raspberry extract plus a few dried berries yields a fruity holiday treat. The formula stays the same: melt, flavor, fold, and scoop.
Texture modifications keep things interesting for repeat bakers. Fold in crisp rice cereal for a crunchier bite, or add toasted coconut for a chewy contrast. Chopped pretzels bring a salty snap that balances the sweetness. Just keep additions to about a quarter cup per batch so the mixture still scoops easily.
Presentation alternatives make these clusters versatile for gifting. Drizzle finished clusters with white chocolate for a bakery-style look. Tuck them into mini paper cups, stack them in clear jars, or arrange them in a wreath shape on a platter. A dusting of edible shimmer suits New Year’s trays, while candy-cane crumbs say Christmas. Choose the finish that matches the occasion.
Serving and Presentation Guide
Plating techniques set the tone for any dessert table. Arrange clusters in loose rows on a marble board or a white platter so their gloss stands out. Group them among other holiday cookies for a generous, abundant look. Add small paper cups for easy grabbing at parties. The goal is effortless abundance, not fussy precision.
Garnishing ideas elevate these Mint Chocolate Chip Clusters with minimal effort. A few crushed candy canes provide red and white contrast that reads as festive. Alternatively, a whisper of flaky salt adds sparkle and flavor. White chocolate drizzle, melted and cooled slightly, creates elegant lines across the tops. Keep garnishes light so the clusters still look like candy, not cake.
Traditional accompaniments include hot cocoa, coffee, and warm cider. These drinks balance the cool mint and rich chocolate nicely. For a dessert board, add shortbread cookies, nuts, and dried fruit alongside. The variety keeps guests grazing and gives the clusters context on a crowded table.
Modern serving suggestions lean toward gift styling. Package clusters in clear bags with ribbon, or use small tins layered with parchment. A handwritten label listing the flavor looks thoughtful and gift-ready. For kids, wrap clusters in paper cups and set them on a festive tray. Simple packaging turns a quick treat into a keepsake.
Temperature considerations matter for the best bite. Serve clusters slightly cool, straight from a pantry or a few minutes out of the refrigerator. When they warm up, the surfaces soften and lose their snap. On warm days, keep the trays cool until serving time. A quick rest on a chilled plate helps in humid weather.
Portion control tips help hosts manage the flow of sweets. Two or three clusters per person makes a generous dessert portion alongside other treats. Display clusters in small batches and refill as needed to keep the table tidy. Since they store well, leftover portions move easily to gift bags or the freezer. Guests appreciate the bite-sized format for trying several treats.
Wine and Beverage Pairing
Wine pairings can highlight the mint chocolate flavors beautifully. A ruby port’s rich sweetness echoes the semisweet chocolate without clashing with the peppermint. For a lighter option, a chilled Brachetto d’Acqui offers red fruit and gentle fizz. Cream sherry also works thanks to its nutty depth. Pour small servings, since the chocolate already brings sweetness to the table.
Non-alcoholic alternatives keep the party friendly for everyone. Cold milk remains the classic companion because it softens the mint and echoes the chocolate. A peppermint hot chocolate doubles down on the theme in a fun way. Sparkling water with a twist of orange cleanses the palate between bites. Iced coffee with cream adds a mocha note that flatters the clusters.
Coffee and tea pairings suit cozy evenings at home. A medium-dark roast coffee mirrors the chocolate intensity without overpowering the mint. A vanilla rooibos tea brings gentle sweetness and warmth. If you prefer tea, avoid highly floral blends that fight with peppermint. A simple mug of strong black tea works reliably.
Temperature considerations guide beverage serving too. Warm drinks contrast nicely with cool mint flavors, while cold drinks refresh the palate. At holiday gatherings, a small station with milk and cocoa invites guests to build their own pairing. Keep hot drinks in insulated carafes so they stay warm through the event. Both hot and cold options cover the crowd.
Serving suggestions round out the pairing experience. Offer one wine or spirit option plus two non-alcoholic choices for balance. Small tasting glasses keep pours modest and encourage variety. On a dessert table, place beverages at the opposite end to encourage mingling. These small choices make the buffet feel complete.
Storage and Shelf Life
Storage methods determine how long your Mint Chocolate Chip Clusters stay fresh. At room temperature, place them in an airtight container with parchment between layers. Keep the container in a cool, dark cupboard away from ovens and radiators. Under these conditions, the clusters hold their snap for about two weeks. Label the container with the date for easy tracking.
Temperature requirements matter more than many bakers realize. Chocolate prefers steady cool conditions around sixty-five to seventy degrees Fahrenheit. Sudden warmth causes bloom, a harmless white haze that looks dull but tastes fine. Refrigeration prevents melting in warm kitchens but can invite condensation on the surface. Let the container sit closed until it reaches room temperature after removal.
Container recommendations focus on protection and separation. Rigid plastic or metal tins work better than soft bags for keeping shapes intact. Layer clusters with parchment or mini paper cups to prevent rubbing. For gifts, choose containers that seal tightly so the peppermint aroma stays contained. Clear containers show off the clusters but need a cool spot away from light.
Signs of spoilage include a dull, grayish surface, a strong bitter taste, or any off smell. Bloom alone does not mean the candy has gone bad, since it results from temperature swings. However, stale chocolate tastes flat and waxy. When in doubt, discard the batch rather than serve questionable candy. Freshness checks take seconds and protect your guests.
Reheating instructions do not apply to these clusters, but you can refresh the surface with a brief chill. If clusters soften on a warm day, place them in the refrigerator for ten minutes to firm up. Avoid the microwave, which melts the shapes. For gifting, assemble close to delivery day so the texture stays at its best.
Freezing guidelines offer longer storage when needed. Freeze cooled clusters in a single layer on a tray, then transfer them to a freezer bag with parchment. They keep well for up to three months. Thaw in the refrigerator overnight, then bring to room temperature before serving to minimize condensation. The texture stays remarkably close to fresh after thawing.
Make Ahead Strategies
Prep timeline planning makes holiday weeks far calmer. You can measure the chocolate chips and mini chips a day ahead and store them in bowls at room temperature. Set out the parchment and tray the night before so assembly takes minutes. Peppermint extract stays ready at room temperature with the cap tight. A few minutes of setup today saves a scramble tomorrow.
Storage between steps offers useful flexibility. If you must pause after melting, keep the chocolate warm in a bowl over a hot-water bath off the heat, stirring occasionally. Better yet, complete the scooping stage quickly and refrigerate the tray. The set clusters hold beautifully for days, so the recipe fits any schedule. Choose the pause point that matches your day.
Quality impact assessment favors making these clusters one to two days before serving. The flavors actually deepen overnight as the mint settles into the chocolate. Textures stay crisp for up to two weeks in a sealed container, so early prep works beautifully. Avoid making them more than three weeks ahead unless you freeze the batch. The freezer route preserves quality for gifts.
Assembly tips streamline gift and party prep. Scoop clusters into mini paper cups right after they set, then arrange cups in gift boxes. Do the packaging in one session so ribbons and labels go quickly. Set up an assembly line with cups, bags, and ribbon in a row. Small systems cut prep time dramatically.
Reheating guidelines barely apply, but softening clusters refresh with a short chill. Skip the oven and microwave entirely. If shipping clusters, add a cool pack in warm weather and wrap layers snugly. These simple safeguards protect the chocolate during travel.
Fresh element additions should wait until serving day. Crushed candy canes stay crisp longer when added just before gifting, since moisture softens them over time. If you plan to drizzle white chocolate, do it after the base clusters set, then chill briefly. Add salt or sprinkles at the same stage for the cleanest look. Planning fresh touches last keeps everything crisp.
Scaling Instructions
Halving the recipe works cleanly, though the extract amount gets tricky. Use half the chocolate and half the mini chips, but measure the peppermint extract carefully by drops. Start with half the extract, taste, and adjust. Small batches set faster, so watch the tray closely and refrigerate sooner. A half batch yields about twelve clusters, perfect for a small household.
Doubling or tripling the batch suits parties and gift season. Melt chocolate in separate bowls or use a large bowl with longer stirring pauses. Work in batches to keep the chocolate fluid, because a huge bowl cools unevenly. Butter the scoop of air from stirring by pausing between additions. Larger batches reward a helper who scoops while you stir.
Equipment adjustments keep big batches manageable. Use two lined trays and two scoops so the process runs continuously. A larger microwave-safe bowl reduces overflow risk, and an extra spatula speeds stirring. Keep the extract bottle closed between uses to protect the aroma. Big-batch success comes down to organization.
Timing modifications matter when you scale up. A triple batch needs about thirty seconds more per melting burst and faster scooping before the chocolate stiffens. Refrigeration time stays roughly the same because the clusters are still small. If your trays crowd, chill them in shifts. Planning the flow avoids half-set mixtures.
Storage considerations change with volume. Large batches need multiple airtight containers and more parchment layers. Label each container with the date and flavor so nothing gets lost in a crowded pantry. For gifts, portion clusters into bags right away so boxes do not pile up. Organized storage makes the extra effort worthwhile.
Nutritional Deep Dive
The macro breakdown varies by brand, but each cluster generally provides around sixty to eighty calories. Most of that energy comes from fat and carbohydrates in the chocolate, with a small amount of protein. Mini chips add a modest calorie bump in exchange for crunch. Portion two or three clusters as a typical serving. Checking your specific chocolate labels gives the most accurate numbers.
Micronutrient analysis highlights cocoa’s natural minerals. Semisweet chocolate contributes iron, magnesium, and some copper, plus antioxidants called flavonoids. Peppermint extract adds no meaningful nutrition, but it delivers flavor without calories. Compared with milk chocolate, semisweet chocolate generally carries less sugar per ounce. Choosing a darker percentage boosts minerals and trims sweetness.
Health benefits center on moderation and enjoyment. Cocoa flavonoids support heart health in studies, and small portions fit within balanced eating patterns. Since these clusters are rich, they satisfy quickly, which supports mindful portions. Pairing them with milk or fruit rounds out the experience. Treats work best when you savor rather than rush them.
Dietary considerations call for label reading. Standard chocolate chips may contain milk, soy, and gluten-adjacent additives, so check brands for allergens. The recipe easily adapts to vegan and dairy-free versions with the right chips. Peppermint extract is naturally vegan and gluten-free in most brands. Those with sensitive diets should verify each package individually.
Portion analysis shows why bite-sized treats succeed at parties. A single cluster offers a full flavor experience at a fraction of a brownie’s calories. Guests can sample several varieties without overindulging. Hosts appreciate the built-in portion control for crowds. Small bites genuinely support balanced dessert tables.
Weight management tips focus on planning and pacing. Choose two clusters with a cup of tea instead of grazing from the container. Freeze extra portions so temptation stays out of reach. Since the recipe scales down easily, make half batches during quiet weeks. Thoughtful habits let you enjoy the recipe all season.
Dietary Adaptations
For gluten-free versions, choose certified gluten-free chocolate chips and mini chips. Most plain chocolate already qualifies, but processing lines vary, so check the label. Peppermint extract is generally gluten-free, though verify the brand. Clean bowls and trays matter if your household handles wheat flour. With these checks, the clusters fit gluten-free holiday trays perfectly.
Dairy-free modifications need dairy-free chocolate, and quality options have improved dramatically. Choose chips made with coconut or oat milk solids, and pair them with dairy-free mini chips. Melt them gently because alternative chocolates can be thicker. A teaspoon of coconut oil loosens the mixture for easier scooping. The finished texture stays impressively close to the original.
Vegan adaptations follow the same path as dairy-free. Select vegan chocolate chips and confirm the mini chips contain no milk fat. Peppermint extract fits vegan diets naturally. Then assemble the clusters exactly as written. Many readers report that guests cannot tell the difference at holiday parties.
Low-carb and keto bakers can use sugar-free chocolate chips sweetened with stevia or allulose. These chips melt differently, so watch the bowl closely to avoid seizing. The mini chips can be reduced or omitted to trim carbs further. Note that sugar alcohols may affect digestion for some guests. Test a small batch before serving a crowd.
Paleo adaptations require dark chocolate with minimal processing and no refined sugar. Choose chocolate sweetened with coconut sugar or dates and skip the mini chips. Add chopped nuts for crunch instead. The result tastes less sweet but still delivers the mint chocolate experience. Label paleo batches clearly at mixed gatherings.
Low-FODMAP considerations mainly involve chocolate choices and portion sizes. Plain dark chocolate is generally low in FODMAPs, but milk solids and additives vary by brand. Keep portions modest and test tolerance during a low-FODMAP phase. Serving sizes matter as much as ingredients here. When in doubt, consult your dietitian for personalized guidance.
Troubleshooting Guide
Texture issues usually trace back to heat. Grainy or dull chocolate means the cocoa butter overheated, so melt more slowly next time and stir patiently. Crumbly clusters often result from water contact, so dry every tool. If the centers stay soft, refrigerate longer before serving. The fix for most texture problems is gentler, slower handling.
Flavor balance problems come from heavy hands with extract. If the mint overwhelms the chocolate, add more melted chocolate to dilute the batch. Too-sweet clusters improve with a pinch of salt or a darker chocolate blend. Flat flavor often means stale chips, so start fresh. Tasting as you go prevents most balance issues.
Temperature problems plague warm kitchens and humid days. Chocolate that never sets may need a cooler room or a longer chill. Condensation droplets form when cold trays meet warm air, so keep the container closed during temperature changes. Bloom is harmless, but it signals temperature swings worth avoiding. Steady conditions protect the finish.
Equipment challenges deserve simple solutions. A weak microwave melts unevenly, so stir more often between bursts. Sticky trays mean parchment or silicone mats got skipped. A small scoop beats a spoon for consistent clusters. With basic gear in good shape, the process flows smoothly.
Ingredient substitutions require small adjustments. Chopped chocolate bars melt faster than chips, so reduce the burst times. Alternative sweeteners change the setting behavior, so chill a test cluster first. Crushed candies add moisture, so use them as topping rather than mixing them in. Taste and texture testing guide each swap.
Timing concerns resolve with planning. If the chocolate stiffens before you finish scooping, warm the bowl briefly and stir. If you are short on time, refrigerate the tray for ten minutes instead of waiting at room temperature. Start with all ingredients measured to shave minutes. Preparation answers most timing worries.
Recipe Success Stories
Community feedback has been overwhelmingly positive for these Mint Chocolate Chip Clusters. Readers love that the recipe needs four ingredients and no oven during the busiest season. Many report making multiple batches in a single afternoon for gift giving. Photos shared online show gorgeous drizzled versions and candy-cane toppings. The consistent theme is how easy and impressive the results feel.
Variation successes keep rolling in from home bakers. One reader added espresso powder and called the mocha version the best holiday candy yet. Another folded in crisp rice cereal for a crunch that kids adore. Dark chocolate with flaky salt remains a favorite among adults. These stories show how adaptable this easy holiday dessert idea truly is.
Adaptation stories highlight dietary inclusivity. A dairy-free reader used oat-milk chocolate and served the clusters at a family gathering with no leftovers. Vegan bakers pair the recipe with vegan hot cocoa for a cozy evening. Low-carb versions earn praise for fitting holiday macros. Every adaptation reinforces the recipe’s flexible backbone.
Reader suggestions sharpen the instructions further. Many recommend starting with slightly less extract and adding more to taste. Others advise chilling the bowl briefly if the kitchen runs warm. Packaging tips, like mini paper cups in gift tins, circulate widely among readers. These crowd-sourced tweaks make the recipe even more reliable.
Photography tips help readers capture the look. Natural window light flatters the glossy chocolate best, and a white marble surface keeps the focus on the clusters. Adding a few peppermint candies or a linen napkin suggests the holiday theme. Straight-on shots show the chips flecked through each bite. Good photos spread the recipe far and wide.
Frequently Asked Questions
PrintMint Chocolate Chip Clusters
-
Total Time: 45 minutes
-
Yield: 4
Description
Easy no-bake mint chocolate chip clusters perfect for holiday treats. Crunchy and refreshing!
Ingredients
- 2 cups semi-sweet chocolate chips
- 1/2 teaspoon peppermint extract
- 1 cup crushed pretzels
- 1/2 cup chopped nuts (optional)
- 1/2 cup mini marshmallows
- 1/2 cup white chocolate chips (optional for drizzle)
Instructions
- Line a baking sheet with parchment paper.
- Melt the semi-sweet chocolate chips in a microwave-safe bowl in 30-second intervals, stirring until smooth.
- Stir in the peppermint extract.
- Fold in the crushed pretzels, nuts (if using), and mini marshmallows until evenly coated.
- Drop spoonfuls of the mixture onto the prepared baking sheet.
- If desired, melt white chocolate chips and drizzle over the clusters.
- Let set at room temperature or refrigerate until firm, about 30 minutes.
Notes
You can customize the seasonings to taste.
- Prep Time: 15 minutes
- Cook Time: 30 minutes
- Method: Main
- Cuisine: American
Mint Chocolate Chip Clusters
- Total Time: 45 minutes
- Yield: 4
Description
Easy no-bake mint chocolate chip clusters perfect for holiday treats. Crunchy and refreshing!
Ingredients
- 2 cups semi-sweet chocolate chips
- 1/2 teaspoon peppermint extract
- 1 cup crushed pretzels
- 1/2 cup chopped nuts (optional)
- 1/2 cup mini marshmallows
- 1/2 cup white chocolate chips (optional for drizzle)
Instructions
- Line a baking sheet with parchment paper.
- Melt the semi-sweet chocolate chips in a microwave-safe bowl in 30-second intervals, stirring until smooth.
- Stir in the peppermint extract.
- Fold in the crushed pretzels, nuts (if using), and mini marshmallows until evenly coated.
- Drop spoonfuls of the mixture onto the prepared baking sheet.
- If desired, melt white chocolate chips and drizzle over the clusters.
- Let set at room temperature or refrigerate until firm, about 30 minutes.
Notes
You can customize the seasonings to taste.
- Prep Time: 15 minutes
- Cook Time: 30 minutes
- Method: Main
- Cuisine: American