Heavenly White Chocolate Pineapple Cake Recipe: A Tropical Dream
Imagine a dessert that captures the essence of a sun-drenched island vacation. This heavenly white chocolate pineapple cake recipe delivers exactly that experience. It combines the rich, creamy sweetness of white chocolate with the bright, tangy burst of pineapple. Consequently, every bite feels like a celebration. The result is a stunning layer cake that looks as impressive as it tastes. Ultimately, it is the perfect centerpiece for any special occasion.
The magic of this cake lies in its beautiful balance. The white chocolate provides a luxurious, velvety base that mellows the pineapple’s natural acidity. Meanwhile, the pineapple infuses the entire dessert with a moist, tropical fragrance. This heavenly white chocolate pineapple cake recipe is surprisingly approachable for home bakers. Moreover, it uses common ingredients in an extraordinary way. The final product is a show-stopping dessert that will have everyone asking for the recipe.
Furthermore, this cake is a masterclass in texture. You get tender, fluffy crumb from the cake layers. Additionally, you experience a lusciously smooth frosting. Finally, you enjoy the delightful chew of sweet pineapple pieces. This heavenly white chocolate pineapple cake recipe creates a symphony of sensations. It is a guaranteed crowd-pleaser that bridges the gap between elegant and comforting. Let’s dive into how you can create this tropical masterpiece in your own kitchen.
Quick Recipe Highlights
- Flavor Profile: This heavenly white chocolate pineapple cake recipe offers a sophisticated sweet-tart balance. The white chocolate brings a vanilla-like, buttery sweetness. Simultaneously, the pineapple contributes a vibrant, tropical tang that cuts through the richness.
- Texture: Expect an incredibly moist and tender cake crumb, thanks to the pineapple juice and brown sugar. The white chocolate buttercream is silky and light. Additionally, the pineapple pieces add pleasant, juicy bursts throughout each slice.
- Aroma: As it bakes, your kitchen will fill with the warm, caramelized scent of brown sugar and the sweet, inviting fragrance of tropical pineapple. The finished cake has a subtle, sweet aroma from the white chocolate that complements the fruit perfectly.
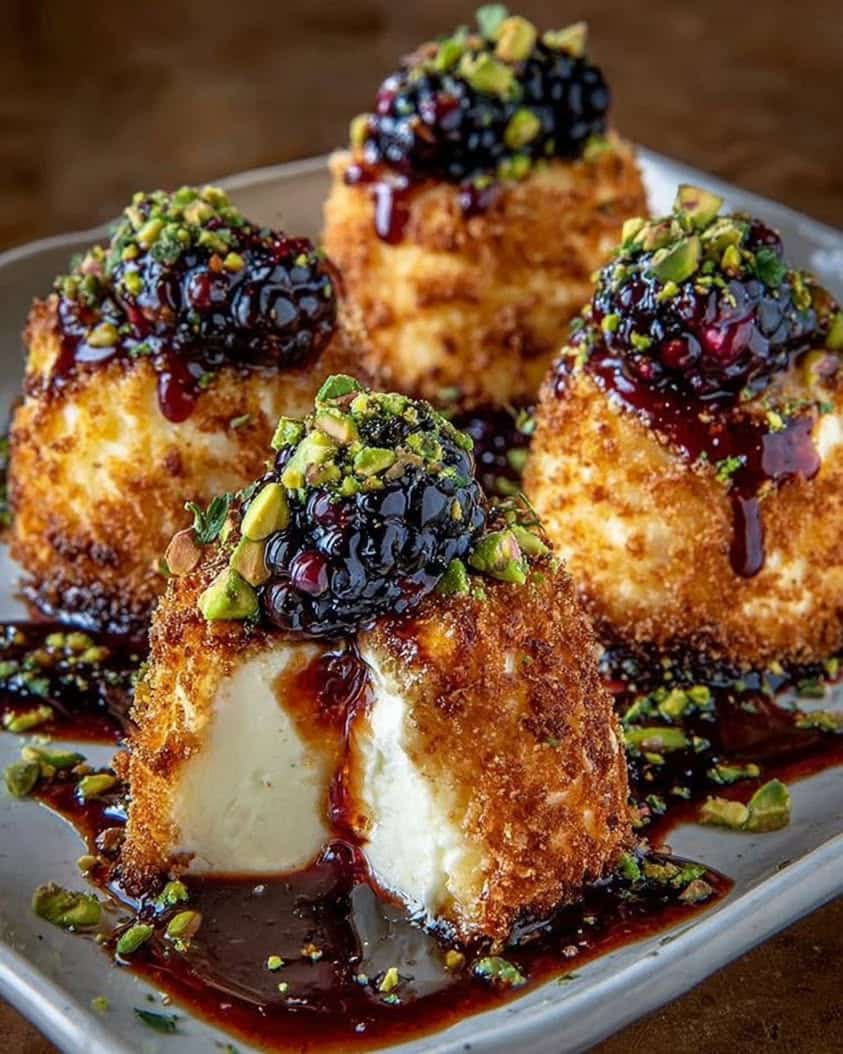
- Visual Appeal: This cake is a stunner with its pristine, snow-white frosting contrasted by golden-brown cake layers. Garnished with toasted coconut or fresh pineapple, it presents a beautiful, elegant look that is perfect for photography and special tables.
- Skill Level Needed: This is an intermediate-level baking project. It requires basic cake-making skills like creaming butter and sugar, folding in dry ingredients, and making a stable buttercream. However, clear instructions make it achievable for confident beginners.
- Special Equipment: You will need standard round cake pans (8 or 9-inch), parchment paper, a stand mixer or hand mixer for the buttercream, and a saucepan for melting white chocolate. A cake turntable and offset spatula are helpful for professional-level frosting.
Recipe Overview
- Difficulty Level: We rate this heavenly white chocolate pineapple cake recipe as intermediate. The process involves multiple components—cake layers, a cooked pineapple filling, and a delicate buttercream. Managing these elements requires organization. However, each step is straightforward when followed methodically.
- Category: This dessert falls squarely into the celebration cake category. It is ideal for birthdays, anniversaries, summer parties, and holiday gatherings. Moreover, it can serve as a spectacular finale to a festive meal or a standout item at a potluck.
- Cuisine: This cake is a fusion dessert with strong influences from American layer cake traditions and tropical, island-inspired flavors. It takes the classic concept of a pineapple upside-down cake and reimagines it as a layered, frosted masterpiece.
- Cost: The cost is moderate, primarily due to the white chocolate and fresh pineapple. Using quality white chocolate is key for flavor. Fortunately, other ingredients like flour, sugar, eggs, and butter are pantry staples for most bakers.
- Season: This heavenly white chocolate pineapple cake recipe shines brightest in spring and summer. Fresh pineapples are at their peak sweetness. Furthermore, the tropical vibe perfectly matches warmer weather gatherings, picnics, and outdoor celebrations.
- Occasion: It is perfect for bridal showers, Mother’s Day, Easter, graduation parties, or any event calling for a “wow factor” dessert. The elegant yet approachable flavor profile appeals to both adults and children, making it universally suitable.
Why You’ll Love This Recipe
First and foremost, the taste is simply unforgettable. This heavenly white chocolate pineapple cake recipe creates a perfect harmony where no single flavor overpowers another. The white chocolate offers a smooth, creamy sweetness that beautifully complements the pineapple’s natural zing. Consequently, each forkful is a delightful exploration of contrasting yet complementary notes. It is a dessert that feels both indulgent and refreshing, a rare and wonderful combination. You will find it hard to stop at just one slice.
From a practical standpoint, this cake is a reliable showstopper. The steps are clear and build upon fundamental baking techniques. While it has multiple components, you can prepare parts in advance. For instance, you can bake the cake layers a day ahead. Additionally, you can cook the pineapple filling ahead of time. This make-ahead flexibility reduces day-of stress significantly. Therefore, you can assemble and frost with confidence, knowing each element is perfect.
Nutritionally, this dessert incorporates fruit, which adds moisture and allows for a slight reduction in added fats compared to some ultra-dense cakes. Pineapple provides vitamin C and manganese. Using brown sugar introduces molasses, which contains minerals like iron and calcium. Of course, this is a celebratory treat. However, knowing it has some redeeming qualities makes enjoying it that much sweeter. It is a more balanced indulgence.
The social value of this heavenly white chocolate pineapple cake recipe is immense. Baking and sharing a beautiful layer cake is an act of love. This cake sparks conversation and admiration. It turns an ordinary gathering into a special event. Moreover, its unique flavor profile sets it apart from common chocolate or vanilla cakes. It shows thoughtfulness and effort, making guests feel truly valued. It is a dessert that creates lasting memories.
Finally, this cake is cost-effective for its impact. Creating a bakery-quality layer cake at home costs a fraction of the price. You control the ingredient quality, opting for real butter, pure vanilla, and good white chocolate. The recipe yields twelve generous servings, making it excellent for entertaining. With smart shopping and a little time, you can produce a dessert that looks and tastes like it came from a high-end patisserie.
Historical Background and Cultural Significance
The story of pineapple in baking is deeply intertwined with colonial trade and the concept of hospitality. Pineapples, native to South America, became a symbol of wealth and welcome in Europe and North America in the 17th and 18th centuries. They were so rare and expensive that displaying one at a party was a major status symbol. This tradition evolved into using pineapple motifs in architecture and, eventually, incorporating the fruit into desserts. The classic pineapple upside-down cake, born in the early 20th century after canned pineapple became widely available, is a direct descendant of this history. Our heavenly white chocolate pineapple cake recipe is a modern, elevated twist on that mid-century classic.
Culturally, pineapple desserts hold a special place in many tropical and subtropical regions. In Hawaii and the Caribbean, pineapple is a staple ingredient, celebrated in both sweet and savory dishes. Cakes incorporating pineapple are common for luaus and festive gatherings, symbolizing the abundance and sweetness of island life. This cake recipe taps into that joyful, celebratory spirit. It merges the tropical fruit’s heritage with the luxurious, European-inspired technique of a layered buttercream cake. The result is a fusion dessert that honors multiple culinary traditions.
The evolution of this specific recipe follows broader dessert trends. White chocolate, invented in the 1930s in Switzerland, gained popularity in gourmet baking in the latter half of the 20th century. Its sweet, mild flavor made it an ideal partner for tart fruits like raspberries, cranberries, and pineapple. Bakers began experimenting, moving beyond the simple upside-down cake format. They started creating layered cakes with pineapple fillings and white chocolate frostings, seeking a more refined presentation. Our recipe represents the culmination of this experimentation—a perfectly balanced, visually stunning creation that would have been a luxury even a few decades ago.
Regional variations of pineapple cake abound globally. For example, in Germany, a “pineapple torte” might use quark cheese in the filling. In parts of Asia, a lighter chiffon cake with pineapple curd is popular. The American version, like this one, often leans into richness with buttercream and brown sugar. Understanding this context enriches the baking experience. When you make this heavenly white chocolate pineapple cake recipe, you are participating in a long, global story of culinary adaptation and celebration. You are creating a dessert that connects historical luxury with modern accessibility.
Ingredient Deep Dive
White Chocolate: True white chocolate must contain cocoa butter, giving it its rich mouthfeel and subtle flavor. Avoid “white baking chips” that use vegetable oil; they lack depth and can seize when melted. For this heavenly white chocolate pineapple cake recipe, choose a bar with at least 30% cocoa butter. White chocolate pairs exquisitely with pineapple because its vanilla and cream notes soften the fruit’s acidity. Store it in a cool, dark place to prevent blooming (those white streaks are just separated cocoa butter, still safe to eat). If you need a dairy-free version, seek out a high-quality vegan white chocolate made with cocoa butter.
Fresh Pineapple: Using fresh pineapple is crucial for the brightest flavor and best texture in the filling. Look for a fruit that smells sweet at the base, yields slightly to pressure, and has vibrant green leaves. The enzyme bromelain in fresh pineapple can prevent gelatin from setting and can make dairy products bitter if not cooked, which is why we cook the filling for this cake. Canned pineapple in juice (not heavy syrup) is a acceptable substitute when fresh is unavailable; just drain it well. Fresh pineapple, rich in vitamin C and bromelain (a digestive enzyme), adds not only flavor but also a touch of nutritional benefit.
Brown Sugar: Brown sugar, especially the dark variety, is the secret weapon for depth of flavor. The molasses in it caramelizes during baking, creating a richer, more complex taste than white sugar alone. It also attracts and retains moisture, ensuring an exceptionally tender cake crumb. For this recipe, packing the sugar firmly into the measuring cup is essential for accuracy. If you run out, you can make a substitute by mixing one cup of white sugar with one tablespoon of molasses for light brown sugar, or two tablespoons for dark brown. Store brown sugar in an airtight container with a terra cotta brown sugar saver or a slice of bread to keep it soft.
Unsalted Butter: Using unsalted butter allows you to control the exact amount of salt in your recipe, which is vital for balancing sweetness. For the buttercream, your butter must be at true room temperature—pliable but not oily—to achieve a smooth, fluffy texture. European-style butter with a higher fat content (82-86%) will yield an even richer, more stable frosting. In the cake batter, creaming room-temperature butter with the sugars incorporates air, which is a primary leavening agent for a light texture. Salted butter can be used in a pinch; simply reduce the added salt in the recipe by 1/4 teaspoon per stick of butter used.
Common Mistakes to Avoid
- Overmixing the Cake Batter: Once you add the dry ingredients and buttermilk, mix only until the flour disappears. Overmixing develops gluten, leading to a tough, dense cake instead of a tender crumb. Use a spatula for the final folds to ensure homogeneity without overworking.
- Using Low-Quality White Chocolate: White baking chips or candy melts often contain no cocoa butter. They will not melt smoothly and can create a grainy, overly sweet frosting. Always use a bar of real white chocolate for the best flavor and texture in your buttercream.
- Not Draining the Pineapple Filling Enough: A runny filling will soak into the cake layers and make them soggy, and it can cause the frosting to slide off. Cook the filling until it is very thick and jam-like, and let it cool completely before assembling.
- Adding Hot Melted White Chocolate to Buttercream: If the melted chocolate is too hot when added to the butter and sugar, it will melt the butter and create a soupy, un-fixable mess. Let the chocolate cool until it is just barely warm to the touch before incorporating.
- Frosting a Warm Cake: Even slightly warm cake layers will melt the buttercream, creating a greasy slide and crumbs in your frosting. Wrap the cooled layers in plastic wrap and refrigerate them for at least an hour before assembling for clean, sharp layers.
- Under-creaming the Butter and Sugar: This step is not just about mixing; it’s about incorporating air. Cream the room-temperature butter and sugars on medium-high speed for a full 3-5 minutes until the mixture is very pale, light, and fluffy. This is key for cake volume.
- Neglecting to Prep Cake Pans: Simply greasing pans is not enough for this moist cake. Always line the bottoms with parchment paper rounds and grease the sides. This guarantees your cakes will release perfectly without tearing.
- Rushing the Buttercream: If your buttercream looks curdled after adding the white chocolate, don’t panic. The butter may have been too cold. Simply keep beating on medium speed; the friction will warm it, and it will eventually come together into a smooth, silky frosting.
Essential Techniques
Creaming Butter and Sugar: This foundational technique incorporates tiny air bubbles into the batter, which expand during baking to create a light, fluffy cake texture. Use room-temperature butter and beat with the sugars (both white and brown) on medium-high speed for 3-5 minutes. The mixture should become noticeably paler in color and have a whipped, almost frosting-like consistency. A common pitfall is using butter that is too cold or too warm, which won’t trap air properly. Visual cue for success: when you stop the mixer and lift the beater, the mixture should form soft peaks that slowly slump over.
Folding Dry Ingredients: After creaming, you alternate adding dry ingredients and wet ingredients (buttermilk). This method prevents overmixing. Start and end with the dry ingredients. Add about one-third of the flour mixture, mix on low just until combined, then add half the buttermilk. Repeat, finishing with the final third of flour. Use a low mixer speed or a spatula for the final incorporation. The goal is a smooth, homogeneous batter with no visible flour pockets, but you must stop immediately once that is achieved to preserve tenderness.
Making a Cooked Pineapple Filling: This technique transforms juicy pineapple into a stable, flavorful layer. Cooking the pineapple with sugar and cornstarch boils away excess water and thickens the juices. Constant stirring is important to prevent scorching on the bottom of the pan. Cook until the mixture is very thick and leaves a clear path when you drag a spatula across the pan bottom. Let it cool completely to room temperature; it will thicken further as it cools. This filling should be spreadable but not runny.
Creating White Chocolate Buttercream: The key here is temperature management. First, ensure your butter is truly at room temperature. Second, let the melted white chocolate cool until it is no longer hot but still fluid. Beat the butter and powdered sugar until very light. Then, with the mixer on low, slowly drizzle in the cooled white chocolate. If the frosting seems too soft, chill it for 10-15 minutes, then re-whip. This frosting should be smooth, spreadable, and hold a soft peak.
Pro Tips for Perfect Heavenly White Chocolate Pineapple Cake
Toast your coconut garnish. Spread sweetened shredded coconut on a baking sheet and bake at 350°F for 5-8 minutes, stirring once, until golden. This adds a nutty flavor and beautiful color contrast against the white frosting.
Use a kitchen scale for the most accurate measurements, especially for flour. Too much flour is the most common cause of a dry cake. One cup of all-purpose flour should weigh 120-125 grams.
For ultra-smooth cake layers, use “cake strips.” These are fabric strips you soak in water and wrap around the outside of the cake pan. They insulate the edges, allowing the cake to bake evenly and rise flat, eliminating the need for trimming domes.
Add a flavor boost to your buttercream with a teaspoon of high-quality coconut extract. It complements the pineapple beautifully and enhances the tropical theme without overpowering the white chocolate.
If your pineapple filling seems too loose after cooling, you can thicken it by cooking it a few minutes longer with an additional teaspoon of cornstarch slurry (mixed with cold water first).
For a professional crumb coat, apply a very thin layer of frosting all over the assembled cake and chill it for 20 minutes. This traps all loose crumbs, ensuring your final, decorative layer of frosting is perfectly smooth and crumb-free.
When slicing the cake, dip your sharp knife in hot water and wipe it clean between each cut. This yields beautifully clean slices with defined layers.
Variations and Adaptations
Regional Variations: For a Hawaiian-inspired twist, add 1/2 cup of finely chopped macadamia nuts to the cake batter. Alternatively, incorporate a tablespoon of dark rum into the pineapple filling after cooking for a Caribbean flair. A Brazilian variation might include a layer of doce de leite (dulce de leche) alongside the pineapple filling.
Seasonal Adaptations: In summer, garnish with fresh berries like raspberries or strawberries for a red, white, and blue theme. During the holidays, add a sprinkle of edible gold dust to the frosting and garnish with pomegranate arils and fresh mint for a festive winter look. You can also add warm spices like a pinch of cardamom or ginger to the cake batter in the fall.
Dietary Modifications: For a gluten-free version, use a 1:1 gluten-free all-purpose flour blend. Ensure your white chocolate is gluten-free. For dairy-free, use plant-based butter and buttermilk (soy milk + lemon juice) and a high-quality vegan white chocolate bar.
Flavor Variations: Infuse the buttercream with passionfruit puree for an extra tropical punch. Add a layer of lime curd between the cake layers along with the pineapple. Or, replace half the white chocolate in the frosting with cream cheese for a tangier, more stable frosting option.
Texture Modifications: For added crunch, press toasted coconut or chopped pecans onto the sides of the frosted cake. Alternatively, create a “naked cake” style by scraping off most of the frosting to reveal the cake layers, then pile the toasted coconut and fresh pineapple chunks on top.
Presentation Alternatives: Bake the recipe as cupcakes for easy individual servings. Fill the liners halfway, add a teaspoon of pineapple filling, then top with more batter. Frost with white chocolate buttercream and a piece of dried pineapple. You can also make a sheet cake for easier serving at large gatherings.
Serving and Presentation Guide
Plating begins with a clean, sharp slice. Use a serrated knife and a gentle sawing motion. Wipe the knife between cuts for pristine layers. Serve on simple white plates to let the cake’s colors pop, or on vibrant tropical-patterned plates to enhance the theme. For a deconstructed presentation, crumble a slice of cake into a bowl, top with a scoop of pineapple filling, a dollop of whipped cream, and fresh fruit.
Garnishing is your final artistic touch. Classic options include rings of fresh pineapple, maraschino cherries, or toasted coconut flakes. For elegance, consider white chocolate curls, edible flowers (like orchids or hibiscus), or a dusting of freeze-dried pineapple powder. A mint sprig adds a fresh color contrast. Arrange garnishes in a deliberate, asymmetrical pattern on top of the cake for a modern look.
Traditional accompaniments are light to balance the cake’s richness. A dollop of freshly whipped cream or a scoop of vanilla bean ice cream is perfect. For a tropical pairing, coconut or pineapple sorbet works wonderfully. A simple side of macerated berries also provides a tart contrast that cleanses the palate.
Modern serving suggestions include drizzling a coulis, such as raspberry or mango, on the plate before placing the slice. For a dinner party, pre-slice the cake in the kitchen and present each slice on a pool of caramel sauce with a quenelle of coconut cream. Serve small, elegant portions as part of a dessert tasting menu.
Temperature considerations are crucial. This cake is best served at cool room temperature. Remove it from the refrigerator 30-45 minutes before serving. This allows the buttercream to soften slightly, becoming creamy and lush, while the cake layers remain firm and distinct. The pineapple filling should be cool but not ice-cold.
Portion control is easy with a layer cake. A standard 9-inch cake yields 12 generous slices. For larger crowds, you can slice it into 16 smaller, more delicate portions. Use a cake server or a thin, offset spatula to lift each slice cleanly from the cake stand to the plate.
Wine and Beverage Pairing
Wine pairings should complement the cake’s sweet-tart profile without competing. A late-harvest Riesling or Gewürztraminer with its notes of apricot and lychee is an excellent choice. Their natural sweetness matches the cake, while their acidity cuts the richness. A Moscato d’Asti, with its light fizz and peach flavors, is another delightful pairing. For a richer option, try a cream sherry or a tawny port; their nutty, caramel notes echo the brown sugar in the cake.
Non-alcoholic alternatives are just as important. Sparkling water with a twist of lime cleanses the palate. A tropical fruit punch made with pineapple, orange, and ginger ale mirrors the cake’s flavors. For a warm option, a creamy coconut chai latte provides a cozy contrast. Iced hibiscus tea offers a beautiful ruby color and a tart, cranberry-like flavor that pairs wonderfully.
Coffee and tea pairings work beautifully. A medium-roast coffee with low acidity and notes of caramel or nuts is ideal. Avoid bitter, dark roasts. For tea, consider a fragrant Earl Grey, whose bergamot citrus notes are lovely with pineapple. A white tea with peach or a simple chamomile tea allows the cake’s delicate flavors to remain the star.
Temperature considerations vary by beverage. Serve dessert wines slightly chilled, around 45-55°F. Sparkling wines and non-alcoholic sparklers should be well-chilled. Coffee should be hot and freshly brewed, while iced tea should be cold but not watered down from too much ice. Offer a variety to suit all guest preferences.
Serving suggestions include offering a small flight of paired beverages for a tasting experience. Place carafes of iced tea and water on the table. For coffee, set up a station with cream, sugar, and cinnamon sticks. Always provide a non-alcoholic option that feels just as special as the alcoholic ones, ensuring every guest can enjoy a perfect pairing.
Storage and Shelf Life
Storage methods depend on the stage of completion. An unfrosted, cooled cake layer can be wrapped tightly in plastic wrap and stored at room temperature for one day or refrigerated for up to three days. The cooked pineapple filling must be stored in an airtight container in the refrigerator. The assembled and frosted cake requires careful handling due to the perishable buttercream.
Temperature requirements are strict for the finished cake. Because the frosting is a butter-based product, the assembled cake must be refrigerated. Store it in a cake carrier or loosely covered with a dome or inverted bowl to protect it from absorbing refrigerator odors. Never leave it at room temperature for more than two hours to prevent spoilage.
Container recommendations include a dedicated cake carrier with a lid, which is ideal. Alternatively, place the cake on a plate and cover it with a large, inverted bowl or a cake dome. If you must use plastic wrap, insert several toothpicks around the top of the cake to prevent the wrap from sticking to and marring the frosting.
Signs of spoilage include an off or sour smell, especially from the dairy components. The buttercream may develop a greasy sheen or separate. The cake itself may become unpleasantly soggy or develop mold if stored too long. When in doubt, it is always safer to discard the cake.
Reheating instructions are not typically needed for cake. However, if you prefer a slightly softened texture, let a refrigerated slice sit at room temperature for 20-30 minutes before serving. Do not microwave it, as this will melt the frosting and potentially make the cake rubbery.
Freezing guidelines are excellent for long-term storage. Wrap unfrosted cake layers individually in plastic wrap and then aluminum foil; they will keep for up to 3 months. Thaw overnight in the refrigerator. You can also freeze the finished, frosted cake. First, freeze it uncovered on a tray until the frosting is solid (2-3 hours), then wrap it tightly in several layers of plastic wrap. Thaw, still wrapped, in the refrigerator overnight.
Make Ahead Strategies
Prep timeline can stretch over three days for minimal stress. Day 1: Bake the cake layers, let them cool completely, wrap tightly in plastic wrap, and refrigerate. Day 2: Prepare the pineapple filling and the white chocolate buttercream. Store the filling in the fridge and the buttercream in an airtight container at cool room temperature if using within 8 hours, otherwise refrigerate it. Day 3 (serving day): Let the buttercream come to room temperature and re-whip if needed. Assemble, frost, and garnish the cake.
Storage between steps is simple. Cooled cake layers are very stable. Wrapped well, they stay moist in the fridge for 3 days or in the freezer for months. The pineapple filling can be made up to 5 days ahead. The buttercream can be refrigerated for up to a week or frozen for a month. Bring refrigerated buttercream to room temperature and beat it vigorously with a mixer to restore its smooth, spreadable texture.
Quality impact assessment is positive. In fact, making cake layers a day ahead often improves flavor and texture, as it allows the crumb to settle and moisten. The pineapple filling’s flavors also meld and intensify when made ahead. The only component that benefits from being made fresh is the final assembly and garnishing, which ensures the best visual presentation.
Assembly tips for make-ahead components: Before assembling, ensure all components are at the correct temperature. The cake layers should be cold (easier to handle, fewer crumbs). The filling should be cool. The buttercream should be spreadable. If the buttercream is too firm, beat it again. If it’s too soft, chill it briefly. Use a dab of buttercream on your cake board or plate to anchor the first layer so it doesn’t slide.
Reheating guidelines do not apply to this cold dessert. The key is proper thawing and temperature adjustment. A cake assembled from cold components and then refrigerated should be allowed to sit at cool room temperature for the optimal serving texture, as previously described.
Fresh element additions are the final touch. Always add any fresh fruit garnish (like pineapple rings or berries) just before serving to prevent them from weeping or wilting. Toasted coconut or nuts can be added a few hours ahead. A dusting of powdered sugar should be done at the very last moment to prevent it from dissolving into the frosting.
Scaling Instructions
Halving the recipe is straightforward for a smaller 6-inch cake or a loaf. Simply divide all ingredient quantities by two. Use two 6-inch round pans and reduce the baking time to 25-30 minutes. For the frosting and filling, halving is also fine, though you may have a little leftover. This is perfect for a small family celebration or if you want to create a trial run before making the full version for a big event.
Doubling or tripling is ideal for making a tiered wedding cake or serving a very large crowd. Double all ingredients precisely. You will likely need to bake the cake layers in batches unless you have multiple ovens. Mix the batter in separate batches to avoid overmixing a single huge quantity. For frosting and filling, it is often easier to make separate batches rather than one enormous one to maintain control over consistency.
Equipment adjustments are necessary when scaling. For a double batch, ensure your mixer bowl is large enough. You may need to use a very large stockpot for the pineapple filling. For a tiered cake, you will need cake boards, dowels, and a sturdy cake stand for support. When halving, smaller pans and a smaller saucepan for the filling are needed.
Timing modifications are crucial. When baking multiple batches, allow your oven to reheat fully between batches. The filling will take longer to cook and thicken when doubled. Buttercream may take longer to come together when made in a large quantity. Factor in extra cooling and assembly time for a large, multi-tiered project.
Storage considerations change with scale. A large tiered cake will be heavier and more difficult to move; assemble it on the serving stand if possible. A halved recipe yields a smaller cake that can be stored in a standard refrigerator more easily. Leftovers from a doubled recipe will be abundant, so plan for appropriate storage containers or consider gifting slices to friends and neighbors.
Nutritional Deep Dive
Macro breakdown per serving (approximate): A slice provides a balance of carbohydrates from the flour, sugars, and pineapple, fats from the butter, white chocolate, and eggs, and a small amount of protein from the eggs and dairy. It is an energy-dense food, typical of celebratory desserts. The brown sugar and pineapple contribute to the carbohydrate content, while the buttercream is the primary source of fat. The exact values depend on specific brands and precise measurements used.
Micronutrient analysis reveals some benefits amidst the indulgence. Pineapple is a notable source of vitamin C and manganese, which support immune function and metabolism. The molasses in brown sugar provides small amounts of iron, calcium, and potassium. Eggs contribute choline, important for brain health. Using real white chocolate means you get some calcium from the milk solids and antioxidants from the cocoa butter, though in smaller amounts than dark chocolate.
Health benefits are relative but present. The enjoyment and social connection fostered by sharing a homemade dessert contribute positively to mental well-being. The cake provides quick energy. Furthermore, using real ingredients like butter, eggs, and fruit means you are avoiding artificial trans fats and excessive preservatives often found in store-bought cakes. It is a “cleaner” indulgence.
Dietary considerations are important for those with restrictions. This cake contains gluten (flour), dairy (butter, buttermilk, white chocolate), and eggs. It is not suitable for vegan, gluten-free, or dairy-free diets without significant modifications, which are outlined in a separate section. Those managing sugar intake should be mindful of portion size.
Portion analysis shows that one-twelfth of a 9-inch cake is a standard serving. This is a satisfying portion for most people. For those wishing to reduce calorie intake, the cake can be sliced into sixteen smaller, yet still delightful, portions. Serving with a side of fresh berries can also help fill the plate and satisfy the sweet tooth with fewer calories from the cake itself.
Weight management tips include enjoying this cake as an occasional treat within an otherwise balanced diet. Savor a single slice mindfully rather than eating straight from the pan. Balance the day’s meals by including lean proteins, vegetables, and whole grains. Physical activity can also help manage the energy input from celebratory foods. Remember, deprivation often backfires; planned enjoyment of special foods is a sustainable part of a healthy lifestyle.
Dietary Adaptations
Gluten-free: Use a reliable 1:1 gluten-free all-purpose flour blend that contains xanthan gum. Brands like Bob’s Red Mill or King Arthur Measure for Measure work well. Be careful not to overmix the batter, as GF blends can sometimes become gummy. Ensure your baking powder and other ingredients are certified gluten-free.
Dairy-free: Replace butter with a high-fat plant-based butter (like Miyoko’s or Earth Balance sticks). For buttermilk, mix 1 cup of unsweetened soy or oat milk with 1 tablespoon of lemon juice or vinegar. The biggest challenge is the white chocolate; you must find a quality vegan white chocolate bar made with cocoa butter, not just palm oil.
Vegan: Follow the dairy-free guidelines above. For the eggs, use a commercial egg replacer suitable for cakes, or a flax egg (1 tbsp ground flax + 3 tbsp water per egg, let sit 5 mins). The structure may be slightly denser. Ensure all sugar used is certified vegan, as some white sugars are processed with bone char.
Low-carb/Keto: This is a significant adaptation. Replace flour with almond flour and a small amount of coconut flour. Use a granulated erythritol/allulose blend instead of brown and white sugars. For pineapple, use a small amount of crushed pineapple, drained extremely well, or use pineapple flavor extract. Make frosting with keto-friendly white chocolate chips and butter.
Paleo: Use almond flour and tapioca flour as the base. Substitute coconut sugar for brown sugar and maple syrup for white sugar. Ghee or coconut oil can replace butter. For the frosting, a paleo-friendly option is a coconut cream and cashew butter frosting sweetened with maple syrup, though it won’t mimic white chocolate exactly.
Low-FODMAP: The pineapple is high in FODMAPs (fructans) in servings over 1/2 cup. This cake Print
Heavenly White Chocolate Pineapple Cake
- Total Time: 45 minutes
- Yield: 4
Description
A moist and tropical cake featuring white chocolate and pineapple, topped with a creamy frosting for a heavenly dessert.
Ingredients
- 2 cups all-purpose flour
- 1 cup granulated sugar
- 1/2 cup unsalted butter, softened
- 3 large eggs
- 1 cup crushed pineapple, drained
- 1/2 cup white chocolate chips, melted
- 1 tsp vanilla extract
- 1 tsp baking powder
- 1/2 tsp baking soda
- 1/4 tsp salt
- 1/2 cup buttermilk
- For frosting: 8 oz cream cheese, softened, 1/4 cup powdered sugar, 1/2 cup heavy cream
Instructions
- Preheat oven to 350°F (175°C). Grease and flour a 9-inch round cake pan.
- In a bowl, cream together butter and sugar until fluffy. Beat in eggs one at a time, then stir in vanilla and melted white chocolate.
- In another bowl, whisk flour, baking powder, baking soda, and salt. Alternately add dry ingredients and buttermilk to the butter mixture, mixing until just combined. Fold in crushed pineapple.
- Pour batter into prepared pan and bake for 30-35 minutes, or until a toothpick inserted comes out clean. Let cool completely.
- For frosting, beat cream cheese and powdered sugar until smooth. In a separate bowl, whip heavy cream to stiff peaks, then fold into cream cheese mixture. Spread over cooled cake.
Notes
You can customize the seasonings to taste.
- Prep Time: 15 minutes
- Cook Time: 30 minutes
- Method: Main
- Cuisine: American