Cherry Pistachio Cheesecake Bars with a Buttery Graham Crust: A Showstopping Dessert
Imagine a dessert that perfectly balances richness, tang, and crunch in every single bite. That is exactly what you get with these stunning Cherry Pistachio Cheesecake Bars with a Buttery Graham Crust. This recipe transforms the classic cheesecake experience into a portable, shareable treat that is as beautiful as it is delicious. Consequently, these bars are ideal for everything from a casual family gathering to an elegant holiday party. The combination of creamy filling, tart fruit, and nutty crunch creates a symphony of textures and flavors that will have everyone asking for the recipe.
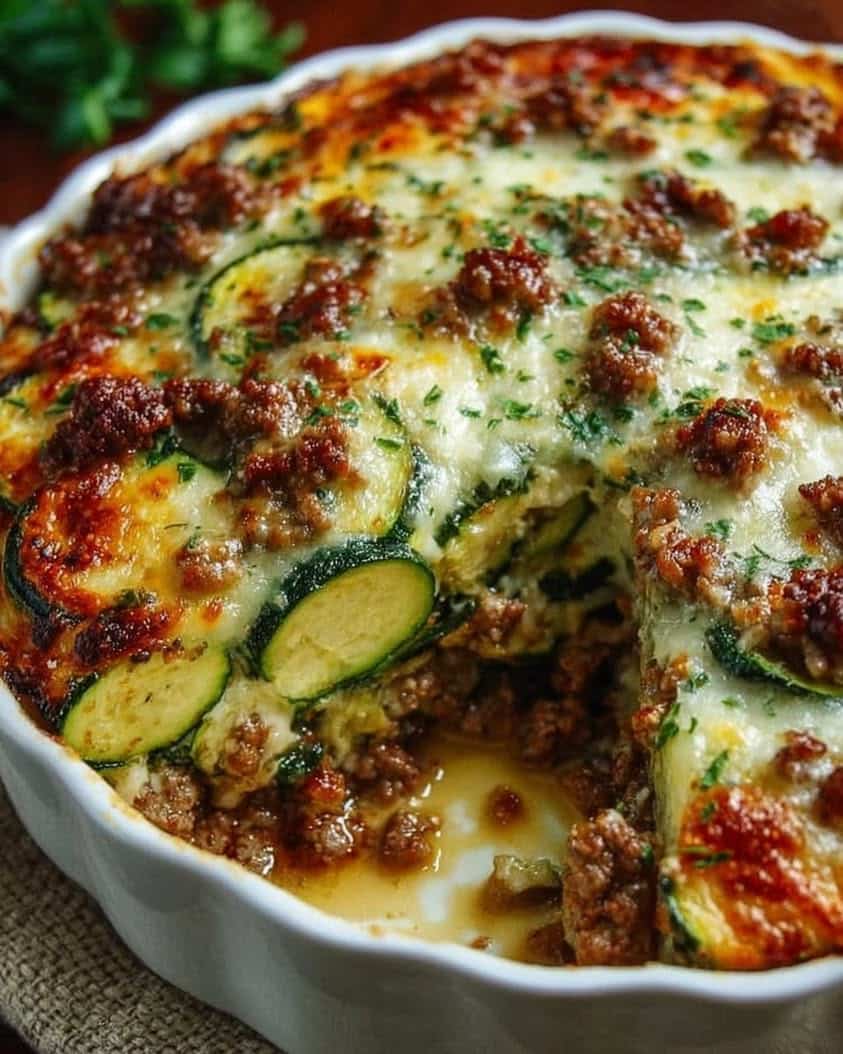
Furthermore, the visual appeal of these Cherry Pistachio Cheesecake Bars is undeniable. The vibrant red cherry topping against the pale cream cheese filling, all sprinkled with green pistachios, creates a festive and inviting look. This dessert feels special without requiring the meticulous work of a traditional springform pan cheesecake. Ultimately, you achieve a professional-quality result with straightforward bar cookie techniques. The buttery graham crust provides a sturdy, sweet foundation that complements the luxurious layers above perfectly.
Additionally, the beauty of this recipe lies in its make-ahead potential. You can prepare these bars a day in advance, allowing the flavors to meld and the texture to set perfectly. This makes entertaining stress-free, as your impressive dessert is ready and waiting. The recipe is forgiving for intermediate bakers, yet the final product tastes like it came from a high-end bakery. Let’s dive into how you can create these unforgettable Cherry Pistachio Cheesecake Bars in your own kitchen.
Quick Recipe Highlights
- Flavor Profile: These Cherry Pistachio Cheesecake Bars offer a masterful balance. The creamy, rich cheesecake filling is perfectly cut by the bright, tangy cherry topping. Meanwhile, the salty, nutty pistachios add a sophisticated finish that elevates the entire dessert.
- Texture: Experience a delightful textural journey from the very first bite. First, you encounter the firm, crumbly, and buttery graham crust. Then, your spoon moves through the ultra-smooth and creamy cheesecake layer. Finally, you get the juicy burst of cherries and the satisfying crunch of pistachios.
- Aroma: As these bars bake, your kitchen will fill with the warm, comforting scent of toasted graham crackers and brown sugar. After cooling, the subtle tang of cream cheese and the sweet-tart fragrance of cherries takes over, promising a decadent treat.
- Visual Appeal: The presentation is truly stunning. The deep red cherry compote creates a glossy, jewel-toned blanket over the ivory cheesecake. The final sprinkle of chopped green pistachios adds a pop of color and a hint of rustic elegance, making the bars look professionally crafted.
- Skill Level Needed: This recipe is perfect for bakers with some experience who are comfortable with multi-step processes. You need to manage a crust, a no-bake-style filling that sets in the oven, and a simple stovetop compote. However, clear instructions make it very achievable.
- Special Equipment: You will need basic baking tools: an 8×8 or 9×9 inch square baking pan, parchment paper, a medium saucepan, and a hand mixer or stand mixer. A food processor makes the crust quickly, but you can also use a zip-top bag and rolling pin.
Recipe Overview
- Difficulty Level: We rate these Cherry Pistachio Cheesecake Bars as intermediate. The process involves three distinct components that require sequential preparation and attention to detail. For instance, you must par-bake the crust, prepare a smooth cheesecake batter, and cook a cherry topping to the right consistency. However, each step is straightforward when followed carefully.
- Category: This dessert falls squarely into the category of bar cookies or dessert bars. It is also a fantastic no-bake cheesecake alternative, though it does involve a short bake time for the crust and filling. These bars are perfect for potlucks, bake sales, and celebratory desserts where individual slices are preferable.
- Cuisine: While cheesecake has ancient roots, the modern version is deeply associated with American cuisine. This recipe, with its graham cracker crust and cream cheese filling, is a classic American dessert. The addition of pistachios nods to Middle Eastern and Mediterranean pastry traditions, creating a delicious fusion.
- Cost: Making these Cherry Pistachio Cheesecake Bars at home is significantly more cost-effective than buying similar gourmet desserts. The most expensive ingredients are the cream cheese, fresh or frozen cherries, and pistachios. Overall, the cost for a 16-serving pan is a fraction of what a bakery would charge.
- Season: These bars are wonderfully versatile across seasons. They feel light and fruity enough for summer picnics, especially with fresh cherries. Conversely, they also bring a rich, celebratory vibe perfect for winter holidays. Using frozen cherries makes them a year-round delight.
- Occasion: This is your go-to dessert for occasions that demand something impressive yet easy to serve. They are ideal for Thanksgiving, Christmas, Fourth of July, birthday parties, and bridal or baby showers. The portable nature of bars makes them superior to a whole cheesecake for many events.
Why You’ll Love This Recipe
First and foremost, the taste and texture combination is utterly irresistible. Each layer of these Cherry Pistachio Cheesecake Bars contributes something special. The buttery graham crust is sweet and crumbly, providing a sturdy base. Then, the creamy cheesecake filling is luxuriously smooth and rich, offering a classic flavor everyone adores. The tangy cherry topping cuts through that richness with a bright, fruity punch. Finally, the crunchy pistachios add a salty, nutty contrast that makes each bite complex and satisfying. This dessert truly has it all, delivering a gourmet experience in a simple bar form.
Next, consider the convenience and preparation benefits. Unlike a traditional cheesecake that requires a water bath and hours of chilling, these bars are remarkably straightforward. You bake the crust briefly, mix the simple filling, and bake again until just set. The cherry compote cooks quickly on the stovetop. Because they are made in a square pan, they are easy to cut, serve, and transport. You can make them a full day ahead, which is a huge advantage when planning a party or gathering. Essentially, you get maximum impact with manageable effort.
Moreover, there are some nutritional advantages to this homemade treat. By making the cherry topping yourself, you control the amount of added sugar, unlike using canned pie filling. Cherries are a great source of antioxidants and anti-inflammatory compounds. Pistachios provide healthy fats, protein, and fiber. While these Cherry Pistachio Cheesecake Bars are certainly a dessert, using real, whole ingredients makes them a better choice than many processed alternatives. You can feel good about serving a treat made from scratch.
Furthermore, the social and entertaining value is incredibly high. A pan of these beautiful bars becomes the centerpiece of any dessert table. They are easy for guests to grab and eat without needing a plate and fork in many cases. The colorful presentation sparks conversation and compliments. Sharing a homemade dessert like this shows care and effort, making guests feel special. They are a guaranteed crowd-pleaser that appeals to both adults and children, bridging the gap between fancy and familiar.
Finally, the cost-effectiveness and accessibility are major wins. The ingredients for these Cherry Pistachio Cheesecake Bars are common and easy to find at any grocery store. Cream cheese, graham crackers, and sugar are pantry staples. You can use fresh or frozen cherries depending on the season and price. Compared to ordering a specialty dessert from a bakery or restaurant, making this at home saves a substantial amount of money. You can create a dessert that looks and tastes expensive for a very reasonable cost, making it perfect for feeding a crowd on a budget.
Historical Background and Cultural Significance
The story of cheesecake begins not in New York, but in ancient Greece. Historians believe the earliest form was served to athletes at the first Olympic Games in 776 BC. This primitive version was simple: cheese pounded smooth with honey and wheat. The Romans later adopted the recipe, spreading it across Europe. However, the creamy, modern cheesecake we know today was impossible without the invention of cream cheese in the late 19th century. American dairyman William Lawrence accidentally created a richer, creamier Neufchâtel cheese in 1872, which eventually became the Philadelphia brand cream cheese. This innovation was the key to the dense, smooth texture that defines American cheesecake.
Cheesecake holds significant cultural importance in many societies. In America, it became a symbol of diner culture and Jewish delicatessens, particularly in New York City. The “New York-style” cheesecake, known for its ultra-rich, dense texture, is a point of civic pride. Conversely, in Japan, cheesecake is often light, fluffy, and soufflé-like. In Italy, ricotta cheese is the star in classics like ricotta pie. The graham cracker crust, a distinctly American invention, emerged after the cracker itself was created in the 19th century as part of a health-focused diet. Its sweet, sandy texture proved to be the perfect, no-fuss base for creamy fillings.
The evolution of the recipe from whole cakes to bars is a tale of practicality and portability. The classic cheesecake is beautiful but fragile, requiring careful unmolding and slicing. The concept of cheesecake bars or squares likely emerged from the mid-20th century American love for “bar cookies” like lemon bars and brownies. Bakers sought a way to enjoy cheesecake’s flavor without the fuss of a springform pan. By baking the cheesecake filling on a crust in a simple square pan, they created a dessert that was easy to make, transport, and serve at potlucks, picnics, and bake sales. This innovation democratized the luxurious dessert.
Regional variations of cheesecake and fruit-topped desserts are endless. The Pennsylvania Dutch are known for their cheesecake made with cottage cheese. Basque cheesecake is intentionally burnt on top for a caramelized flavor. The addition of fruit compote, like cherry, is a classic American diner staple. The specific pairing of cherries and pistachios, however, has a more gourmet flair. Pistachios are celebrated in Middle Eastern and Mediterranean sweets like baklava. Combining them with cherries and cream cheese is a modern fusion that highlights contrasting colors, textures, and flavors, representing today’s globalized approach to baking where traditions beautifully intersect.
Ingredient Deep Dive
Graham Crackers: More than just a s’mores ingredient, graham crackers were invented by Presbyterian minister Sylvester Graham in the 1820s as part of a bland, vegetarian diet to curb sinful desires. Ironically, they now form the base of one of the most indulgent desserts. For the crust, you will need about 10-12 full sheets to yield one and a half cups of fine crumbs. Their mild honey-like sweetness and wheaty flavor provide the perfect neutral foundation. Always crush them finely for a cohesive crust that holds together when sliced. For a twist, try using chocolate or cinnamon graham crackers.
Cream Cheese: This is the non-negotiable star of the filling. Use full-fat, brick-style cream cheese for the best texture and flavor. Low-fat versions contain more water and stabilizers, which can lead to a runny filling or undesirable texture. Always bring your cream cheese to room temperature before mixing; this is crucial for creating a smooth, lump-free batter. Cold cream cheese will result in a chunky filling no matter how long you mix. The rich, tangy flavor of quality cream cheese is what defines a great cheesecake bar.
Fresh or Frozen Cherries: Cherries bring the essential tangy fruit component. You can use either fresh sweet cherries (like Bing) when in season or frozen pitted cherries year-round. Avoid maraschino cherries, as they are too sweet and lack real fruit flavor. Cherries are packed with antioxidants like anthocyanins, which give them their red color and offer anti-inflammatory benefits. For the compote, cooking them with a little sugar and lemon juice breaks them down into a thick, glossy topping. The natural pectin in the fruit helps it set beautifully on the cheesecake layer.
Pistachios: These green nuts are the elegant finishing touch. Opt for unsalted, shelled pistachios to control the salt level in your dessert. Pistachios are a nutritional powerhouse, offering healthy fats, protein, and fiber. Their subtly sweet, almost floral flavor and vibrant green color make them a premium garnish. Lightly toasting them before chopping will enhance their nutty aroma and crunch. They provide a sophisticated salty contrast that balances the sweetness of the cherries and the richness of the cheesecake, elevating the entire dessert.
Other Key Ingredients: Unsalted butter binds the graham cracker crust; using unsalted allows you to control the saltiness. Granulated sugar sweetens both the filling and the topping, while a small amount of brown sugar in the crust adds depth. A touch of cornstarch in the cherry compote acts as a thickener, ensuring it’s not runny. Pure vanilla extract and a pinch of salt are flavor enhancers that round out the sweetness in both the crust and filling, making all the other flavors pop.
Common Mistakes to Avoid
- Using Cold Cream Cheese: This is the number one cause of a lumpy cheesecake filling. Cold cream cheese will never incorporate smoothly with the other ingredients, no matter how long you mix. Always plan ahead and let the bricks sit on the counter for at least one to two hours until they are completely soft to the touch.
- Overmixing the Filling: Once you add the eggs to the cream cheese mixture, mix only until just combined. Overbeating incorporates too much air, which can cause the filling to puff up dramatically in the oven and then fall and crack as it cools. A smooth, slow incorporation is key.
- Overbaking the Cheesecake Layer: The goal is for the center to be just set but still slightly jiggly when you gently shake the pan. It will continue to set as it cools. If you bake until the center is completely firm, the bars will be dry and dense. The residual heat is your friend for perfect texture.
- Not Letting the Crust Cool: Pouring the creamy cheesecake filling onto a hot graham cracker crust can cause the butter in the crust to melt further and make the base greasy or soggy. Always let the par-baked crust cool on a wire rack for at least 10-15 minutes before adding the filling.
- Skipping the Parchment Paper: Lining your baking pan with parchment paper, leaving an overhang on two sides, is non-negotiable. Without this “sling,” you will have an extremely difficult time removing the bars cleanly for slicing. This simple step ensures perfect, crumb-free squares.
- Adding Topping Too Soon: The cherry compote should be completely cool before you spread it over the cheesecake layer. If it’s warm or hot, it will melt the delicate cheesecake surface and create a messy, combined layer instead of distinct strata. Patience here ensures beautiful layers.
- Not Chilling Long Enough: These Cherry Pistachio Cheesecake Bars require ample chilling time to fully set. Cutting into them after only a couple of hours will result in a gooey, messy slice. For clean cuts, you must chill for at least four hours, though overnight is ideal for the flavor and texture to mature.
- Using Pre-Made Pie Filling: While convenient, canned cherry pie filling is often overly sweet, artificially flavored, and has a gloopy texture. The five-minute homemade compote is vastly superior in flavor and allows you to control the sweetness and consistency, making a significant difference in the final dessert.
Essential Techniques
Creating the Perfect Crust: The foundation of a great bar is a crust that holds together. The key is to use enough melted butter to moisten all the graham cracker crumbs thoroughly. The mixture should resemble wet sand and hold together when you pinch it. Press it firmly and evenly into the pan using the bottom of a measuring cup or glass. This even pressure prevents thick, hard spots and thin, crumbly areas. Par-baking the crust for 8-10 minutes sets the structure and prevents it from becoming soggy when the wet filling is added, ensuring a crisp base.
Achieving a Smooth Cheesecake Filling: Room temperature ingredients are the absolute secret. Start by beating the softened cream cheese alone until it is completely smooth and no lumps remain. Scrape down the bowl thoroughly. Then, add the sugar and beat again until creamy. Finally, add eggs one at a time, mixing on low speed just until each is incorporated. Overbeating after adding eggs incorporates air, which leads to cracking. The final batter should be velvety and homogeneous. Pour it gently over the cooled crust to avoid disrupting it.
Making a Thick Cherry Compote: A runny topping will make your bars messy. The technique is simple: combine pitted cherries, sugar, lemon juice, and cornstarch in a saucepan. The cornstarch must be dissolved in the lemon juice first to prevent clumps. Cook over medium heat, stirring frequently, until the cherries release their juices and the mixture comes to a simmer. Let it bubble gently for 3-5 minutes until it thickens noticeably and becomes glossy. It will continue to thicken as it cools. This creates a perfect, spoonable topping that holds its shape.
The Clean Slice: For picture-perfect bars, you must use the right tools and method. First, ensure the bars are fully chilled. Then, lift the entire slab out of the pan using the parchment paper overhang. Place it on a cutting board. Use a large, sharp chef’s knife. Dip the knife in very hot water, wipe it dry with a towel, and make a clean cut. Repeat this hot-knife process for each cut. The heat helps the knife glide through the creamy filling and sticky topping without dragging or smearing, revealing those beautiful, clean layers.
Pro Tips for Perfect Cherry Pistachio Cheesecake Bars
First, for the ultimate graham cracker crust, add a tablespoon of brown sugar to the crumb mixture along with the granulated sugar. The molasses notes in the brown sugar add a deeper, more caramelized flavor that pairs wonderfully with the cherries and cream cheese.
Second, place your room-temperature cream cheese in the bowl of your mixer and beat it for a full minute before adding anything else. This initial step breaks down any remaining small lumps and aerates it slightly, guaranteeing the smoothest possible base for your filling.
Third, to prevent surface cracks on your cheesecake layer, run a thin knife or offset spatula around the edges of the pan immediately after removing it from the oven. This releases the filling from the sides, allowing it to contract evenly as it cools instead of pulling and cracking in the center.
Fourth, if using frozen cherries for the compote, do not thaw them first. Add them directly to the saucepan while still frozen. This helps them retain their shape and texture better during cooking, preventing them from turning to complete mush.
Fifth, toast your pistachios before chopping them for the garnish. Spread them on a baking sheet and toast in a 350°F oven for 5-7 minutes until fragrant. This simple step intensifies their nutty flavor and makes them extra crunchy, providing a better textural contrast.
Sixth, for the cleanest layers, spread the cooled cherry compote over the chilled cheesecake layer, not the room-temperature one. Chill the cheesecake base completely (about 2 hours) first, then add the compote, and chill again. This keeps the red topping from bleeding into the white filling.
Seventh, if you love a stronger vanilla flavor, scrape the seeds from half a vanilla bean pod into the cream cheese filling along with the extract. The tiny black specks also add a beautiful, gourmet look to the creamy layer.
Eighth, for a festive twist during the holidays, sprinkle a tiny amount of edible gold dust over the pistachio garnish or use dried edible rose petals for an extra special presentation that will wow your guests.
Variations and Adaptations
Regional Variations: Explore global flavors by altering the crust and toppings. For a British twist, use crushed digestive biscuits for the crust. For a German-inspired version, add a tablespoon of poppy seeds to the graham crust and use a blueberry compote. To channel Italian flavors, mix a tablespoon of finely ground espresso powder into the crust and top with an amarena cherry compote.
Seasonal Adaptations: Make this recipe shine all year by swapping the fruit. In spring, use a lemon curd topping with fresh raspberries. For summer, try a mixed berry compote or fresh peach and ginger. In fall, a spiced apple or pear compote with candied walnuts is divine. Winter calls for a cranberry-orange topping with a hint of cinnamon.
Dietary Modifications: For gluten-free Cherry Pistachio Cheesecake Bars, use certified gluten-free graham crackers or almond flour mixed with a little sugar and butter for the crust. For a dairy-free version, use high-quality vegan cream cheese and plant-based butter. The topping and garnish remain naturally dairy-free.
Flavor Variations: Infuse the cream cheese filling with different extracts. Almond extract (just 1/2 teaspoon) complements the cherries and pistachios beautifully. For a citrus kick, add the zest of one orange or lemon to the filling. Chocolate lovers can mix 1/4 cup of sifted cocoa powder into the crust or swirl melted chocolate into the cheesecake batter before baking.
Texture Modifications: If you prefer a firmer, denser New York-style texture, add one extra egg yolk and a tablespoon of all-purpose flour or cornstarch to the cream cheese filling. For a lighter, fluffier texture, fold in 1/2 cup of whipped heavy cream into the filling just before pouring it onto the crust.
Presentation Alternatives: Instead of bars, you can make mini versions in a muffin tin lined with paper liners. Simply press the crust into the bottoms, add a scoop of filling, and bake for less time. You can also forgo the pistachio sprinkle and instead dip half of each chilled bar in melted dark chocolate for an elegant finish.
Serving and Presentation Guide
Plating Techniques: For individual servings, place a single Cherry Pistachio Cheesecake Bar on a small dessert plate or a modern slate tile. You can add a swipe of extra cherry sauce or a dollop of lightly sweetened whipped cream on the side for decoration. Alternatively, for a family-style presentation, arrange the whole slab (uncut) on a beautiful cake stand and garnish the top with whole cherries and pistachio clusters, allowing guests to cut their own piece.
Garnishing Ideas: Beyond chopped pistachios, consider a light dusting of powdered sugar just before serving for a snowy effect. A fresh mint leaf adds a pop of green and a refreshing aroma. A drizzle of salted caramel or dark chocolate sauce can add another layer of flavor. For a textural garnish, sprinkle with crushed freeze-dried cherries for an intense, tart crunch.
Traditional Accompaniments: A classic pairing is a simple cup of black coffee or espresso, which cuts through the richness. A glass of cold milk is always a crowd-pleaser. For a more formal tea service, serve these bars alongside Earl Grey or a fruity herbal tea like hibiscus or berry blend.
Modern Serving Suggestions: Crumble a bar over a bowl of vanilla ice cream or Greek yogurt for an incredible deconstructed dessert. For a brunch item, serve a smaller square alongside fresh fruit salad. You can also skewer small cubes of the bar with fresh cherries for a fun, finger-food dessert kabob at a party.
Temperature Considerations: These bars are best served chilled but not ice-cold. Remove the pan from the refrigerator about 15-20 minutes before you plan to serve and slice them. This slight warming allows the flavors to bloom and the texture of the cheesecake to become optimally creamy, rather than overly firm.
Portion Control Tips: An 8×8 inch pan cut into 9 squares yields generous, rich portions. For a larger crowd or lighter serving, cut the slab into 16 smaller, two-bite squares. These mini bars are perfect for buffet tables where guests may want to try multiple desserts, and they look adorable arranged on a tiered stand.
Wine and Beverage Pairing
Wine Pairings: The rich creaminess and tart cherries in these bars call for wines with good acidity to cleanse the palate. A late-harvest Riesling or a Moscato d’Asti, with their inherent sweetness and bright acidity, are fantastic matches. For red wine lovers, a light, fruity Beaujolais or a Pinot Noir with low tannins complements the cherry flavors without overwhelming the dessert. A classic pairing is Brachetto d’Acqui, a lightly sparkling red Italian wine that feels celebratory.
Non-Alcoholic Alternatives: Sparkling beverages are excellent for cutting through the richness. Try a tart cherry sparkling water or a ginger beer for a spicy kick. A homemade cherry limeade or a pomegranate spritzer mirrors the fruity notes of the dessert. For a creamy option, a chai tea latte or a cold brew coffee with a splash of cream provides a wonderful contrast.
Coffee and Tea Pairings: Coffee is a traditional and perfect partner. A medium-roast coffee with notes of chocolate or nut will harmonize with the crust and pistachios. For tea, consider a black tea like Darjeeling, which has stone fruit notes, or a rooibos tea, which is naturally sweet and nutty. Avoid overly bitter or smoky teas that could clash with the dessert’s delicate sweetness.
Temperature Considerations: Serve white and sparkling wines well chilled. Red wines should be served slightly cooler than room temperature, at about 55-60°F, to keep them refreshing. Non-alcoholic sparklers should be ice-cold. Coffee can be served hot or as iced coffee, depending on the season. The key is that all beverages should be refreshing to counterbalance the dense, sweet bars.
Serving Suggestions: Offer a pairing flight for a special dinner party: a small square of the bar with a taste of late-harvest Riesling, a sip of sparkling water, and a sample of cold brew coffee. This allows guests to explore how different beverages interact with the complex flavors of the Cherry Pistachio Cheesecake Bars, making the dessert course an interactive experience.
Storage and Shelf Life
Storage Methods: Always store these bars in the refrigerator, covered tightly with plastic wrap or in an airtight container. The layers, especially the creamy cheesecake, are dairy-based and must be kept cold to prevent spoilage. If stacking layers in a container, place parchment paper between the layers to prevent them from sticking together and damaging the topping.
Temperature Requirements: Consistent refrigeration at or below 40°F is essential. Do not leave the pan out at room temperature for more than two hours total, including serving time. If you are transporting them to an event, keep them in a cooler with ice packs until ready to serve to maintain food safety and texture.
Container Recommendations: The best container is the baking pan itself, tightly covered with foil. For pre-sliced bars, a shallow, rectangular glass or plastic container with a tight-fitting lid is ideal. Avoid deep containers where bars might be stacked too high and get crushed.
Signs of Spoilage: Visually inspect the bars before serving. Discard if you see any mold growth, which is unlikely but possible with fresh fruit. A sour or “off” smell from the dairy components is a clear sign. If the texture becomes excessively watery or the layers separate significantly, it’s best to err on the side of caution and not consume them.
Reheating Instructions: These bars are not meant to be reheated. Serving them chilled is part of their appeal. However, if you simply must have a slightly less cold piece, let an individual portion sit on the counter for 10-15 minutes. Do not microwave, as this will melt the layers and create a soupy mess.
Freezing Guidelines: You can freeze these bars successfully for up to two months. First, chill the uncut slab completely. Then, wrap the entire slab tightly in plastic wrap, followed by a layer of heavy-duty aluminum foil. To serve, thaw overnight in the refrigerator. The texture of the cheesecake may be slightly denser after freezing, and the cherry topping may weep a little liquid, but the flavor will remain excellent.
Make Ahead Strategies
Prep Timeline: These Cherry Pistachio Cheesecake Bars are the ultimate make-ahead dessert. The full recipe can be completed 24 hours before serving. For even more advanced planning, you can prepare the components separately. The graham cracker crust can be par-baked, cooled, and stored at room temperature, covered, for one day. The cherry compote can be made and stored in an airtight container in the refrigerator for up to three days.
Storage Between Steps: If preparing components ahead, let the crust cool completely before wrapping. Store the cooled compote in the fridge. The cream cheese filling is best made fresh, but you can bring all its ingredients to room temperature ahead of time to speed up the process on assembly day. This staged approach breaks the work into manageable chunks.
Quality Impact Assessment: Making the bars a full day ahead actually improves them. The chilling time allows the flavors to meld beautifully. The crust absorbs a tiny amount of moisture from the filling, becoming the perfect tender-crisp texture instead of being overly hard. The cherry topping sets firmly, making slicing cleaner. The overall result is more cohesive and flavorful.
Assembly Tips: For same-day assembly with pre-made parts, ensure the cherry compote is completely chilled before spreading. If it’s cold and too thick to spread easily, let it sit at room temperature for 10 minutes or stir in a teaspoon of warm water to loosen it. Assemble the bars (cooled crust, baked and cooled filling, cold topping) and then give them the full 4+ hour chill before serving.
Reheating Guidelines: As noted, reheating is not recommended. The make-ahead strategy relies on proper chilling. If you need to soften the bars slightly for serving, simply follow the “temperature considerations” advice from the serving guide: a brief 15-minute rest on the counter is all that’s needed.
Fresh Element Additions: If making more than a day in advance, consider adding the final pistachio garnish just before serving. This keeps the nuts their crunchiest and brightest green. You can store the chopped, toasted pistachios in a small bag at room temperature. Sprinkle them over the bars right as you set them out for guests.
Scaling Instructions
Halving the Recipe: To make a smaller batch, simply divide all ingredient quantities by two. Use a 6×6 inch or 8×4 inch loaf pan lined with parchment. The par-bake time for the crust may reduce by 1-2 minutes. The cheesecake bake time will likely be closer to 25-30 minutes; watch for the jiggly center cue. All chilling times remain the same. This is perfect for a small family or couple.
Doubling or Tripling: For a large crowd, doubling is straightforward. Double all ingredients. Bake in a 9×13 inch pan for a standard bar thickness. The crust may need 10-12 minutes to par-bake. The cheesecake layer will take longer, likely 40-50 minutes; again, rely on the visual jiggle test, not the clock. For tripling, make one double batch in a 9×13 pan and one single batch in an 8×8 pan. Mixing the filling in batches is easier than trying to mix a triple batch at once.
Equipment Adjustments: When scaling up, ensure your mixer bowl is large enough to handle the increased volume of filling. You may need to mix the filling in two batches and combine them in a larger bowl. For a doubled recipe in a 9×13 pan, you will need a larger saucepan for the cherry compote. A wider pan helps liquid evaporate faster for proper thickening.
Timing Modifications: While oven temperature stays the same, baking times will change with pan size and volume. A thicker layer (like in a doubled 9×13) takes longer. A thinner layer (like in a halved loaf pan) bakes faster. Always start checking for doneness 5-10 minutes before the original recipe’s suggested time. The “edges set, center jiggly” rule is your constant guide, regardless of scale.
Storage Considerations: A larger pan of bars will take slightly longer to chill completely in the center. Plan for an extra hour of refrigeration if you’ve made a double-thick batch in a 9×13. When freezing a large batch, consider slicing it first and freezing portions in separate containers for easier thawing of only what you need.
Nutritional Deep Dive
Macro Breakdown: A typical bar from this recipe provides a balance of macronutrients driven by its components. The crust and filling Print
Cherry Pistachio Cheesecake Bars
- Total Time: 45 minutes
- Yield: 4
Description
Buttery graham crust, creamy cheesecake filling, tangy cherry topping, and crunchy pistachios—these bars are rich, colorful, and perfect for any occasion.
Ingredients
- 1 1/2 cups graham cracker crumbs
- 1/2 cup unsalted butter, melted
- 1/4 cup granulated sugar
- 16 oz cream cheese, softened
- 1/2 cup sour cream
- 2/3 cup granulated sugar
- 2 large eggs
- 1 tsp vanilla extract
- 1 cup cherry pie filling
- 1/4 cup chopped pistachios
Instructions
- Preheat oven to 350°F (175°C). Line an 8×8-inch baking pan with parchment paper.
- Mix graham cracker crumbs, melted butter, and 1/4 cup sugar in a bowl. Press firmly into the bottom of the pan. Bake for 10 minutes, then let cool slightly.
- Beat cream cheese, sour cream, 2/3 cup sugar, eggs, and vanilla until smooth. Pour over crust. Bake for 25-30 minutes until set. Cool completely, then chill for 2 hours.
- Spread cherry pie filling over chilled cheesecake layer. Sprinkle with chopped pistachios. Cut into bars and serve.
Notes
You can customize the seasonings to taste.
- Prep Time: 15 minutes
- Cook Time: 30 minutes
- Method: Main
- Cuisine: American