Roasted Beet Blue Cheese Towers with Pear and Balsamic Glaze: A Showstopping Salad
If you want a dish that looks like it came straight out of a fine dining kitchen, these Roasted Beet Blue Cheese Towers with Pear and Balsamic Glaze deliver exactly that. This recipe stacks sweet roasted beets, creamy blue cheese, and juicy pear into elegant little towers that wow every guest at the table. Even better, the roasted beet blue cheese towers come together with just a handful of fresh ingredients and a drizzle of rich balsamic glaze. Whether you serve them as a starter, a side, or a light main course, these towers bring color, flavor, and drama to any plate. The combination of earthy beets, tangy cheese, and sweet pear creates a balance that feels both sophisticated and comforting at the same time.
The first time you bite into a roasted beet blue cheese tower, the flavors hit you in layers. The natural sweetness of the beets pairs beautifully with the salty punch of blue cheese. Meanwhile, the pear adds a crisp, juicy contrast that keeps every bite refreshing. A glossy balsamic glaze ties everything together with a tangy, slightly sweet finish. This is the kind of recipe that makes people think you spent hours in the kitchen, yet it only takes about an hour from start to finish. That makes roasted beet blue cheese towers a smart choice for dinner parties, holiday gatherings, or even a fancy weeknight treat.
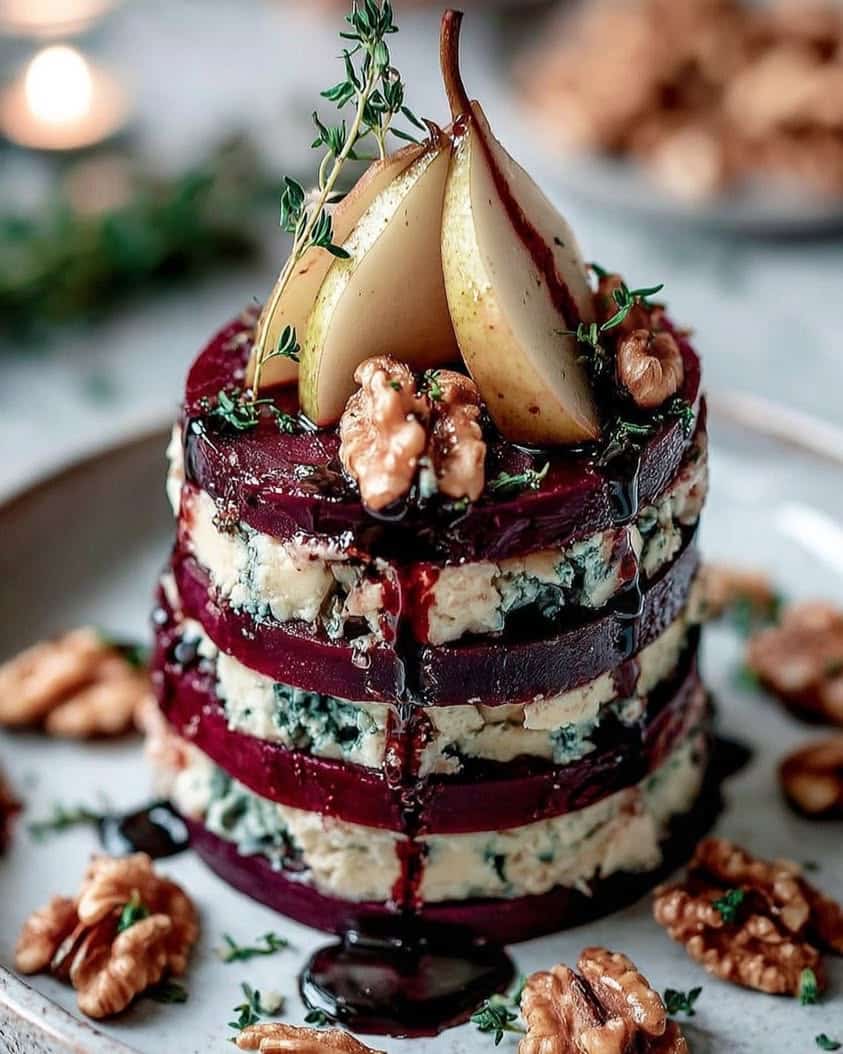
Beyond the taste, this recipe offers serious visual appeal. The deep ruby color of the beets against the white and blue veins of the cheese creates a striking contrast. Slices of pale pear add a soft, golden touch on top. When you finish the tower with a shiny ribbon of balsamic glaze, the whole plate looks like a work of art. Home cooks of almost any skill level can master this dish with a little patience and the right techniques. So grab your apron, preheat the oven, and get ready to build a plate that your family and friends will talk about for weeks.
Quick Recipe Highlights
- Flavor Profile: These roasted beet blue cheese towers blend earthy sweetness from the beets with the bold, salty tang of blue cheese. The pear adds a bright, fruity note that lifts the whole dish. A balsamic glaze brings a syrupy, slightly acidic finish that rounds out every bite.
- Texture: You get a lovely mix of textures here. The roasted beets turn tender and almost buttery, while the pear stays crisp and juicy. Creamy blue cheese melts slightly against the warm beets, and the glaze adds a silky coating that ties it all together.
- Aroma: Roasting the beets fills your kitchen with a deep, sweet, earthy scent. Once you add the blue cheese and balsamic glaze, the aroma turns rich and tangy. Fresh herbs like thyme or chives add a light, green note at the end.
- Visual Appeal: The deep ruby red of the beets contrasts beautifully with the pale, creamy blue cheese. Golden pear slices add brightness on top. A dark, shiny drizzle of balsamic glaze makes the whole tower look polished and restaurant worthy.
- Skill Level Needed: This recipe suits a confident home cook who is comfortable roasting vegetables and assembling layered plates. You do not need advanced culinary training. However, you should handle the beets gently so the towers stay upright and neat.
- Special Equipment: You need a sharp knife, a cutting board, a sheet pan, and parchment paper. A small cookie cutter or ring mold helps shape perfect towers, but you can build them freehand too. A small saucepan works well for reducing the balsamic glaze.
Recipe Overview
- Difficulty Level: I rate this recipe as intermediate because it involves a few key steps that need attention. Roasting the beets takes time, and you must slice them evenly for stable towers. Assembling the layers gently also requires a steady hand. Still, the process is straightforward, and most home cooks can handle it with ease.
- Category: This dish works as a starter, a side salad, or a light main course. It fits beautifully into a multi course dinner as an elegant appetizer. You can also serve it as a hearty lunch with crusty bread on the side.
- Cuisine: The recipe draws from modern American and French bistro traditions. Roasted beet and blue cheese salads appear often on farm to table menus across the United States. The stacked presentation reflects contemporary plating styles. The balsamic glaze nods to Italian cooking as well.
- Cost: You can expect to spend about twelve to eighteen dollars to serve four people. Beets cost very little, especially in season. Blue cheese and good balsamic vinegar make up most of the expense. Pear and fresh herbs add just a few more dollars.
- Season: Fall and winter suit this recipe best because beets and pears peak during those months. That said, you can find good beets year round in most U.S. grocery stores. The dish feels especially cozy during the holidays.
- Occasion: Serve these towers at dinner parties, Thanksgiving, Christmas, or New Year’s Eve. They also work well for elegant brunches and romantic date nights. Because they look impressive, they make a great potluck contribution too.
Why You’ll Love This Recipe
First, the taste and texture of these roasted beet blue cheese towers truly stand out. Each layer brings something different to the plate. The beets offer a natural, caramelized sweetness that deepens as they roast. The blue cheese delivers a bold, salty kick that cuts through the sugar. Then the pear arrives with a crisp, refreshing juiciness. Finally, the balsamic glaze adds a tangy, syrupy note that harmonizes everything. This balance of sweet, salty, tangy, and fresh keeps you coming back for more. Few salads deliver this kind of complexity, and that is exactly why this recipe earns a spot in your regular rotation.
Second, the convenience of this recipe makes it a joy to prepare. You only need six main ingredients, and most of them keep well in the fridge. The oven does most of the work while you prepare the glaze and slice the pear. Cleanup stays minimal because you roast the beets on a single sheet pan. You can also roast the beets a day or two ahead and assemble the towers right before serving. That flexibility takes the stress out of entertaining, and it lets you focus on your guests instead of the stove.
Third, the nutritional advantages give you plenty of reasons to feel good about this dish. Beets pack fiber, folate, and antioxidants that support heart health. Pears add vitamin C and more fiber to keep you full. Blue cheese offers protein and calcium, though in smaller amounts. Olive oil brings healthy fats that help your body absorb the nutrients. Overall, these roasted beet blue cheese towers deliver a satisfying, nutrient dense option that fits a balanced diet.
Fourth, the social and entertaining value of this recipe is hard to beat. These towers look impressive on the plate, so guests always react with delight. The individual portions make serving easy, and each person gets a beautiful presentation. You can build the towers in advance and keep them chilled until the moment you plate them. That means you spend less time in the kitchen and more time enjoying conversation. Hosting feels effortless when a dish this elegant comes together so smoothly.
Fifth, this recipe proves remarkably cost effective and accessible. Beets rank among the most affordable root vegetables at any grocery store. Pears cost little, especially in fall. A small wedge of blue cheese goes a long way because the flavor is so bold. Good balsamic vinegar is the priciest item, but a little drizzle is all you need. When you compare the cost to a restaurant version of this dish, you save a lot of money while enjoying the same wow factor at home.
Historical Background and Cultural Significance
The origin story of this dish traces back to European peasant cooking, where beets and blue cheese were everyday staples. Farmers in France, Italy, and Eastern Europe grew beets for their hardy nature and long storage life. Blue cheese developed naturally in caves where milk curds aged and formed distinct veins. Cooks paired these two ingredients because they complemented each other so well. Over time, the combination moved from rustic farm tables to elegant city restaurants, where chefs refined the presentation into the stacked towers we know today.
Culturally, beets carry deep significance in many regions. In Eastern Europe, borscht made beets a symbol of home and comfort. In France, roasted beets often appear in classic salads with goat cheese or blue cheese. The pear brings its own history as a fruit prized since ancient Rome. Balsamic vinegar, meanwhile, originated in Modena, Italy, where families aged it for decades in wooden barrels. Together, these ingredients tell a story of European culinary tradition that crossed the Atlantic and evolved into modern American farm to table cuisine.
The evolution of this recipe reflects broader changes in how Americans eat. During the 1980s and 1990s, chefs began stacking salads into tall, architectural presentations. This style turned simple ingredients into visual centerpieces. Roasted beet and blue cheese salads became a staple on bistro menus across the country. Home cooks soon adapted the idea, and the stacked tower format made its way into cookbooks and food magazines. Today, the dish feels both classic and contemporary at once.
Regional variations abound across the United States and Europe. In California, chefs often add candied walnuts and arugula. In the Midwest, cooks might use local honey in the glaze. French versions sometimes feature walnut oil and fresh chives. Italian cooks may drizzle aged balsamic straight from Modena. Some variations swap the pear for apple or fig. No matter the region, the core idea stays the same. Sweet beets, bold blue cheese, and a tangy glaze create a combination that transcends borders and seasons.
Ingredient Deep Dive
Beets form the heart of this recipe, and they carry rich cultural significance around the world. Ancient Greeks and Romans cultivated beets for their leaves before people valued the roots. Over centuries, cooks in Europe and Asia learned to roast and pickle the roots for winter storage. Today, beets symbolize healthy, earthy cooking in many cultures. Nutritionally, they deliver fiber, folate, potassium, and powerful antioxidants called betalains. These compounds support heart health and may reduce inflammation. When you select beets, choose firm roots with smooth skin and no soft spots. Smaller beets tend to be sweeter and more tender than large ones. Store beets in a cool, dark place or in the fridge for up to two weeks. If you cannot find fresh beets, you can substitute pre cooked beets, though the flavor will differ slightly.
Blue cheese brings bold character and a long history to this dish. People have made blue cheese for centuries in caves where natural molds created the famous blue veins. Roquefort from France and Gorgonzola from Italy rank among the most famous varieties. In the United States, Maytag blue cheese from Iowa has earned a loyal following. Nutritionally, blue cheese offers protein, calcium, and vitamin B12, though it is high in fat and sodium, so a little goes a long way. When you shop, look for cheese with even veining and a creamy texture. Avoid cheese that smells overwhelmingly of ammonia, as that signals spoilage. Wrap blue cheese tightly in foil or plastic and store it in the fridge for up to two weeks. If you dislike blue cheese, you can substitute goat cheese, feta, or even a sharp white cheddar.
Pears add a crisp, juicy contrast that lifts the whole dish. Pears have grown in Europe and Asia for thousands of years, and colonists brought them to North America in the 1600s. Today, pears symbolize autumn harvests and holiday tables across the United States. Nutritionally, pears provide fiber, vitamin C, and antioxidants that support digestion and immune health. When you choose pears, look for firm fruit with smooth skin and no bruises. Bartlett, Anjou, and Bosc all work well in this recipe. Store pears at room temperature until ripe, then move them to the fridge to slow ripening. If pears are out of season, apples or figs make excellent substitutes.
Balsamic vinegar transforms into a rich, syrupy glaze that ties the dish together. This vinegar originated in Modena, Italy, where families have aged it in wooden barrels for centuries. Traditional balsamic carries protected status and commands high prices, but everyday balsamic works fine for glazes. Nutritionally, balsamic vinegar contains small amounts of antioxidants and may support blood sugar control. When you shop, look for vinegar with no added caramel color or thickeners. Store balsamic in a cool, dark cabinet for years. If you want a shortcut, you can buy pre made balsamic glaze, though homemade tastes fresher and lets you control the sweetness.
Common Mistakes to Avoid
- Overcooking the beets until they turn mushy. Mushy beets cannot hold their shape in a tower, so they collapse under the weight of the cheese and pear. Roast them until a knife slides in with slight resistance, not until they fall apart.
- Undercooking the beets so they stay hard and crunchy. Raw beets taste bitter and feel unpleasant to chew. Always test doneness with a sharp knife before slicing.
- Slicing the beets unevenly. Uneven slices create wobbly towers that tip over on the plate. Use a sharp knife and take your time to cut each slice to a similar thickness.
- Skipping the glaze reduction. Thin balsamic vinegar runs right off the tower and soaks the plate. Reduce it on the stove until it coats the back of a spoon.
- Using cold blue cheese straight from the fridge. Cold cheese crumbles and tears the beets. Let the cheese sit at room temperature for fifteen minutes before assembling.
- Building the towers too far in advance. The beets release juice over time, which makes the towers slide apart. Assemble them within thirty minutes of serving for the best results.
- Choosing pears that are too ripe. Soft pears turn to mush under the weight of the tower. Pick firm but ripe pears that hold their shape when sliced.
- Forgetting to season each layer. A pinch of salt and pepper between layers makes a big difference in the final flavor. Do not rely on the glaze alone for seasoning.
- Dressing the plate too heavily. A pool of glaze or oil looks messy and overwhelms the delicate towers. Drizzle lightly and let the towers shine.
- Rushing the cooling step. Hot beets steam and soften the cheese, which ruins the texture. Let the roasted beets cool to room temperature before building.
Essential Techniques
Roasting beets properly is the foundation of this recipe, so take time to master it. Roasting concentrates the natural sugars and deepens the earthy flavor in ways boiling never can. Start by scrubbing the beets clean and trimming the tops, then wrap each one loosely in foil. Place them on a sheet pan and roast at 400 degrees Fahrenheit for about forty minutes. You will know they are done when a knife slides in with gentle resistance. Common pitfalls include overcrowding the pan and skipping the foil, which leads to dry, tough beets. Visual cues matter here, so look for slightly wrinkled skin and a fork tender center before you pull them from the oven.
Reducing balsamic vinegar into a glaze is the next essential skill. This step transforms thin, acidic vinegar into a sweet, syrupy ribbon that clings to every layer. Pour one cup of balsamic vinegar into a small saucepan and bring it to a gentle simmer over medium heat. Stir occasionally and watch closely, because the vinegar can burn in seconds once it thickens. You will know the glaze is ready when it coats the back of a spoon and leaves a clear line when you draw your finger through it. Common pitfalls include boiling too hard and walking away from the pan. If the glaze turns bitter, you have cooked it too long, so start over with fresh vinegar.
Slicing beets evenly is a simple technique that makes a big difference in presentation. Even slices create stable towers that stand tall and look polished. Use a sharp chef’s knife and cut each beet into quarter inch rounds. Hold the beet steady with your fingertips curled inward to protect them. You will know your slices are even when they stack without wobbling. Common pitfalls include using a dull knife, which crushes the beets instead of cutting them. Visual cues help here, so check that every slice looks uniform in thickness before you begin building the towers.
Assembling the towers gently requires patience and a steady hand. Start with the largest beet slice as your base, then layer cheese, pear, and another beet slice on top. Press down lightly between layers so everything holds together. You will know the tower is stable when it stands on its own without support. Common pitfalls include stacking too quickly and pressing too hard, which squishes the cheese. Visual cues matter, so check that each layer sits flat and centered before adding the next one. A small ring mold can help if you struggle with freehand stacking.
Pro Tips for Perfect Roasted Beet Blue Cheese Towers
- Roast the beets a day ahead and store them in the fridge. This saves time on the day you serve and lets the flavors deepen overnight.
- Use a mandoline slicer for perfectly even beet rounds. Even slices create stable towers that look professional on the plate.
- Warm the blue cheese slightly before assembling. Room temperature cheese spreads more easily and holds the layers together.
- Toss the pear slices in a little lemon juice to prevent browning. This keeps them looking fresh and bright on the plate.
- Drizzle the glaze at the very last moment. This prevents the beets from bleeding color into the glaze and keeps the presentation clean.
- Add a handful of toasted walnuts or pistachios for crunch. Nuts bring texture contrast and pair beautifully with blue cheese.
- Season each layer with a pinch of flaky sea salt and cracked pepper. Layered seasoning makes every bite taste balanced.
- Chill the assembled towers for ten minutes before serving. This helps them hold their shape when you move them to plates.
Variations and Adaptations
Regional variations offer endless ways to make this dish your own. In the American South, cooks sometimes add candied pecans and a drizzle of sorghum. In New England, maple syrup replaces some of the balsamic for a deeper autumn flavor. French versions often feature walnuts and a light walnut oil dressing. Italian cooks may use aged balsamic and shaved Parmigiano instead of blue cheese. Each region brings its own pantry staples and traditions to the plate. Try a few versions to discover which one suits your taste best.
Seasonal adaptations keep this recipe fresh all year long. In fall, use ripe Bartlett pears and add roasted squash cubes. In winter, swap in apples and pomegranate seeds for color and crunch. Spring calls for fresh strawberries and a lighter vinaigrette. Summer welcomes peaches and a squeeze of fresh lime. Adjusting the fruit and garnish to match the season keeps the dish exciting and lets you shop locally.
Dietary modifications make this recipe accessible to almost everyone. For a dairy free version, use a plant based cheese or skip the cheese entirely and add avocado. For a vegan option, replace blue cheese with cashew based cheese and use maple syrup in the glaze. For gluten free needs, this recipe already qualifies since none of the core ingredients contain gluten. Just check labels on any added nuts or garnishes to be safe.
Flavor variations let you play with the profile of the dish. Add a teaspoon of honey to the glaze for extra sweetness. Stir in a little Dijon mustard for tang. Sprinkle fresh thyme or chives between layers for a green, herbal note. A pinch of smoked paprika adds warmth and depth. Each tweak shifts the balance slightly, so taste as you go and adjust.
Texture modifications can make the dish crunchier or creamier. Add toasted seeds like pumpkin or sunflower for extra crunch. Swap the pear for crisp apple if you want more bite. Use a softer cheese like Brie for a creamier mouthfeel. Toasted breadcrumbs sprinkled on top add a pleasant crispness that contrasts the smooth glaze. Play with these ideas to find your perfect combination.
Presentation alternatives let you rethink the classic tower shape. Instead of stacking, arrange the ingredients in a fan on the plate. You can also serve the components in small lettuce cups for a handheld version. A flat lay on a large platter works well for buffets. Some cooks layer everything in a clear glass for a parfait style look. No matter the shape, the flavors stay just as delicious.
Serving and Presentation Guide
Plating techniques make or break the visual impact of these towers. Place each tower in the center of a white or light colored plate so the colors pop. Use a small offset spatula to lift the towers gently without disturbing the layers. Leave plenty of empty space around each tower so the presentation feels clean. Wipe the rim of the plate with a damp cloth before serving. A neat plate makes the dish look restaurant quality.
Garnishing ideas elevate the dish with minimal effort. Scatter fresh arugula or microgreens around the base for a pop of green. Sprinkle chopped chives or thyme over the top for color and aroma. Add a few toasted walnuts or pistachios for texture. A light dusting of cracked black pepper finishes the plate nicely. Keep garnishes simple so they enhance the towers rather than distract.
Traditional accompaniments round out the meal. Crusty bread or baguette slices work well for soaking up extra glaze. A light green salad with a lemon vinaigrette balances the richness of the cheese. Roasted chicken or grilled steak turn this starter into a full dinner. For a vegetarian spread, pair the towers with a hearty grain salad or creamy soup.
Modern serving suggestions bring a fresh twist to the table. Try serving the towers on a bed of whipped ricotta for a creamy base. Add a swirl of honey and balsamic on the plate for a decorative touch. Some hosts plate the towers on slate tiles for a rustic, modern look. Small tasting portions in shot glasses make elegant passed appetizers at parties.
Temperature considerations matter when you serve this dish. The beets taste best at room temperature or slightly warm. Cold beets lose some of their sweetness and feel less inviting. The cheese should be cool but not ice cold, since cold mutes its flavor. Assemble the towers within thirty minutes of serving so every element stays at its peak.
Portion control tips help you serve the right amount to each guest. One tower per person works well as an appetizer or side. For a main course, serve two towers with a grain side and crusty bread. If you host a buffet, plan on one and a half towers per guest to account for seconds. Adjust the number based on the rest of your menu.
Wine and Beverage Pairing
Wine pairings can turn this dish into a truly memorable experience. A crisp Sauvignon Blanc cuts through the creamy blue cheese and balances the sweet beets. For red wine lovers, a light Pinot Noir offers soft tannins that complement the earthy flavors. Sparkling wine like Champagne or Prosecco brings bright acidity that refreshes the palate between bites. A dry Rosé also works beautifully, especially in warmer months. Avoid heavy, tannic reds, as they overpower the delicate balance of the dish.
Non alcoholic alternatives keep the meal accessible to everyone at the table. Sparkling water with a splash of pomegranate juice adds a festive touch. Chilled hibiscus tea brings a tart note that mirrors the balsamic glaze. Apple cider, especially in fall, pairs naturally with roasted beets and pears. Ginger beer offers a spicy kick that stands up to the bold blue cheese. Serve any of these in a wine glass for a special feel.
Coffee and tea pairings work surprisingly well with this recipe. A light roasted coffee brings out the earthy notes in the beets. Earl Grey tea offers a citrusy bergamot note that lifts the pear. Green tea provides a clean, grassy flavor that balances the richness of the cheese. For an after dinner version, serve the towers with a small espresso. The bitterness of the coffee contrasts nicely with the sweet glaze.
Temperature considerations apply to beverages too. Serve white wine and sparkling options well chilled, around forty five to fifty degrees Fahrenheit. Red wines taste best slightly below room temperature, around sixty degrees. Non alcoholic drinks should be served cold over ice unless you prefer them warm. The right temperature makes every sip more enjoyable.
Serving suggestions for beverages include thoughtful glassware and presentation. Use stemmed glasses for wine to keep hands from warming the bowl. Serve sparkling drinks in flutes for a festive look. Offer water in a clear pitcher with lemon slices for a clean, refreshing option. Small details like these make the whole meal feel considered and elegant.
Storage and Shelf Life
Storage methods matter if you want to enjoy leftovers safely. Store the roasted beets and blue cheese separately in airtight containers. Keep the pear slices in a bowl with a little lemon juice to prevent browning. The balsamic glaze keeps well in a sealed jar at room temperature. Never store assembled towers, because they fall apart and release too much juice. Keeping components separate lets you rebuild fresh towers the next day.
Temperature requirements play a key role in food safety. Store beets and cheese in the refrigerator at forty degrees Fahrenheit or below. The glaze can stay in a cool, dark cabinet for several weeks. Pear slices should stay refrigerated and used within two days. Never leave dairy products at room temperature for more than two hours, as bacteria grow quickly.
Container recommendations help maintain quality. Use glass containers with tight fitting lids for the beets so they do not stain plastic. Wrap blue cheese in foil or wax paper, then place it in a zip top bag. Store the glaze in a small glass jar with a lid. Keep pear slices in a shallow container so they do not bruise under their own weight.
Signs of spoilage help you know when to toss leftovers. Beets that smell sour or feel slimy have gone bad. Blue cheese that shows fuzzy green or black mold beyond the natural veins should be discarded. Pear slices that turn brown and mushy no longer taste good. The glaze stays safe for weeks, but toss it if you see any film on the surface.
Reheating instructions keep the beets tasting fresh. Warm them gently in a skillet over low heat or in the microwave for thirty seconds. Avoid high heat, which dries them out and makes them tough. The blue cheese should stay at room temperature and never be reheated. The pear stays cold and crisp, so add it fresh each time.
Freezing guidelines help you plan ahead. You can freeze roasted beets for up to three months in a freezer safe bag. Thaw them in the fridge overnight before using. Do not freeze blue cheese, because the texture turns crumbly and grainy. The glaze freezes well in small portions, and it thaws quickly at room temperature. Pear should never be frozen for this recipe since it turns mushy.
Make Ahead Strategies
A smart prep timeline makes entertaining stress free. Roast the beets up to three days ahead and store them in the fridge. Make the balsamic glaze up to a week in advance and keep it in a jar. Slice the pear the morning of your event and toss it in lemon juice. Assemble the towers within thirty minutes of serving. This staggered approach keeps you calm and organized.
Storage between steps protects quality and flavor. Keep the beets in a sealed container so they do not dry out. Store the glaze at room temperature so it stays pourable. Keep the cheese wrapped tightly to prevent it from absorbing fridge odors. Pear slices need their own container to avoid getting crushed.
Quality impact assessment helps you decide what to prep early. Roasted beets actually taste better after a day in the fridge, since the flavors deepen. The glaze holds up perfectly for a week. Blue cheese stays fresh for up to two weeks if wrapped well. Pear loses quality quickly, so slice it as close to serving as possible.
Assembly tips keep the final build quick and clean. Set up a workstation with all components within reach. Use a small ring mold if you want perfectly round towers. Build from largest to smallest slice for stability. Work on a parchment lined tray so you can move the towers easily.
Reheating guidelines keep the dish tasting fresh. Warm the beets briefly in a skillet or microwave before building. Serve the cheese at room temperature for the best flavor. Never reheat the pear or the glaze, since both taste best fresh. If you must reheat, do it gently and only once.
Fresh element additions bring new life to make ahead components. Add fresh herbs like chives or thyme right before serving. Sprinkle toasted nuts on top for crunch. Drizzle the glaze at the last moment so it stays glossy. A squeeze of lemon over the pear brightens the whole plate.
Scaling Instructions
Halving the recipe works easily for smaller gatherings. Use two beets, half the cheese, one pear, and half a cup of balsamic vinegar. The cook time stays the same for roasting, since smaller batches roast at the same rate. Adjust the glaze reduction time slightly, since less liquid evaporates faster. Watch the pan closely to avoid burning.
Doubling or tripling the recipe suits larger parties. Use two sheet pans so the beets roast in a single layer. Increase the glaze amount but reduce it in batches so it does not overflow the pan. Buy extra pears and cheese, and plan for more assembly time. Larger batches need more hands, so recruit a friend to help build the towers.
Equipment adjustments keep the process smooth when you scale. Use a second sheet pan when roasting more than six beets. Grab a larger saucepan for bigger batches of glaze. A second cutting board helps when slicing many beets at once. Small changes like these keep the workflow efficient.
Timing modifications matter when you cook in larger quantities. Roasting time stays similar, but cooling takes longer with more beets on the tray. Glaze reduction moves faster in small batches, so plan accordingly. Assembly time grows with each tower, so allow extra minutes before serving.
Storage considerations change with bigger batches. Use larger containers or multiple smaller ones for the roasted beets. Keep the glaze in a bigger jar with a tight lid. Store extra pear slices in shallow containers so they do not bruise. Label everything with dates so you use the oldest items first.
Nutritional Deep Dive
The macro breakdown of these roasted beet blue cheese towers offers a balanced profile. Each serving delivers roughly three hundred calories, twelve grams of fat, thirty grams of carbohydrates, and nine grams of protein. The beets and pear provide most of the carbs, while the blue cheese and olive oil supply the fat. Protein comes mainly from the cheese. These numbers make the dish a satisfying starter or light main course.
Micronutrient analysis reveals plenty of health perks. Beets deliver folate, manganese, and potassium, along with antioxidants called betalains. Pears add vitamin C, copper, and more fiber. Blue cheese brings calcium, phosphorus, and vitamin B12. Olive oil provides vitamin E and healthy monounsaturated fats. Together, these nutrients support heart health, digestion, and immune function.
Health benefits extend beyond basic nutrition. The fiber in beets and pears supports gut health and helps you feel full. Antioxidants in beets may reduce inflammation and support liver function. The healthy fats in olive oil help your body absorb fat soluble vitamins. Blue cheese offers probiotics in some varieties, which support a healthy microbiome.
Dietary considerations matter for people with specific needs. This recipe is naturally gluten free and vegetarian. It contains dairy, so it does not suit vegan or dairy free diets without swaps. The sodium content comes mostly from the blue cheese, so watch portions if you monitor salt intake. The natural sugars from beets and pear are moderate and balanced by fiber.
Portion analysis helps you fit the dish into your daily plan. One tower makes a light appetizer at around one hundred fifty calories. Two towers with a grain side create a full meal around four hundred fifty calories. Adjust portions based on your goals and the rest of your menu. The dish fits well into most balanced eating plans.
Weight management tips help you enjoy the dish without overindulging. Use a lighter hand with the blue cheese to cut calories and fat. Skip the olive oil drizzle and rely on the glaze for moisture. Add extra arugula to bulk up the plate with few calories. Choose smaller beets so each tower stays modest in size.
Dietary Adaptations
Gluten free eaters can enjoy this recipe without any changes. The core ingredients contain no wheat, barley, or rye. Just check labels on any added nuts, crackers, or garnishes. Some blue cheeses contain added ingredients that might include gluten, so read the label. Serve with gluten free bread if you want a side.
Dairy free versions swap the blue cheese for a plant based alternative. Cashew based cheese spreads work well and bring a creamy texture. Nutritional yeast adds a savory, cheesy flavor without dairy. Coconut oil can replace the butter in the glaze if you use any. The rest of the recipe stays the same.
Vegan adaptations go a step further and remove all animal products. Use a cashew cheese or a store bought vegan blue cheese. Replace honey with maple syrup if your glaze calls for it. Olive oil already fits a vegan diet. The result tastes surprisingly close to the original.
Low carb and keto versions reduce the sugar from the pear and the glaze. Swap the pear for cucumber slices or skip it entirely. Use a sugar free sweetener in the glaze and reduce it carefully. Blue cheese fits keto well since it is low in carbs. These tweaks keep the dish within your macros.
Paleo followers can enjoy this recipe with a few swaps. Choose a blue cheese made from raw milk if available, or use a paleo friendly nut cheese. Skip any added sugar in the glaze and Print
Roasted Beet Blue Cheese Towers with Pear & Balsamic Glaze
- Total Time: 1 hour 15 minutes
- Yield: 4
Description
A stunning and elegant appetizer or salad course featuring layers of roasted beets, creamy blue cheese, and sweet pear, finished with a tangy balsamic glaze. Perfect for impressing guests at any dinner party.
Ingredients
- 3 medium beets, roasted, peeled, and sliced into 1/4-inch rounds
- 4 oz blue cheese, crumbled
- 1 ripe but firm pear, cored and thinly sliced
- 1/4 cup balsamic vinegar
- 2 tablespoons honey
- 2 tablespoons extra-virgin olive oil
- Salt and freshly ground black pepper, to taste
- Fresh arugula or microgreens, for garnish (optional)
Instructions
- Preheat oven to 400°F (200°C). Wrap beets in foil and roast for 45-60 minutes, until tender when pierced with a knife. Let cool, then peel and slice into 1/4-inch rounds.
- In a small saucepan, combine balsamic vinegar and honey. Bring to a simmer over medium heat and cook until reduced by half and syrupy, about 5-7 minutes. Set aside to cool.
- To assemble towers, place a beet slice on a plate. Top with a slice of pear and some crumbled blue cheese. Repeat layers, finishing with a beet slice on top. Drizzle with olive oil and balsamic glaze. Season with salt and pepper. Garnish with arugula or microgreens if desired.
Notes
You can customize the seasonings to taste. For a variation, try adding toasted walnuts or pecans between layers for extra crunch.
- Prep Time: 15 minutes
- Cook Time: 1 hour
- Method: Appetizer
- Cuisine: American