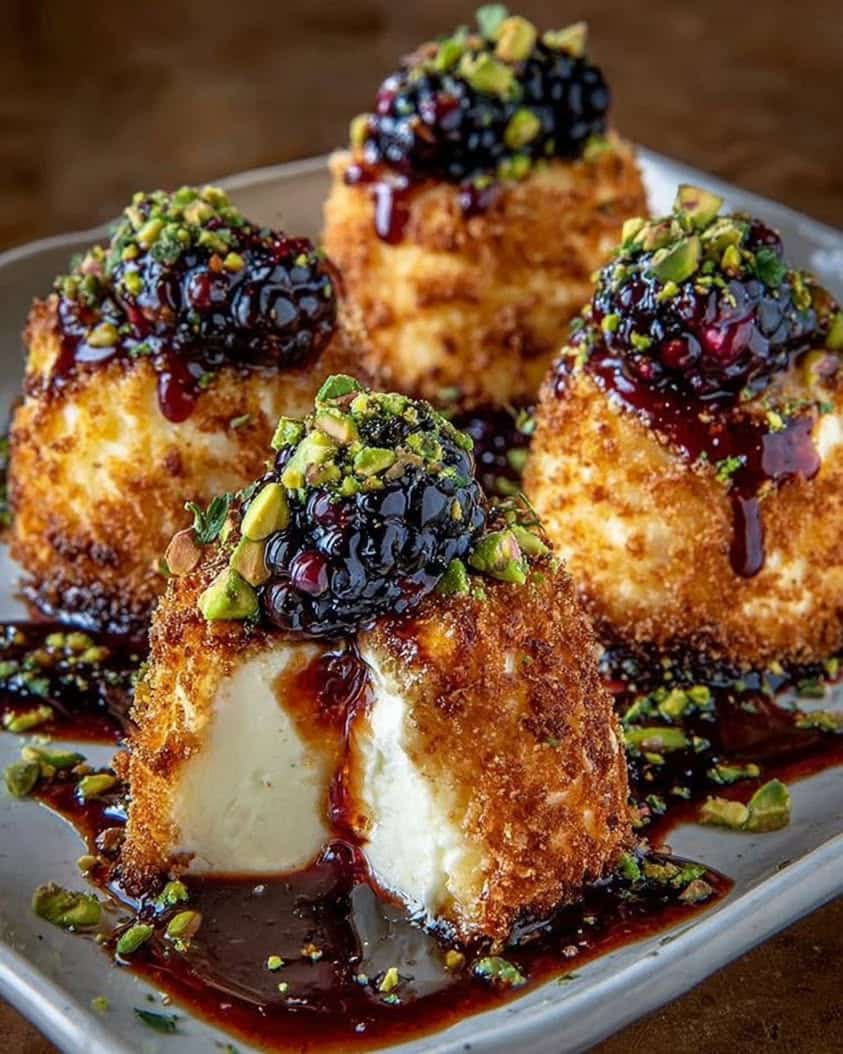
Crispy Hot Honey Lemon Feta Chicken Tenders: A Perfect Weeknight Dinner
Welcome to a weeknight dinner that completely transforms your expectations of chicken tenders. These Crispy Hot Honey Lemon Feta Chicken Tenders deliver an unforgettable combination of textures and flavors. You get a shatteringly crisp coating, tender and juicy chicken inside, and a glossy, tangy, sweet, and spicy glaze that clings to every bite. The finishing touch is a generous crumble of salty, creamy feta cheese that melts slightly from the heat, creating a truly crave-worthy experience. This is not your average chicken finger recipe; it is a bold, restaurant-quality dish you can easily make at home.
The magic of this dish lies in its perfect balance. The hot honey provides a gentle, building warmth that never overpowers the bright acidity of fresh lemon juice. The feta cheese adds a briny, tangy richness that cuts through the sweetness and heat beautifully. Each element works in harmony, creating a flavor profile that is complex yet incredibly approachable. The aroma that fills your kitchen as these tenders bake or fry is intoxicating, promising a meal that is both comforting and exciting. This recipe is designed to be a crowd-pleaser, equally suitable for a busy Tuesday night or a casual weekend gathering with friends.
When you bite into these tenders, the first sensation is the audible crunch of the perfectly browned breading. This gives way to the supremely moist and flavorful chicken, which has been seasoned to perfection. The warm, sticky glaze immediately coats your palate with a wave of sweetness and spice, followed by a bright, zesty finish from the lemon. Finally, the creamy, salty feta melts on your tongue, adding a decadent layer that ties everything together. This dish is a full sensory journey, and it will have everyone at the table reaching for more. Prepare to see chicken tenders in a whole new light after you try these Crispy Hot Honey Lemon Feta Chicken Tenders.
Quick Recipe Highlights
- Flavor Profile: The taste is a masterful blend of sweet, spicy, tangy, and savory. Hot honey provides the initial sweetness and a slow-building warmth, while fresh lemon juice adds a bright, citrusy acidity. The feta cheese contributes a salty, tangy, and creamy counterpoint that balances the bold, sticky glaze.
- Texture: You will experience a symphony of textures. The exterior is exceptionally crunchy and offers a satisfying, audible crackle. Inside, the chicken remains incredibly tender, juicy, and moist. The salty feta crumbles are soft and creamy, providing a delightful contrast to the crispy chicken and the sticky sauce.
- Aroma: The primary aromatic notes are sweet and spicy honey, bright and zesty lemon, and the savory, salty scent of garlic and herbs. As the chicken bakes, the aroma of golden, fried chicken fills the kitchen, promising a hearty and satisfying meal.
- Visual Appeal: The finished dish is vibrantly appetizing. The chicken tenders are a deep, golden brown, coated in a glossy, amber-colored hot honey sauce. A generous garnish of bright white feta cheese crumbles and a sprinkle of fresh, green parsley or chives creates a beautiful, rustic presentation that is hard to resist.
- Skill Level Needed: This recipe is excellent for beginner and intermediate home cooks. The steps are straightforward, and the ingredients are common. Success depends on proper coating and baking technique, but the instructions are easy to follow, making it an ideal recipe for building confidence in the kitchen.
- Special Equipment: You will need a large baking sheet, wire cooling rack, and three shallow bowls for the breading station. A good set of tongs simplifies the coating process. A small saucepan is helpful for making the hot honey glaze.
Recipe Overview
- Difficulty Level: The recipe is rated as easy because the preparation involves simple techniques like breading and baking. There is no deep-frying required, which reduces mess and skill requirements, and the glaze is a simple sauce that comes together in minutes. Even a novice cook can achieve professional, crispy results by following the instructions for baking on a wire rack.
- Category: This dish falls perfectly under main course entrees, but it also excels as a hearty appetizer or party snack. It fits the American comfort food category while incorporating Mediterranean-inspired flavors from the feta and lemon. It is a versatile recipe that works for lunch, dinner, or game-day gatherings.
- Cuisine: The primary culinary tradition is American, with strong Mediterranean influences. The use of chicken tenders, breading, and a spicy-sweet glaze is distinctly American. However, the addition of salty feta cheese and bright lemon juice clearly draws from Greek and Mediterranean flavor profiles, creating a unique fusion dish.
- Cost: The recipe is very cost-effective. Chicken tenders are generally an affordable cut of poultry, and pantry staples like flour, breadcrumbs, honey, and lemon juice are inexpensive. Feta cheese can be slightly more expensive but is used in a moderate amount to add significant flavor, making this a budget-friendly option for a delicious meal.
- Season: While delicious year-round, this dish is especially perfect for late spring and summer. The bright, tangy lemon and salty feta flavors feel lighter and more refreshing, making it an ideal pairing for fresh salads and grilled vegetables served outdoors. The sweet and spicy glaze also complements summer cocktails perfectly.
- Occasion: These tenders are perfect for a wide range of occasions. They are a fantastic, quick weeknight dinner for the family. Additionally, they shine as a fun, interactive entree for casual get-togethers or as a crowd-pleasing appetizer for game-day parties and movie nights. They are easy to scale for a cookout.
Why You’ll Love This Recipe
The taste and texture appeal is simply undeniable. The contrast between the shatteringly crisp coating and the juicy, tender chicken is a classic for a reason. The real magic, though, is the complex sauce. The hot honey adds a sweet heat that is both comforting and exciting. The lemon cuts through the richness with a bright, clean burst of acidity, while the salty, creamy feta creates a luxurious finish. It is a multi-layered flavor explosion that will challenge your preconceptions about chicken tenders.
Convenience and preparation benefits are huge advantages of this recipe. The entire process from start to finish takes only about 35 minutes, which makes it a perfect choice for busy weeknights. Moreover, most of the ingredients are common pantry staples. The method is straightforward, requiring no special culinary skills. You can even prep the chicken in advance and refrigerate it, making the final cooking step incredibly quick and easy. It is a reliable dinner solution that minimizes stress in the kitchen.
Nutritional advantages make this a smarter choice than traditional fried chicken. Since we bake the tenders on a wire rack, they achieve a perfect crunch without being submerged in a deep fryer. This significantly reduces the fat and calorie content. Plus, the recipe uses high-protein chicken breast and incorporates healthy fats from the olive oil. Feta cheese provides calcium and protein. Compared to a fast-food alternative, this meal is far more nutritious and satisfying, fitting easily into a balanced diet.
Social and entertaining value is another key reason to love this recipe. These chicken tenders are an absolute party magnet. They are easy to serve, appealing to both kids and adults, and are perfect for sharing. You can serve them as a main course with a side of fries and slaw, or cut them into smaller pieces and serve them on skewers at a cocktail party. They are a guaranteed conversation starter, and the unique flavor combination will impress your guests without requiring you to spend hours in the kitchen. They feel special.
Cost-effectiveness and accessibility make this a savvy choice. Chicken tenders are one of the most affordable proteins you can buy. The other ingredients are also very budget-friendly, including staples like flour, panko breadcrumbs, honey, and a lemon. A small block of feta cheese provides a big flavor punch for a modest price. This meal provides a high-value dining experience that tastes far more expensive than its ingredient list suggests, making it a great recipe for those looking to eat well without spending a lot of money.
Historical Background and Cultural Significance
The chicken tender itself is a relatively modern American invention. While fried chicken has deep roots in the American South, the specific idea of preparing and serving the small, tender strip of meat from the breast became popular in the late 20th century. Restaurants like the Anchor Bar in Buffalo may be famous for wings, but it was fast-food chains and casual dining spots in the 1980s and 1990s that popularized the chicken tender as a standalone menu item. It quickly became a staple of American comfort food, known for its kid-friendly appeal and ease of eating.
This recipe’s specific fusion of flavors reflects the modern, globalized nature of American cuisine. The hot honey trend, which combines sweet and spicy elements, gained massive popularity in the 2010s. It is a flavor profile that chefs have used to elevate everything from pizza to fried chicken. The use of feta cheese and lemon is a direct nod to Greek and Mediterranean culinary traditions, where these ingredients are paired to add brightness, saltiness, and tang. This recipe is a perfect example of how American kitchens freely borrow from other cultures to create new classics.
The evolution of this specific recipe is based on a desire for convenience without sacrificing flavor. Traditional fried chicken requires deep frying, which is messy, time-consuming, and less healthy. Home cooks and food bloggers began developing methods to achieve a similar crunch using the oven, perfecting the use of wire racks and high heat. The addition of a sticky, flavorful sauce that is easy to make on the stovetop was a natural progression. This recipe is part of a larger movement to make restaurant-quality food more accessible and healthier for the home cook.
Regional variations of this concept are now common across the United States. In the South, you might find these tenders served with a sweet tea or a creamy ranch dressing to cool the heat. In the Southwest, the cilantro and lime would likely replace the parsley and lemon, and a cotija cheese might substitute for the feta. In coastal regions, a fish or shrimp version of this recipe is a popular alternative. These variations show the incredible adaptability of the core concept, which allows for endless creativity based on local ingredients and personal tastes.
Ingredient Deep Dive
Feta cheese is the star of the Mediterranean-inspired finish. Its history dates back thousands of years, originating in Greece, where it is traditionally made from sheep’s milk or a mix of sheep and goat milk. It is protected by a PDO (Protected Designation of Origin) status in the European Union. Nutritionally, feta is an excellent source of calcium, protein, and B vitamins, and it contains probiotics that are beneficial for gut health. It is lower in fat than many other aged cheeses. For this recipe, look for a block of feta stored in brine, as it will be creamier and less dry than pre-crumbled feta. The brine also ensures the cheese retains its moisture and tangy flavor. You can store it in its brine in the refrigerator for several weeks.
Lemon juice provides the bright, acidic component that balances the sweetness and spice. The lemon is a hybrid citrus fruit that has been cultivated for centuries, likely originating in the Himalayan region. It is foundational to cuisines across the globe, from Italian to Persian. Nutritionally, lemons are a powerhouse of Vitamin C, which supports immune function and acts as an antioxidant. When selecting lemons, choose ones that are heavy for their size, as this indicates a higher juice content. The skin should be bright yellow and smooth. For the freshest juice, always roll the lemon on the counter under your palm before cutting to release the internal juices. You can store whole lemons at room temperature for up to a week, or in the refrigerator for longer.
Hot honey is a modern condiment that combines the sweetness of honey with the heat of chili peppers. This simple but brilliant combination has become incredibly popular for its ability to elevate simple dishes. The honey provides a deep, floral sweetness while the chili adds a slow-building, complex warmth that is not instantly overpowering. If you cannot find prepared hot honey, you can easily make your own by simmering a strong honey with a few dried red chili flakes or a splash of your favorite hot sauce. For this recipe, the hot honey creates the sticky, beautiful glaze that is the signature of the dish. Store any leftover hot honey in a sealed jar at room temperature for several months.
Chicken tenders are the central protein in this recipe. They are the small, tender muscle located at the inner side of the chicken breast. They are naturally tender and require minimal cooking time, which makes them perfect for quick recipes like this one. When selecting chicken tenders, look for packages that are plump, pink, and have a fresh, non-ammonia smell. They should be free of excess liquid or slime. If you cannot find pre-cut tenders, you can easily slice a chicken breast lengthwise into strips of even thickness. Storing chicken requires careful attention; keep it in the coldest part of your refrigerator and use it within a day or two of purchase, or freeze it flat in a freezer bag for up to three months.
Panko breadcrumbs are essential for achieving that extra-crispy texture. Unlike regular breadcrumbs, panko is made from bread without crusts, which creates larger, flakier crumbs that produce a lighter, crunchier coating when baked or fried. Panko originated in Japan and is a staple of Japanese cuisine, used for dishes like tonkatsu and katsu curry. To get the best results, toast the panko in a little olive oil before coating the chicken. This step is critical as it ensures the crumbs are already partially browned and will crisp up beautifully in the oven instead of steaming. You can find panko in the international aisle of most grocery stores.
Common Mistakes to Avoid
- Not drying the chicken thoroughly before breading is a common mistake. Excess moisture will prevent the flour from adhering properly, leading to a soggy coating. Always pat the chicken tenders completely dry with paper towels before you begin the breading process.
- Using a wet batter instead of a dry breading station is another frequent error. This recipe relies on a dry flour-egg-panko process to build the crunchy crust. A wet batter will not bake as crisply and can become chewy and heavy when baked instead of fried.
- Baking the tenders directly on the baking sheet without a wire rack will cause the bottoms to become soggy. The wire rack allows hot air to circulate around the entire tender, ensuring all sides become golden and crisp. This is a critical step for oven-frying success.
- Overcrowding the baking sheet is a problem that reduces oven temperature and creates steam. The tenders need space to breathe. If they are touching each other, the moisture will be trapped, and they will steam rather than bake, losing their crunch.
- Forgetting to toast the panko breadcrumbs in oil can lead to a pale, less crispy coating. This pre-toasting step jumpstarts the browning process and ensures a deep golden color and satisfying shatter in the final dish.
- Adding the sauce too early will soften the crisp coating. The sauce should be applied just before serving to maintain the texture. If you sauce the tenders and let them sit, the crunch will be lost to the moisture of the glaze.
- Skipping the step of seasoning the flour and egg mixture will result in bland chicken. Each layer of the breading needs flavor. Make sure to season the flour with salt, pepper, garlic powder, and paprika for a well-seasoned crust.
- Using pre-crumbled feta cheese instead of a block can result in a less creamy, more crumbly texture. Pre-crumbled feta often contains anti-caking agents that prevent it from melting smoothly. A block feta is superior for this recipe.
Essential Techniques
The standard breading procedure is the foundation of this recipe. It is a three-step process that includes dredging in seasoned flour, dipping in beaten egg, and coating with panko breadcrumbs. The most important aspect is the order. The flour first allows the egg to stick to the chicken. Then, the egg acts as a glue for the panko to adhere to. When you press the panko onto the chicken after the egg dip, you need to apply firm, even pressure to ensure a good bond. This creates a thick, even coating that will not fall off during baking. A visual cue for success is when the tender is uniformly covered with crumbs and looks dry and bumpy.
Pre-toasting panko in olive oil is a transformative technique for achieving maximum crunch. Instead of using raw panko, spread the crumbs on a baking sheet, drizzle with olive oil, and toss to coat. Bake them for 5-7 minutes at 350 degrees Fahrenheit, stirring halfway through, until they turn a light golden brown. This process partially cooks and dehydrates the crumbs. This pre-toasted panko will then cook faster and become significantly crispier in the final bake. It also prevents the inner layer of the breading from becoming soggy from the chicken’s internal moisture. The visual cue is a uniform, pale golden color. The panko should not look burnt or dark brown; just lightly toasted.
Baking on a wire rack over a baking sheet is a crucial oven-frying technique. This method allows hot air to circulate completely around the chicken tender. The heat rises from the oven floor and hits the bottom of the tender, ensuring it becomes as crispy as the top. Without the wire rack, the bottom of the tender sits in its own juices and in the hot air that becomes trapped under the baking sheet, resulting in a soggy, steamed-bottom outcome. The steam is the enemy of crispiness. A rimmed baking sheet is important to catch any drips, and the wire rack should be stable. The visual cue is even golden brown coloring on all sides of the tender.
Making a perfect glaze is about controlling heat and thickening. To prepare the hot honey lemon glaze, you combine hot honey, lemon juice, and a small amount of butter in a small saucepan. You heat this mixture over low to medium heat, whisking constantly. The goal is not to boil the sauce but to warm it enough to thicken slightly and melt the butter, which creates a glossy finish. If you boil the honey too aggressively, it can caramelize quickly and become too thick and sticky. A visual cue for the perfect glaze is when it becomes slightly syrupy and coats the back of a spoon. You can also test by touching a small drop to a cold plate; it should run slowly.
Pro Tips for Perfect Crispy Hot Honey Lemon Feta Chicken Tenders
Pat the chicken tenders dry with paper towels before you start. This simple step removes surface moisture, which is the enemy of a crispy crust. It ensures the flour sticks properly and prevents the breading from sliding off during baking.
Season every layer of the breading for maximum flavor. Add salt, pepper, garlic powder, and paprika to the flour. You can add a pinch of salt and pepper to the beaten eggs as well. This builds flavor from the inside out, avoiding blandness.
Use a heavy hand when pressing the panko onto the chicken. After dipping the tender in the egg, place it in the bowl of panko and press down firmly from all sides. This ensures the breadcrumbs stick well and creates a thick, crunchy coating that will not fall off.
Do not skip the pre-toasting step for the panko. This is the single most important tip for achieving an incredible crunch. It jump-starts the browning process and removes excess moisture from the crumbs. This step guarantees success.
Let the breaded tenders rest on a plate for 10 minutes before baking. This rest period allows the breading to hydrate slightly and adhere more firmly to the chicken. The result is a more unified coating that resists peeling off during the bake.
Bake the tenders at a high temperature, around 425 degrees Fahrenheit. This high heat creates steam inside the tender, which cooks the chicken quickly and helps to set the crust before the interior has a chance to release moisture that could make the coating soggy.
Apply the glaze just before serving to maintain the crunch. Toss the hot, just-baked tenders in the warm glaze for a final coat. Serve them immediately. If you let them sit in the glaze, the sauce will gradually soften the crisp coating over time.
Variations and Adaptations
Regional variations can bring exciting new flavors to this base recipe. For a Southwestern twist, swap the lemon juice for lime juice, use cilantro instead of parsley, and substitute cotija cheese for the feta. You could also add a pinch of cumin to the flour mixture. For a Southern-style version, use buttermilk instead of eggs in the breading process, which will create a tangier, more tender crust. You can also add a pinch of cayenne pepper to the glaze for extra heat. Consider dipping the finished tenders in a cool ranch dressing or a creamy blue cheese dip to balance the spice.
Seasonal adaptations allow you to enjoy this recipe with the freshest produce. In the spring, serve the tenders on a bed of arugula salad with shaved Parmesan and a light lemon vinaigrette. In the summer, pair them with a juicy tomato and cucumber salad or some grilled corn on the cob. During the fall, you can add a touch of smoked paprika or chipotle powder to the hot honey for a deeper, smokier flavor. In the winter, you might serve them with roasted root vegetables like sweet potatoes and carrots, which soak up the extra glaze beautifully.
Dietary modifications make this recipe more inclusive. For a gluten-free version, simply use gluten-free panko breadcrumbs and a gluten-free all-purpose flour blend in the breading. The rest of the process remains the same. For a dairy-free adaptation, substitute the feta cheese with a high-quality vegan feta, or skip the cheese entirely and add more fresh herbs for flavor. You can also use a plant-based butter alternative in the glaze. These modifications allow everyone to enjoy this delicious dish without compromising on the core flavors and textures.
Flavor variations can change the profile of the dish entirely. If you want a milder, sweeter flavor, use regular honey instead of hot honey and add a tablespoon of Dijon mustard to the glaze for a tangy twist. For a more savory and herb-forward version, add dried oregano, thyme, and rosemary to the flour and panko mixture. You can also sprinkle the baked tenders with fresh lemon zest before serving for an extra burst of citrus aroma. For a spicy, smoky version, add smoked paprika to the flour and chipotle powder to the glaze, and use a smoky, artisanal hot honey.
Texture modifications offer different ways to enjoy the concept. If you prefer a more classic, Southern-style coating, you can use crushed cornflakes or cracker crumbs combined with a little melted butter for a richer, denser crust. For a lighter, more delicate crust, use only a single layer of seasoned flour and a light spray of oil before baking, skipping the egg and panko altogether. This is a healthier alternative but offers a different type of texture. You can also experiment with using crushed pork rinds for a very low-carb, keto-friendly coating that still provides a satisfying crunch.
Presentation alternatives allow you to change the serving style. Instead of serving the tenders as a main course, cut them into bite-sized pieces before breading and baking to create perfect appetizers or party snacks. They can be served on a platter with toothpicks and a variety of dipping sauces, such as a cool tzatziki or a creamy dill ranch. You can also arrange the whole tenders on a large wooden board alongside some toasted pita chips, olives, and grape tomatoes for a Mediterranean-inspired grazing platter.
Serving and Presentation Guide
Plating techniques will elevate the visual appeal of your dish. For a beautiful presentation, arrange the glazed tenders in a single, overlapping layer on a large white platter. This allows the glossy sauce and the garnishes to stand out. For a more modern approach, you can serve two or three tenders per plate, leaning them against a small pile of arugula or a fresh lemon salad. Consider drizzling any remaining glaze from the pan over the top for an extra pop of color and flavor.
Garnishing ideas are crucial for the final impression. A generous and even crumble of creamy feta cheese is a must. Follow this with a sprinkle of freshly chopped parsley or chives for a pop of green. A final flourish of fresh lemon zest adds a bright, citrusy aroma and a beautiful yellow color. You can also add a pinch of red pepper flakes for a hint of extra heat and a striking red contrast against the white cheese and green herbs.
Traditional accompaniments make this feel like a complete meal. A classic pairing is with crispy oven-baked french fries or sweet potato fries. A side of coleslaw, either classic creamy or a bright vinegar-based slaw, provides a cool, refreshing contrast to the spicy-sweet tenders. A simple green salad with a lemon vinaigrette is another excellent choice. For a more Mediterranean feel, serve them with warm pita bread, a side of tzatziki or hummus, and some fresh vegetables.
Modern serving suggestions can make this dish feel fresh and exciting. You can slice the tenders and serve them over a bed of warm quinoa or couscous for a hearty grain bowl. They are also fantastic on top of a Greek salad, where the hot glaze acts as a dressing for the greens. For a fun, interactive meal, set up a “tender bar” with the tenders, a variety of sauces, and different toppings, allowing guests to build their own plates.
Temperature considerations are very important. These chicken tenders are best served immediately after glazing, when the crust is at its most shatteringly crisp and the sauce is hot and sticky. If you are serving them at a party, you can hold them in a low-temperature oven (around 200 degrees Fahrenheit) for up to 30 minutes, but the crust will lose some of its initial crunch. Avoid letting them sit at room temperature for too long before serving.
Portion control tips are helpful for a balanced meal. For a hearty main course for an adult, you should plan on three to four tenders per serving. For a lighter meal or for children, two tenders is often sufficient. When serving as an appetizer, you can budget for one to two tenders per person, depending on what else is being served. Using a kitchen scale, you can aim for around 6 to 8 ounces of chicken per person for a main course portion.
Wine and Beverage Pairing
Wine pairings are a natural complement to these bold flavors. The sweetness and spice of the hot honey glaze call for a wine with a touch of sweetness and lower alcohol. A dry or off-dry Riesling is a classic choice; its high acidity cuts through the fat and spice, while its residual sweetness cools the heat. A Gewurztraminer also works beautifully, with its aromatic lychee and rose notes that harmonize with the honey and lemon. For a red wine lover, a light-bodied, low-tannin option like a Gamay (Beaujolais) is a safe and delicious choice. Its fruity character and soft texture will not overpower the delicate chicken.
Non-alcoholic alternatives are just as enjoyable for this meal. A classic glass of tart lemonade or limeade is a perfect palate cleanser between bites of the spicy-sweet tenders. The acidity is a fantastic counterbalance to the honey and cheese. An iced black tea, especially one with a hint of peach or berry flavor, also works wonderfully. The gentle astringency of the tea helps to cleanse your palate, while the sweetness complements the honey in the glaze. A simple sparkling water with a squeeze of fresh lemon or lime is another refreshing, zero-calorie option that is always a safe choice.
Coffee and tea pairings can also be considered for a complete meal. If you are serving these tenders for a brunch or a light dinner, a cup of hot, unsweetened green tea is an excellent choice. Its grassy, slightly astringent notes will cut through the richness of the chicken and the feta. For a more robust pairing, a cold brew coffee with its low acidity and smooth, chocolatey notes can surprisingly work well. The coffee’s bitterness can balance the sweetness of the hot honey, creating an interesting flavor contrast. However, a sweet iced tea is likely the most universally pleasing and accessible option for most American households.
Temperature considerations for your beverages are key to the overall dining experience. A cold, crisp beverage is almost always the best choice to contrast the warmth of the hot honey and the oven-baked chicken. The cold temperature provides a refreshing counterpoint, helping to cool your palate and allowing you to better appreciate the next spicy-sweet bite. For wine, serve the Riesling well-chilled, around 45 to 50 degrees Fahrenheit. For non-alcoholic drinks, plenty of ice is your friend. A room-temperature drink will not provide this same refreshing contrast and can make the dining experience feel heavier.
Serving suggestions can enhance the enjoyment of your chosen beverage. Pour the wine into tall, tulip-shaped glasses to help concentrate its aromatic qualities. For a non-alcoholic punch at a party, combine lemonade, iced tea, and a splash of simple syrup to create a refreshing Arnold Palmer that will appeal to all guests. You can also rim the glasses with a mixture of salt and a little chili powder for a spicy-sweet twist. A small sprig of fresh mint or a slice of lemon in the glass adds a beautiful aromatic and visual touch that ties back to the lemon and herbs in the dish.
Storage and Shelf Life
Storage methods are important for preserving the quality of the leftovers. The best approach is to store the chicken tenders and the sauce separately. Place any uneaten tenders in an airtight container lined with paper towels to absorb excess moisture. The paper towels will help to keep the coating from becoming too soggy. Store the leftover hot honey lemon glaze in a separate small container or a jar. This separation is crucial for preventing the coating from becoming instantly soft and wet from the sauce.
Temperature requirements are standard for food safety. All cooked chicken must be stored in the refrigerator within two hours of cooking. The refrigerator temperature should be set below 40 degrees Fahrenheit to inhibit the growth of harmful bacteria. If you are planning to keep the tenders for more than a few days, they should be moved to the freezer. Leaving them out at room temperature for extended periods is not safe and will lead to spoilage and a significant loss of quality in both texture and flavor.
Container recommendations focus on preserving texture. Glass or plastic containers with tight-fitting lids are ideal for storage. For the tenders, a wider, shallower container is better than a deep one, as it prevents the tenders from being stacked too high and getting crushed. For the glaze, a small glass jar or a ramekin with a lid is perfect. Avoid using metal containers for the glaze, as the acidity from the lemon can react with the metal and impart an off-flavor.
Signs of spoilage are easy to spot with cooked chicken. The most obvious sign is a sour or unpleasant odor. Fresh cooked chicken should have a neutral, slightly savory smell. If you detect any ammonia-like or sulfurous notes, the chicken is no longer safe to eat. Other signs include a slimy or sticky texture on the surface of the chicken or the growth of visible mold. The breading may also become excessively soft and wet, which is a sign of moisture buildup. If any of these signs are present, you should discard the chicken immediately.
Reheating instructions are critical for restoring some of the original crispiness. The microwave is the worst option, as it will make the coating rubbery and steaming. Instead, reheat the tenders in a preheated oven at 400 degrees Fahrenheit for 5-7 minutes. Place them on a wire rack over a baking sheet to allow air circulation. An air fryer is also an excellent tool for reheating, as it can restore the crunch in just 2-3 minutes at 350 degrees Fahrenheit. Avoid adding the sauce until after you have reheated the tenders to maintain crispness.
Freezing guidelines allow you to make a large batch ahead of time. You can freeze the breaded but unbaked chicken tenders for up to three months. To do this, place the breaded tenders on a baking sheet lined with parchment paper and freeze them until solid. Then, transfer them to a freezer-safe bag or container. When you are ready to cook them, you can bake them directly from frozen, adding about 5-8 minutes to the cooking time. It is best to add the glaze after baking, as the glaze may not freeze and reheat well.
Make Ahead Strategies
A prep timeline makes the cooking process much smoother. The most effective make-ahead strategy is to bread the chicken tenders up to 24 hours in advance. After you have completed the breading process, arrange them in a single layer on a baking sheet lined with parchment paper. Cover the sheet tightly with plastic wrap and store it in the refrigerator. This allows the breading to set firmly, which means it will stick to the chicken even better during baking, resulting in a cleaner and more professional finish.
Storage between steps is straightforward. You can also prepare the hot honey glaze up to two weeks in advance. Store it in a sealed glass jar in the refrigerator. The flavors will actually meld and deepen over time, making the glaze even more delicious. When you are ready to use it, simply warm it gently on the stovetop or in the microwave until it becomes liquid again. Combining the prepped tenders and the pre-made glaze means you are only 20 minutes away from a hot, satisfying dinner on a busy weeknight.
Quality impact assessment is positive for this recipe. Pre-breading the chicken does Print
Crispy Hot Honey Lemon Feta Chicken Tenders
- Total Time: 30 minutes
- Yield: 4
Description
Juicy chicken tenders coated in a crispy panko and feta crust, baked until golden, then drizzled with a spicy-sweet hot honey lemon sauce.
Ingredients
- 1 lb chicken tenders
- 1/2 cup all-purpose flour
- 2 large eggs, beaten
- 1 cup panko breadcrumbs
- 1/2 cup crumbled feta cheese
- 1 teaspoon garlic powder
- 1 teaspoon paprika
- 1/2 teaspoon salt
- 1/4 teaspoon black pepper
- 3 tablespoons honey
- 2 tablespoons hot sauce (e.g., Sriracha)
- 1 tablespoon lemon juice
- 1 teaspoon lemon zest
- Cooking spray or olive oil
Instructions
- Preheat oven to 400°F (200°C). Line a baking sheet with parchment paper and lightly grease with cooking spray.
- In a shallow bowl, mix together panko, crumbled feta, garlic powder, paprika, salt, and pepper. In another bowl, place flour. In a third bowl, beat the eggs.
- Dredge each chicken tender first in flour, then dip in egg, then coat thoroughly with the panko-feta mixture. Press gently to adhere.
- Place coated tenders on the prepared baking sheet. Lightly spray or drizzle with olive oil to help browning.
- Bake for 12-15 minutes, flipping halfway through, until golden brown and cooked through (internal temp 165°F).
- Meanwhile, prepare the hot honey lemon sauce: In a small bowl, whisk together honey, hot sauce, lemon juice, and lemon zest.
- Remove tenders from oven and let cool for 2 minutes. Drizzle or brush generously with the hot honey lemon sauce before serving.
Notes
You can customize the seasonings to taste. For extra heat, add more hot sauce or a pinch of cayenne to the breading.
- Prep Time: 15 minutes
- Cook Time: 15 minutes
- Method: Main
- Cuisine: American