Butterfinger Caramel Crunch Mini Pies: An Easy No-Bake Dessert
Imagine a dessert that delivers the perfect combination of sweet, salty, crunchy, and creamy without ever turning on your oven. These Butterfinger Caramel Crunch Mini Pies are exactly that kind of magical treat. They combine a buttery graham cracker crust with a rich, fluffy filling and a topping that features the iconic candy bar we all love. Ultimately, this recipe is your secret weapon for a stunning dessert that looks like you spent hours in the kitchen.
The beauty of these no-bake mini pies lies in their simplicity and incredible flavor payoff. You get layers of texture in every single bite, from the crisp crust to the smooth cream cheese filling and the fantastic crunch of the Butterfinger topping. Furthermore, they are incredibly versatile for parties, potlucks, or a special weeknight treat. This dessert proves that sometimes, the most impressive creations are also the easiest to make.
Everyone will adore these individual desserts. They offer a nostalgic taste of Butterfinger candy bars in a elegant, handheld form. The caramel drizzle adds a beautiful finishing touch and an extra layer of gooey sweetness. In short, if you need a guaranteed crowd-pleaser that requires minimal effort, these Butterfinger Caramel Crunch Mini Pies are your perfect answer.
Quick Recipe Highlights
- Flavor Profile: These mini pies deliver a masterful balance of sweet and salty notes. The rich, peanut-buttery flavor of the Butterfinger candy perfectly complements the tangy cream cheese filling. Meanwhile, the caramel drizzle adds a deep, buttery sweetness that ties everything together.
- Texture: Experience a delightful symphony of textures in each bite. You get a firm, crumbly crust, followed by a luxuriously smooth and creamy filling. The crowning glory is the generous topping of crushed Butterfinger, which provides an addictive, crispy crunch that is utterly satisfying.
- Aroma: As you assemble these pies, the kitchen fills with the inviting scent of crushed graham crackers and brown sugar. The aroma of the peanut butter candy is unmistakable and nostalgic. Finally, a hint of vanilla from the filling adds a warm, comforting note to the mix.
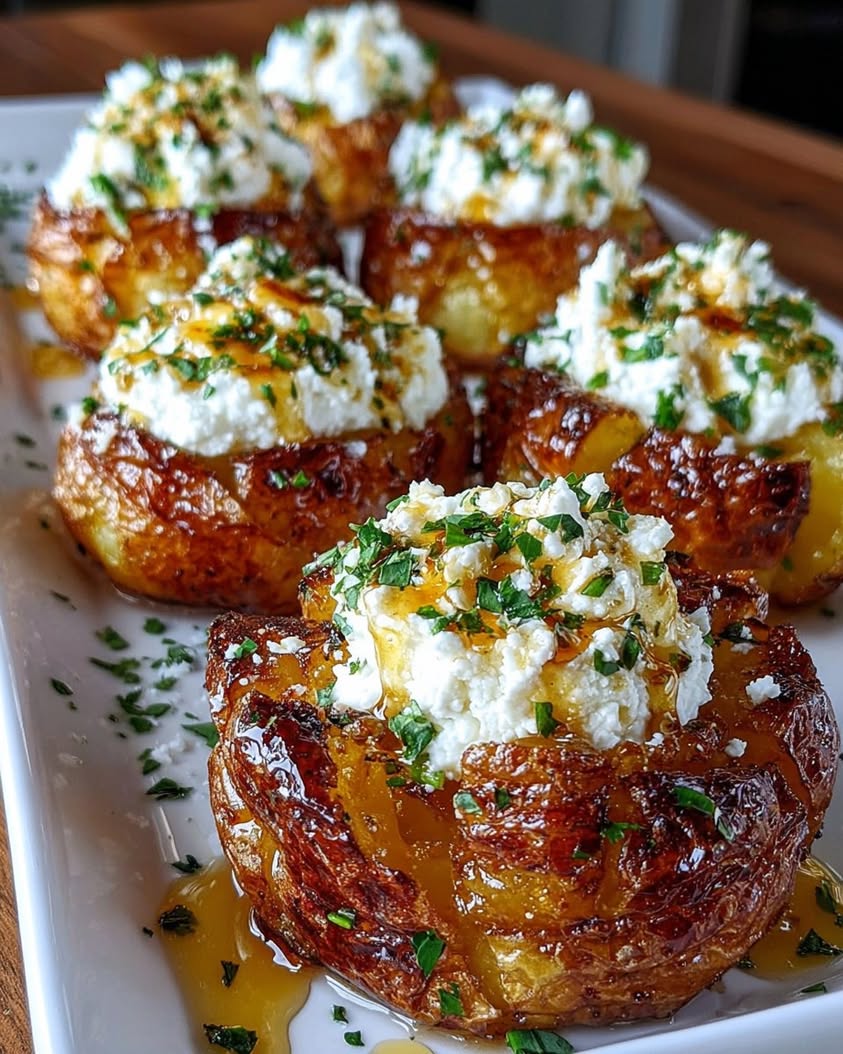
- Visual Appeal: These individual desserts are stunning on a dessert table. The white filling creates a beautiful canvas for the golden-brown Butterfinger crumbs. The artistic drizzle of caramel sauce over the top adds a professional, glossy finish that makes them look store-bought in the best way.
- Skill Level Needed: This is a beginner-friendly recipe that requires no special pastry skills. The most complex technique involves mixing a filling and pressing crust into cups. Consequently, even novice bakers or kids helping in the kitchen can achieve perfect results with ease.
- Special Equipment: You only need basic kitchen tools. A standard 12-cup muffin tin, a mixing bowl, and a hand mixer or sturdy whisk are essential. Additionally, you will need a rolling pin or food processor to crush the graham crackers and candy bars efficiently.
Recipe Overview
- Difficulty Level: We rate this recipe as “Easy” because it involves straightforward, no-bake assembly. There is no dough to roll, no custard to cook, and no temperamental techniques. The steps are simple: mix, press, fill, and top. Therefore, it is nearly impossible to mess up, making it ideal for first-time dessert makers.
- Category: This recipe falls squarely into the dessert category, specifically individual no-bake desserts. It is perfect for parties, picnics, and holiday gatherings. Moreover, it can easily function as a sweet snack or a decadent treat after any meal.
- Cuisine: While not tied to a specific traditional cuisine, these mini pies are a classic example of American home baking and candy-inspired treats. They draw inspiration from the popularity of peanut butter cups, cheesecakes, and candy bar pies that are staples at American potlucks and family gatherings.
- Cost: This is a very cost-effective dessert to make. The primary cost comes from the cream cheese and Butterfinger candy bars. Graham crackers, sugar, and butter are typically pantry staples. Overall, you can create an impressive dozen desserts for a fraction of the cost of buying them from a bakery.
- Season: These Butterfinger Caramel Crunch Mini Pies are truly a year-round delight. They are cool and refreshing in the summer when you do not want to heat the oven. Conversely, their rich, comforting flavors also make them a hit during fall and winter holidays.
- Occasion: They are incredibly versatile for any event. Serve them at birthday parties, baby showers, or book club meetings. They also make a fantastic addition to a Thanksgiving dessert spread or a Fourth of July celebration. Basically, any time you need a portable, individual sweet treat, this recipe shines.
Why You’ll Love This Recipe
First and foremost, you will adore the incredible taste and texture of these Butterfinger Caramel Crunch Mini Pies. Each component works in harmony to create a dessert that is far greater than the sum of its parts. The creamy filling cuts through the sweetness of the candy, while the crust provides a necessary sturdy base. Every single bite delivers a satisfying contrast that keeps you coming back for more. Ultimately, the familiar, nostalgic flavor of Butterfinger transformed into an elegant mini pie is a combination that is simply irresistible.
Secondly, the convenience factor of this no-bake dessert cannot be overstated. You can whip up a full batch in about 25 minutes of active prep time without any baking or cooling wait for a crust. This makes it an ideal last-minute recipe for unexpected guests or when your sweet tooth strikes urgently. Furthermore, the clean-up is minimal since you only use a few bowls and a muffin tin. For busy home cooks, this ease is a massive benefit that does not sacrifice any quality or wow factor.
From a social perspective, these mini pies are fantastic for entertaining. Their individual serving size eliminates the mess of slicing and plating a larger cake or pie. Guests appreciate having their own personal dessert, which always feels special. They are also easy to transport in the muffin tin, making them the perfect potluck contribution. You will undoubtedly receive countless recipe requests after people try them, solidifying your reputation as a dessert hero.
Additionally, you can feel good about the control you have over the ingredients. While indulgent, you can choose full-fat or reduced-fat cream cheese based on your preference. You can also adjust the amount of candy topping or caramel drizzle to suit your taste. This adaptability is a significant advantage over store-bought versions, which are often overly sweet or use artificial flavors. Homemade always allows for a fresher, more tailored result.
Finally, the visual appeal and professional presentation are major reasons to love this recipe. These mini pies look like they came from a high-end bakery or patisserie. The layered look with the crumb topping and caramel drizzle is instantly impressive. You achieve a stunning dessert with very little technical skill, which is incredibly rewarding. In conclusion, this recipe delivers on every front: flavor, ease, presentation, and crowd-pleasing power.
Historical Background and Cultural Significance
The story of these Butterfinger Caramel Crunch Mini Pies is inherently linked to the history of the Butterfinger candy bar itself. The Butterfinger bar was introduced in 1923 by the Curtiss Candy Company. Interestingly, the name was chosen through a public contest, won by a Chicago resident. The candy’s unique flaky, crunchy core and peanut buttery flavor quickly made it an American icon. Consequently, incorporating this beloved candy into other desserts was a natural evolution for home bakers seeking to capture that nostalgic taste in new forms.
Culturally, no-bake desserts like this one have deep roots in American home cooking, especially in the mid-20th century. During post-war eras and hot summers, home cooks prized recipes that did not require heating up the kitchen with an oven. Recipes for icebox cakes, refrigerator pies, and chilled desserts became staples in community cookbooks. This particular recipe follows in that practical, innovative tradition, updating a classic concept with a popular modern candy ingredient for a new generation.
The evolution of the mini dessert trend also plays a key role. Over the past two decades, individual-sized desserts have surged in popularity for catering and home entertaining. They offer portion control, elegant presentation, and ease of service. Combining this trend with the timeless appeal of a candy bar pie created the perfect recipe concept. Therefore, these Butterfinger Caramel Crunch Mini Pies represent a fusion of historical practicality, cultural nostalgia, and contemporary food presentation trends.
Regional variations of similar concepts exist across the United States. In the South, you might find a full-sized peanut butter pie with crushed peanuts. In the Midwest, cheesecakes with candy bar mix-ins are common at church socials. This recipe borrows from these traditions but packages them into a personal, portable format. It is a testament to the creative, adaptive nature of American home baking, where classic flavors are constantly reinvented in delightful new ways.
Ingredient Deep Dive
Graham Cracker Crumbs: Graham crackers, invented by Sylvester Graham in the 19th century for a vegetarian diet, are now a dessert staple. They provide a sweet, slightly honeyed flavor and a sturdy structure for no-bake crusts. For the best texture, crush them finely but not into dust; you want a little texture. Store opened boxes in an airtight container to keep them crisp. If you need a substitute, crushed vanilla wafers or digestive biscuits work wonderfully.
Butter: Unsalted butter is crucial here because it allows you to control the salt level in the crust. It binds the graham cracker crumbs together and adds rich, creamy flavor. For optimal results, use real butter, not margarine. Ensure it is properly melted but not browned. You can store butter in the fridge for weeks or freeze it for longer-term storage. For a dairy-free version, a high-quality plant-based butter substitute will work.
Cream Cheese: Use full-fat, brick-style cream cheese for the creamiest, most stable filling. Reduced-fat varieties contain more water and can lead to a softer, less set filling. Always bring the cream cheese to room temperature before mixing; this is the single most important tip for a lump-free, smooth filling. Unopened packages last for weeks in the fridge. For a twist, try using a flavored cream cheese, though it will alter the classic taste profile.
Butterfinger Candy Bars: The star of the show! These candy bars provide the signature peanut-buttery crunch. Their unique layered, flaky texture comes from a process of pulling and layering the candy mixture. For the best crunch, crush them just before assembling to prevent them from getting sticky. Store unused bars in a cool, dry place. While other crunchy peanut butter candies can substitute, the distinct texture of a Butterfinger is truly irreplaceable in this recipe.
Caramel Sauce: Caramel sauce adds a luxurious, gooey finish and enhances the buttery notes. You can use a high-quality store-bought sauce or make your own. For a homemade version, simply melt sugar with a bit of water until amber-colored, then whisk in cream and butter. Store leftover sauce in a sealed jar in the refrigerator for up to two weeks. Warm it slightly before drizzling for the best consistency and presentation.
Common Mistakes to Avoid
- Using Cold Cream Cheese: This is the most common error. Cold cream cheese will not blend smoothly with the powdered sugar, resulting in a lumpy, unappealing filling. Always plan ahead and let the cream cheese sit on the counter for at least 30-60 minutes until it is soft to the touch.
- Overcrushing the Graham Crackers: If you process the graham crackers into a fine powder, your crust can become dense and pasty. You want a mixture with some small, sandy bits for the best texture. Pulse them in a food processor or place them in a bag and crush with a rolling pin until you have a variety of crumb sizes.
- Not Packing the Crust Firmly: A loosely packed crust will fall apart when you try to remove the mini pie from the liner or take a bite. Use a small glass or measuring cup to firmly press the crumb mixture into the bottom and up the sides of each muffin cup. This creates a solid vessel for the filling.
- Adding the Topping Too Early: If you sprinkle the crushed Butterfinger on the filling immediately after piping, the moisture from the filling can soften the candy and make it lose its iconic crunch. Let the filled cups chill in the refrigerator for at least 15-20 minutes to let the surface set slightly before adding the crunchy topping.
- Skimping on Chilling Time: While these are no-bake, they still require adequate time to set. The filling needs the cold temperature to firm up so the pies hold their shape. Rushing this process will lead to messy, soft pies that are difficult to serve. Patience is key for the perfect texture.
- Using a Runny Caramel Sauce: A caramel sauce that is too thin will soak into the topping and make it soggy instead of creating a beautiful drizzle on top. If your sauce is runny, you can thicken it by simmering it gently for a few minutes to reduce it, or simply chill it before using.
- Not Lining the Muffin Tin: Always use paper or foil liners. The butter in the crust can make the pies stick to an unlined muffin tin, leading to a frustrating cleanup and ruined desserts. Liners guarantee easy removal and a pristine presentation.
- Storing at Room Temperature: Because of the dairy-based filling, these pies must be stored in the refrigerator. Leaving them out for more than two hours risks spoilage and will cause the filling to become too soft. Always keep them chilled until ready to serve.
Essential Techniques
Creating the Perfect No-Bake Crust: The technique for a no-bake crust is simple but vital. Combine the fine graham cracker crumbs with melted butter and sugar until the mixture resembles wet sand. The key is to ensure every crumb is coated with butter, as this is what binds the crust together when chilled. Use a firm, flat-bottomed object to press the mixture firmly and evenly into the muffin cups. A proper press ensures the crust holds together when you bite into the finished pie.
Creaming Room Temperature Cream Cheese: This technique is the foundation of a smooth, lump-free filling. Room temperature cream cheese blends easily with other ingredients, creating a homogeneous mixture. Use a hand mixer or stand mixer on medium speed. First, beat the cream cheese alone until it is completely smooth and creamy. Then, gradually add the powdered sugar and vanilla, scraping down the sides of the bowl often. This method incorporates air and ensures there are no hidden lumps.
Piping or Spooning the Filling: For a neat and professional look, transfer your smooth filling to a piping bag fitted with a large round or star tip. Pipe the filling into the chilled crust shells, starting in the center and swirling outward. This gives you control over the amount and creates a lovely swirled top. If you do not have a piping bag, a zip-top bag with a corner snipped off works perfectly, or you can carefully spoon and smooth the filling.
Crushing Candy Bars for Optimal Texture: To preserve the fantastic crunch, do not over-process the Butterfinger bars. Place them in a sturdy zip-top bag and use a rolling pin to crush them. Alternatively, pulse them a few times in a food processor. You want a mix of small pieces and some larger crumbs for varied texture. Avoid turning them into a fine powder, as you will lose the satisfying crunch that defines this dessert.
Pro Tips for Perfect Butterfinger Caramel Crunch Mini Pies
For an extra-sturdy crust, add one extra tablespoon of melted butter to the graham cracker mixture. This is especially helpful in humid climates where crumbs can absorb moisture.
Chill your mixing bowl and beaters in the freezer for 10 minutes before making the filling. A cooler bowl helps the cream cheese filling set up a bit faster and maintains its structure.
Use a small cookie scoop or a tablespoon to portion the crust mixture into the muffin cups. This ensures each mini pie has an equal amount of crust, leading to uniform baking and presentation.
If your caramel sauce is too thick to drizzle, place the jar in a bowl of warm water for a few minutes. This will gently thin it to the perfect consistency for creating beautiful lines over the topping.
For a more intense peanut butter flavor, mix one tablespoon of smooth peanut butter into the cream cheese filling. This amplifies the candy bar theme without overpowering the other elements.
Garnish with a tiny pinch of flaky sea salt on top of the caramel drizzle just before serving. The salt cuts the sweetness and enhances all the other flavors dramatically.
To make removal from the muffin tin super easy, run a small offset spatula or butter knife around the edge of each pie after chilling. This loosens any filling that may have crept over the liner.
For a clean presentation, wait to add the final Butterfinger crumbs and caramel drizzle until just before serving. This keeps the topping maximally crunchy and the caramel looking glossy.
Variations and Adaptations
Regional Variations: Across different regions, you can adapt the candy bar to local favorites. In the South, try using crushed pecans or pralines mixed into the crust. For a Rocky Road twist popular in many areas, add mini marshmallows and chopped almonds to the topping along with the Butterfinger.
Seasonal Adaptations: Make these festive for any holiday. For Halloween, use orange and black sprinkles. During Christmas, mix in crushed peppermint candies with the Butterfinger and drizzle with chocolate sauce instead of caramel. In autumn, add a pinch of cinnamon to the graham cracker crust for a warm spice note.
Dietary Modifications: For a gluten-free version, use certified gluten-free graham crackers. To make them dairy-free, employ plant-based butter and cream cheese, and ensure your candy and caramel are dairy-free. For a lower-sugar option, use a sugar substitute blend in the filling and a sugar-free caramel syrup.
Flavor Variations: The base recipe is wonderfully adaptable. Substitute the Butterfinger with other crunchy candy bars like Heath bar, Skor, or even crushed pretzels for a sweet-and-salty version. You can also flavor the cream cheese filling with a tablespoon of instant coffee powder or cocoa powder for a mocha or chocolate twist.
Texture Modifications: If you prefer a softer bite, mix the crushed Butterfinger directly into the cream cheese filling instead of using it as a topping. For added creaminess, fold a half-cup of whipped cream or whipped topping into the filling before piping it into the shells.
Presentation Alternatives: Instead of a muffin tin, make one large pie in a 9-inch springform pan. You can also layer the components in small dessert cups or shot glasses for a deconstructed parfait-style treat. For a more rustic look, use a rectangular baking dish and cut into bars after chilling.
Serving and Presentation Guide
Plating Techniques: For individual service, place each chilled mini pie on a small dessert plate. You can add a smear of extra caramel sauce or a dusting of cocoa powder on the plate first for a professional touch. Alternatively, arrange them on a tiered dessert stand for a party, which creates height and visual interest on your table.
Garnishing Ideas: Beyond the caramel drizzle, consider other garnishes. A dollop of freshly whipped cream on the side is classic. A single peanut or a small piece of a Butterfinger bar placed on top adds elegance. A light sprinkle of edible gold dust or colorful sprinkles can match the theme of your event.
Traditional Accompaniments: These rich mini pies pair beautifully with a scoop of vanilla ice cream or a dollop of lightly sweetened whipped cream. The cold, creamy element contrasts wonderfully with the crunchy topping. A glass of cold milk is always a nostalgic and perfect beverage pairing for this candy-based dessert.
Modern Serving Suggestions: For a contemporary dessert board, place the mini pies alongside other bite-sized treats like chocolate-dipped strawberries, macarons, and cheese cubes. You can also serve them as part of a dessert “flight” with mini versions of other pies, allowing guests to sample a variety.
Temperature Considerations: These pies must be served chilled. However, taking them out of the refrigerator 5-10 minutes before serving can slightly soften the filling, making it even creamier and more luxurious to eat. Do not let them sit out for more than 30 minutes to ensure food safety and structural integrity.
Portion Control Tips: The standard recipe makes 12 generous mini pies. For a larger crowd or a lighter dessert option, you can make 24 smaller pies using a mini-muffin tin. Simply reduce the baking time is not applicable, but reduce the amount of crust and filling in each cup accordingly. This is perfect for cocktail parties or buffets where guests want to try multiple desserts.
Wine and Beverage Pairing
Wine Pairings: The sweet, nutty, and creamy profile of these mini pies calls for wines with complementary notes. A rich, creamy Oloroso Sherry or a Tawny Port with its nutty caramel flavors is a magnificent match. For a still wine, opt for a late-harvest Riesling or a Moscato d’Asti; their bright acidity and fruity sweetness cut through the richness beautifully without overpowering the dessert.
Non-Alcoholic Alternatives: A cold glass of creamy vanilla oat milk or almond milk complements the flavors perfectly. For a more sophisticated option, try a sparkling apple cider or a ginger beer; the effervescence cleanses the palate between bites. A salted caramel hot chocolate, served cool or warm, doubles down on the dessert’s theme for an ultra-indulgent experience.
Coffee and Tea Pairings: Coffee is a classic partner. A medium-roast coffee with notes of caramel and nut will echo the pie’s flavors. For tea lovers, a strong cup of English Breakfast tea or a smoky Lapsang Souchong provides a bold contrast. A chai tea latte, with its warm spices, also creates a wonderfully cozy pairing, especially in cooler weather.
Temperature Considerations: Serve your paired beverages at their ideal temperatures. Chilled wines and sparkling ciders should be properly cooled. Coffee and tea should be hot to provide a temperature contrast with the cold pie, which enhances the overall tasting experience. Always offer beverages alongside, not poured over, the dessert.
Serving Suggestions: When hosting, consider offering a small beverage pairing station. Set out carafes of cold milk, hot coffee, and perhaps a bottle of dessert wine with appropriate glasses. This allows guests to choose their own perfect pairing and elevates the entire dessert service from simple to special.
Storage and Shelf Life
Storage Methods: Always store assembled Butterfinger Caramel Crunch Mini Pies in the refrigerator. Keep them in their muffin tin covered tightly with plastic wrap, or transfer them to a single layer in a large, airtight container. Placing a sheet of parchment paper between layers if you must stack them is advisable to prevent sticking.
Temperature Requirements: Consistent refrigeration at or below 40°F (4°C) is mandatory for food safety due to the dairy content. Do not leave them at room temperature for extended periods. For serving, you can remove them 10-15 minutes ahead of time to slightly soften, but return any leftovers to the fridge promptly.
Container Recommendations: An airtight container is the best choice to prevent the pies from absorbing other odors from the fridge and to keep the crust from becoming stale. If using the original muffin tin, ensure the plastic wrap is sealed tightly over the top. For individual portions, you can store them in separate small containers for grab-and-go treats.
Signs of Spoilage: Discard the pies if you notice an off smell, significant discoloration (like darkening or mold), or if the filling becomes excessively watery or separates. The crust may soften over time, but that is a texture issue, not necessarily spoilage. When in doubt, follow the rule: if it has been in the fridge for more than 4-5 days, it is best to err on the side of caution.
Reheating Instructions: These are a no-bake, chilled dessert and are not meant to be reheated. Serving them cold is essential for their structure and flavor profile. Attempting to warm them will melt the filling and make the crust soggy, ruining the intended texture contrast.
Freezing Guidelines: You can freeze these mini pies for up to one month. Place the fully assembled and chilled pies on a baking sheet and flash-freeze until solid (about 2 hours). Then, transfer them to a freezer-safe bag or container. Thaw overnight in the refrigerator before serving. Note that the topping may lose a bit of its crispness after freezing and thawing.
Make Ahead Strategies
Prep Timeline: You can prepare nearly every component 1-2 days in advance. Make the crusts and press them into the lined muffin tin, then cover and refrigerate. Prepare the cream cheese filling, store it in a sealed container in the fridge. Crush the Butterfinger bars and store them in an airtight bag at room temperature. Assemble the pies up to 4 hours before your event for the freshest texture.
Storage Between Steps: The chilled, unfilled crusts will keep perfectly in the fridge for 48 hours. The cream cheese filling may separate slightly if made too far ahead; simply give it a quick re-whisk with a spatula or mixer to bring it back together before using. Keep the crushed candy in a dry place to maintain its crunch.
Quality Impact Assessment: Making components ahead has minimal negative impact. In fact, chilling the crusts allows the butter to fully set, resulting in a sturdier shell. The filling may firm up in the fridge, making it even easier to pipe neatly. The only element that must be done close to serving is the final assembly with the candy topping to preserve its signature crunch.
Assembly Tips: When ready to assemble, pipe or spoon the filling into the chilled crusts. Then, return the filled pies to the fridge for a brief 15-minute chill to set the surface. This quick chill prevents the candy from sinking into the soft filling when you add the topping. Finally, add the Butterfinger crumbs and caramel drizzle.
Reheating Guidelines: As a chilled dessert, no reheating is needed or recommended. The make-ahead strategy is all about advanced preparation and final assembly, not about cooking components later.
Fresh Element Additions: The final garnish is where you add freshness. Always add the crushed Butterfinger and caramel drizzle within a few hours of serving. If using whipped cream as an extra garnish, add that just moments before serving to prevent it from deflating or weeping.
Scaling Instructions
Halving the Recipe: To make six pies, simply divide all ingredient quantities by two. Use a six-cup muffin tin or fill every other cup in a 12-cup tin to ensure even air circulation. The preparation steps and times remain identical. This is perfect for a small family or to avoid excessive leftovers.
Doubling or Tripling: For a large crowd, doubling or tripling is straightforward. Use multiple muffin tins or work in batches. When mixing the filling, you may need to use a larger stand mixer bowl or mix in batches to ensure everything incorporates evenly. The chilling time may need to be extended slightly if the refrigerator is very full, as cold air needs to circulate.
Equipment Adjustments: Scaling up requires planning. Ensure you have enough muffin tin liners and enough space in your refrigerator to accommodate the trays. If using a stand mixer for a large batch of filling, pause occasionally to scrape the bottom and sides to incorporate all ingredients uniformly.
Timing Modifications: The active prep time will increase linearly when you scale up. Crushing more candy bars and pressing more crusts will take more time. However, the passive chilling time remains constant at about one hour. Factor in this extra hands-on time when planning for an event.
Storage Considerations: A larger batch means you will have more leftovers to store. Ensure you have adequate airtight containers or space in the fridge. Label containers with the date made. Remember that the pies are best within 3-4 days, so scale according to how many you realistically expect to serve and consume.
Nutritional Deep Dive
Macro Breakdown: A typical mini pie is rich in carbohydrates and fats, providing a high-energy dessert. The primary carbs come from the graham crackers, powdered sugar, and candy. Fats are contributed by the butter, cream cheese, and peanut butter in the candy. The protein content is relatively low, coming mainly from the cream cheese and peanuts. This is an indulgent treat best enjoyed in moderation as part of a balanced diet.
Micronutrient Analysis: While not a significant source of vitamins and minerals, this dessert does offer some calcium from the cream cheese. The peanuts in the Butterfinger provide a small amount of niacin, magnesium, and vitamin E. The graham crackers may offer trace amounts of iron. However, it is important to view this as a pleasure food rather than a nutrient-dense one.
Health Benefits: The potential benefits are more psychological and social than physical. Enjoying a treat can boost mood and satisfaction. Sharing homemade food fosters connection. If you use natural peanut butter or reduce the added sugar in adaptations, you can slightly improve the nutritional profile. Ultimately, mindful enjoyment of treats is a healthy part of a holistic approach to eating.
Dietary Considerations: This standard recipe contains gluten (graham crackers), dairy (butter, cream cheese), soy (often in candy coatings), and peanuts. It is high in sugar and saturated fat. Individuals with allergies, diabetes, or heart conditions should consume with caution or seek adapted versions. Always check labels on pre-packaged ingredients for specific allergen information.
Portion Analysis: The mini pie format is inherently helpful for portion control. One pie provides a satisfying taste and finish to a meal without the temptation of a second large slice. This can help prevent overindulgence compared to cutting a piece from a full-sized pie. Being mindful and savoring one portion is a good strategy.
Weight Management Tips: If you are watching your weight, you can still enjoy this dessert. Plan for it by balancing your other meals that day with lean proteins and vegetables. Savor your one mini pie slowly, focusing on the texture and flavor. You can also try the dietary adaptations, like using low-fat cream cheese and a sugar substitute, to create a lighter version that still satisfies the craving.
Dietary Adaptations
Gluten-Free: Use certified gluten-free graham-style crackers to make the crust. Double-check that all other packaged ingredients, including the Butterfinger bars and caramel sauce, are certified gluten-free, as cross-contamination is common. Many brands now offer gluten-free candy and sauces, making this adaptation easier than ever.
Dairy-Free: Replace the butter with a plant-based alternative and use a high-quality dairy-free cream cheese. Be sure to select a vegan caramel sauce and verify that the Butterfinger candy bar substitute is also dairy-free (many peanut butter chocolates are, but always check labels). The texture and flavor will be very close to the original.
Vegan: Follow the dairy-free guidelines and also ensure the sugar used is vegan (some refined white sugar uses bone char in processing). Use a vegan powdered sugar for the filling. You will need to find a vegan peanut butter crunch candy bar or make your own using peanut butter, syrup, and vegan chocolate.
Low-Carb/Keto: Create a crust from crushed nuts (like almonds or pecans), butter, and a low-carb sweetener. For the filling, use full-fat cream cheese with a powdered erythritol or monk fruit sweetener. Replace the Butterfinger with a homemade crunch made from crushed peanuts, sweetener, and sugar-free chocolate. Use a sugar-free caramel syrup for the drizzle.
Paleo: This is a challenging adaptation due to the dairy and processed candy. A close approximation would use a crust of dates and nuts, a filling of blended cashews and coconut cream, and a topping of crushed roasted peanuts with a drizzle of date caramel. It would be a different but delicious dessert inspired by the original flavors.
Low-FODMAP: The main triggers here are lactose and high-fructose corn syrup. Use a lactose-free cream cheese and butter. For the crust, use gluten-free graham crackers (wheat is a FODMAP) in a small, Monash-certified portion. Omit the caramel sauce or find one made without high-fructose corn syrup. The Butterfinger candy is not low-FODMAP, so you would need to substitute with a small amount of plain peanuts and dark chocolate.
Troubleshooting Guide
Crumbly Crust That Falls Apart: This means the crust did not have enough butter to bind it, or it was not pressed firmly enough. Solution: For your next batch, add an extra half-tablespoon of melted butter to the crumb mixture. For existing pies, you can carefully press them back together in the liner. Serving them with a spoon in the liner is also a fine fix.
Lumpy Cream Cheese Filling: This occurs when the cream cheese was too cold. Solution: Try to salvage it by Print
Butterfinger Caramel Crunch Mini Pies
- Total Time: 45 minutes
- Yield: 4
Description
Decadent mini pies with a buttery crust, creamy caramel filling, and a crunchy Butterfinger topping, perfect for a sweet treat.
Ingredients
- 1 package refrigerated pie crusts (for 2 crusts)
- 1 cup caramel sauce (store-bought or homemade)
- 1/2 cup cream cheese, softened
- 1/4 cup powdered sugar
- 1 teaspoon vanilla extract
- 4 Butterfinger candy bars, crushed
- 1/4 cup chopped peanuts (optional)
- Whipped cream for serving
Instructions
- Preheat oven to 375°F (190°C). Roll out pie crusts and cut into circles to fit a mini pie pan or muffin tin. Press crusts into greased cups and prick bottoms with a fork. Bake for 10-12 minutes until golden, then let cool completely.
- In a bowl, mix cream cheese, powdered sugar, and vanilla until smooth. Fold in 1/4 cup of caramel sauce. Spoon this mixture evenly into cooled crusts.
- Drizzle remaining caramel sauce over each pie. Sprinkle crushed Butterfinger bars and optional peanuts on top. Chill for at least 30 minutes before serving with whipped cream.
Notes
You can customize the seasonings to taste.
- Prep Time: 15 minutes
- Cook Time: 30 minutes
- Method: Dessert
- Cuisine: American