Greek Style Loaded Hummus: The Ultimate Mediterranean Appetizer
Greek Style Loaded Hummus transforms a simple chickpea dip into a stunning Mediterranean appetizer that your guests will rave about for weeks. This Greek Style Loaded Hummus recipe combines creamy, velvety hummus with a colorful array of fresh toppings that burst with flavor in every single bite. Moreover, you will love how this Greek Style Loaded Hummus comes together in just fifteen minutes with zero cooking required. Whether you serve it at a summer barbecue, a holiday gathering, or a casual weeknight dinner, this Greek Style Loaded Hummus delivers impressive results every time.
The first time you scoop this Greek Style Loaded Hummus onto a warm pita chip, you will experience an incredible medley of textures and tastes. The smooth, garlicky hummus base spreads like silk across your tongue while the crunchy cucumbers, juicy tomatoes, and briny olives add delightful contrast. Meanwhile, the tangy feta cheese crumbles and the drizzle of good olive oil tie everything together into pure Mediterranean perfection. Additionally, fresh herbs like parsley and mint brighten each bite with garden freshness. Consequently, this Greek Style Loaded Hummus quickly becomes the most requested appetizer at every party you host.
Furthermore, this Greek Style Loaded Hummus fits effortlessly into almost any lifestyle or dietary preference. The recipe naturally accommodates vegetarian, gluten-free, and Mediterranean diet plans without sacrificing any flavor whatsoever. Because you control the toppings, you can customize this Greek Style Loaded Hummus to match your family’s exact taste preferences. In addition, the ingredients remain affordable and accessible at any grocery store in the United States. Therefore, you can whip up this Greek Style Loaded Hummus whenever a craving strikes without breaking your budget or making a special shopping trip.
Quick Recipe Highlights
- Flavor Profile: This Greek Style Loaded Hummus delivers a bold, tangy, and savory experience that balances creamy garlic hummus with salty feta, bright lemon, and earthy herbs. Each bite offers a harmonious blend of Mediterranean flavors that keep you coming back for more. The combination of fresh vegetables and briny olives creates a complex taste profile that never feels heavy.
- Texture: You get an incredibly satisfying mouthfeel from the smooth hummus base topped with crunchy cucumbers, firm cherry tomatoes, and crisp red onion. The creamy feta and velvety olive oil add a luxurious richness that coats your palate. Meanwhile, the toasted pine nuts provide a delightful crunch that contrasts beautifully with the softer elements.
- Aroma: The fragrance of fresh garlic, lemon zest, and chopped herbs fills the air the moment you set this Greek Style Loaded Hummus on the table. Oregano and mint release earthy, sweet notes that immediately transport you to a sunny Mediterranean terrace. The olive oil carries all these aromas upward, making the dish irresistible before you even take a bite.
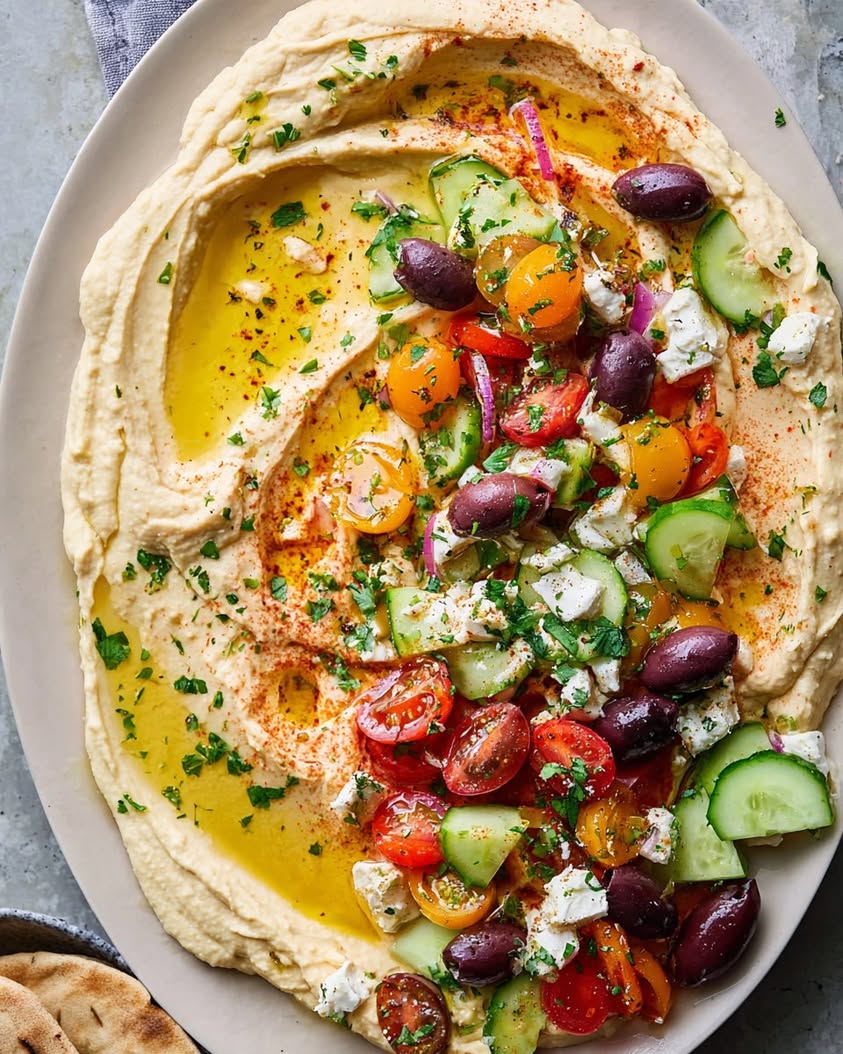
- Visual Appeal: This Greek Style Loaded Hummus looks like an edible work of art with its vibrant mosaic of red tomatoes, green cucumbers, purple onions, and white feta. The colorful toppings create a stunning contrast against the creamy beige hummus beneath. A final drizzle of golden olive oil and a sprinkle of fresh herbs makes the presentation absolutely magazine-worthy.
- Skill Level Needed: This Greek Style Loaded Hummus requires only basic kitchen skills like chopping, measuring, and layering ingredients. Even a complete beginner can execute this recipe flawlessly on the first attempt because no cooking or complex techniques are involved. If you can operate a food processor and use a knife, you can master this Greek Style Loaded Hummus with ease.
- Special Equipment: You need a food processor or high-speed blender to achieve the ultra-smooth hummus texture that makes this Greek Style Loaded Hummus so special. A sharp chef’s knife and a cutting board handle all the vegetable prep efficiently. Additionally, a large shallow serving bowl or platter works best for spreading the hummus and arranging the colorful toppings.
Recipe Overview
- Difficulty Level: This Greek Style Loaded Hummus earns an easy rating because it involves no cooking, no baking, and no advanced techniques. You simply blend the hummus ingredients, chop the vegetables, and arrange everything on a platter. The entire process takes about fifteen minutes from start to finish, which makes it perfect for busy weeknights or last-minute entertaining. Even novice cooks achieve restaurant-quality results with this Greek Style Loaded Hummus.
- Category: This Greek Style Loaded Hummus works beautifully as an appetizer, a mezze platter centerpiece, or a light lunch option. You can serve it as a starter before a Mediterranean-inspired dinner or as a snack at casual gatherings. Additionally, it functions wonderfully as a potluck contribution because it travels well and appeals to diverse palates. Many people even enjoy this Greek Style Loaded Hummus as a satisfying meatless main course with pita bread and a salad.
- Cuisine: This Greek Style Loaded Hummus draws deeply from Greek and Middle Eastern culinary traditions that have celebrated chickpeas, olive oil, and fresh vegetables for thousands of years. The Greeks perfected the art of mezze spreads while Middle Eastern cultures pioneered creamy hummus preparations. Furthermore, this Greek Style Loaded Hummus represents a delicious fusion of these overlapping Mediterranean foodways. The result honors tradition while embracing the fresh, vibrant flavors that define modern Mediterranean cooking.
- Cost: Preparing this Greek Style Loaded Hummus costs approximately eight to twelve dollars total, which breaks down to roughly two dollars per serving. Canned chickpeas, tahini, lemon, and garlic form the affordable base while fresh vegetables and feta add modest expense. However, you can reduce costs further by cooking dried chickpeas and purchasing vegetables at a farmers market. Compared to store-bought hummus with toppings, this Greek Style Loaded Hummus saves you money while tasting far superior.
- Season: This Greek Style Loaded Hummus shines brightest during spring and summer when tomatoes, cucumbers, and fresh herbs reach peak flavor and affordability. However, you can prepare this Greek Style Loaded Hummus year-round using greenhouse-grown vegetables or quality imports. During colder months, the bright Mediterranean flavors offer a welcome escape from heavy winter fare. Consequently, this Greek Style Loaded Hummus earns a place on your table during every season of the year.
- Occasion: Serve this Greek Style Loaded Hummus at dinner parties, holiday celebrations, game days, bridal showers, or casual backyard cookouts. The stunning presentation makes it elegant enough for formal entertaining while the casual nature suits relaxed gatherings. Moreover, this Greek Style Loaded Hummus works wonderfully for meal prep lunches throughout the week. You can also bring it to potlucks and picnics because it holds up beautifully at room temperature.
Why You’ll Love This Recipe
The taste and texture of this Greek Style Loaded Hummus create an unforgettable sensory experience that keeps people gathered around the bowl. Creamy, dreamy hummus made from chickpeas, tahini, lemon juice, and garlic provides the perfect canvas for the vibrant toppings. Additionally, the salty feta, sweet tomatoes, and crisp cucumbers create layers of flavor that evolve with every bite. The briny kalamata olives add depth while the fresh dill and parsley contribute bright herbal notes. Consequently, this Greek Style Loaded Hummus satisfies every craving from creamy to crunchy, salty to tangy, and everything in between.
Convenience and preparation benefits make this Greek Style Loaded Hummus an absolute joy for busy home cooks. You need only fifteen minutes and zero cooking skills to produce a dish that looks like it came from a high-end Mediterranean restaurant. Furthermore, you can prepare the hummus base up to five days in advance and simply add the fresh toppings right before serving. Cleanup takes minimal effort since you use only a food processor, a cutting board, and a serving platter. Therefore, this Greek Style Loaded Hummus delivers maximum impact with minimum kitchen effort.
Nutritional advantages abound in this Greek Style Loaded Hummus, making it a smart choice for health-conscious eaters. Chickpeas provide plant-based protein and fiber that keep you satisfied while supporting digestive health. Olive oil delivers heart-healthy monounsaturated fats, and fresh vegetables contribute essential vitamins and antioxidants. Additionally, tahini offers calcium, iron, and beneficial minerals that many people lack in their daily diets. Because this Greek Style Loaded Hummus packs so much nutrition into every serving, you can feel great about serving it to family and friends.
Social and entertaining value sets this Greek Style Loaded Hummus apart from ordinary appetizers because it encourages sharing and conversation. The large, colorful platter invites guests to gather around and scoop from the center together, creating a warm communal atmosphere. Furthermore, the customizable nature means everyone finds something they enjoy, even picky eaters. You can easily adjust toppings to accommodate dietary restrictions without making separate dishes. Consequently, this Greek Style Loaded Hummus becomes the centerpiece of connection at your gatherings.
Cost-effectiveness and accessibility make this Greek Style Loaded Hummus a practical choice for any budget. All ingredients come from standard grocery stores, and you probably already have olive oil, garlic, and lemon in your kitchen. Moreover, the recipe uses affordable pantry staples like canned chickpeas and tahini that last for months. You can feed six people generously for under twelve dollars, which beats most store-bought appetizers on both price and quality. Therefore, this Greek Style Loaded Hummus proves that incredible food does not require a big spending commitment.
Historical Background and Cultural Significance
The origin story of hummus stretches back centuries across the Levant and Eastern Mediterranean regions where chickpeas grew abundantly. Ancient cooks discovered that mashing cooked chickpeas with tahini, lemon, and garlic created a nutritious and delicious spread. Furthermore, historical records suggest that hummus-like preparations appeared in Egyptian, Syrian, and Palestinian kitchens long before reaching Greek shores. This Greek Style Loaded Hummus honors those ancient roots while celebrating the Greek tradition of layering fresh ingredients atop creamy bases. Consequently, every scoop connects you to thousands of years of Mediterranean culinary heritage.
Cultural importance surrounds hummus throughout the Middle East and Mediterranean, where it symbolizes hospitality, generosity, and community. Families serve hummus at gatherings large and small because it represents the warmth of sharing food with loved ones. Additionally, hummus appears at breakfast tables, mezze spreads, and celebratory feasts across many cultures. In Greece, the tradition of loading dips with vegetables, olives, and cheeses reflects the Greek philosophy of enjoying abundant, fresh, and colorful food. Therefore, this Greek Style Loaded Hummus carries cultural meaning far beyond its simple ingredients.
The evolution of this recipe reflects how Mediterranean cuisine has traveled and transformed across borders and generations. Greek cooks adapted traditional hummus by adding their beloved feta, oregano, and kalamata olives to create something distinctly their own. Meanwhile, Greek immigrants brought these flavorful adaptations to the United States, where the dish found enthusiastic new audiences. Over time, home cooks began loading hummus with an even wider array of toppings to suit modern tastes. Consequently, this Greek Style Loaded Hummus represents the living, breathing evolution of Mediterranean food culture.
Regional variations of loaded hummus exist throughout Greece, with each island and mainland region adding its own signature touches. Cretan cooks might add wild greens and local sheep’s milk cheese, while Thessaloniki versions feature roasted red peppers and spicy peppers. Furthermore, island versions often include capers, fresh seafood, or preserved lemons unique to their terroir. This Greek Style Loaded Hummus recipe draws inspiration from the most beloved Panhellenic toppings that showcase Greece’s finest flavors. Therefore, you can feel confident that this version captures the authentic spirit of Greek culinary tradition.
Ingredient Deep Dive
Chickpeas form the heart and soul of this Greek Style Loaded Hummus, providing the creamy base that supports all the vibrant toppings. These humble legumes have nourished Mediterranean civilizations for over seven thousand years, appearing in ancient Roman, Greek, and Egyptian cuisines. Nutritionally, chickpeas deliver impressive amounts of plant protein, fiber, folate, and manganese that support overall health. When selecting chickpeas, choose canned varieties packed in water without added salt for the cleanest flavor, or cook dried chickpeas for superior texture. Store canned chickpeas in a cool, dark pantry for up to three years, and keep cooked chickpeas refrigerated for four to five days. If you need a substitute, white beans or cannellini beans work reasonably well, though the flavor will differ from traditional hummus.
Tahini, the sesame seed paste essential to authentic hummus, contributes richness, nuttiness, and a distinctive silky quality. This ancient ingredient has graced Middle Eastern tables for centuries and remains a staple in Greek and Levantine cooking today. Tahini provides healthy fats, calcium, iron, and B vitamins that boost the nutritional profile of this Greek Style Loaded Hummus significantly. For the best results, select tahini made from hulled sesame seeds with a smooth, pourable consistency and a mild, nutty aroma. Store tahini in your pantry before opening, then refrigerate after opening for up to six months. Sunflower seed butter or cashew butter can replace tahini in a pinch, though the flavor profile will shift noticeably.
Extra virgin olive oil brings fruity, peppery notes and a luxurious mouthfeel that defines quality Greek Style Loaded Hummus. Greece produces some of the world’s finest olive oil, and Greek cooks generously drizzle it over everything from salads to dips. This golden liquid delivers heart-healthy monounsaturated fats and powerful antioxidants called polyphenols that fight inflammation. When choosing olive oil, look for cold-pressed extra virgin varieties from Greece, Italy, or Spain with a harvest date on the label. Store olive oil away from heat and light in a dark bottle or tin for up to two years. Avocado oil offers a suitable substitute, but olive oil remains the authentic and flavorful choice.
Fresh lemon juice brightens this Greek Style Loaded Hummus with tangy acidity that cuts through the richness of tahini and olive oil. Lemons have long been prized in Mediterranean cooking for their ability to enhance flavors and aid digestion. This citrus fruit provides vitamin C, flavonoids, and antioxidants that support immune health and skin vitality. Select lemons that feel heavy for their size with smooth, thin skin and a bright, uniform yellow color. Store lemons at room temperature for one week or refrigerate them in a plastic bag for up to four weeks. Bottled lemon juice works as a substitute, but fresh-squeezed juice delivers far superior flavor and aroma.
Feta cheese adds salty, tangy, and creamy elements that make this Greek Style Loaded Hummus unmistakably Greek in character. Greece has produced feta for thousands of years, and the European Union protects the name to ensure authentic origin and production methods. This brined cheese contributes calcium, protein, and beneficial bacteria that support bone health and digestion. Purchase feta packed in brine rather than pre-crumbled varieties because brine preserves moisture and flavor. Store feta in its original brine in the refrigerator for up to three months, changing the brine every two weeks. Ricotta salata or goat cheese can substitute when feta proves unavailable, though the flavor will differ.
Kalamata olives deliver briny, fruity, and slightly smoky notes that transport this Greek Style Loaded Hummus straight to the Greek islands. These purple-black olives grow exclusively in the Kalamata region of southern Greece and have been cultivated for centuries. Nutritionally, kalamata olives provide healthy fats, vitamin E, and antioxidants that support cardiovascular health. Choose olives packed in olive oil or brine without excessive additives, and look for firm texture and shiny skin. Refrigerate opened olives in their liquid for up to two months, ensuring they remain submerged. Castelvetrano or niçoise olives work as substitutes, but kalamata olives remain the most authentic Greek choice.
Fresh vegetables like cucumber, cherry tomatoes, and red onion add crunch, color, and freshness to this Greek Style Loaded Hummus. These vegetables represent the Mediterranean diet’s emphasis on seasonal, colorful produce that nourishes the body. Cucumbers provide hydration and vitamin K, tomatoes deliver lycopene and vitamin C, and red onions contribute quercetin and antioxidants. Select firm, unblemished vegetables with vibrant colors and fresh aromas for the best results. Store cucumbers and tomatoes at room temperature away from direct sunlight, and refrigerate cut onions in an airtight container for up to one week. Bell peppers, radishes, or carrots can substitute or supplement these vegetables based on preference.
Common Mistakes to Avoid
- Using cold chickpeas straight from the can often results in grainy, stiff hummus that lacks the creamy texture this Greek Style Loaded Hummus deserves. Always rinse chickpeas thoroughly and warm them slightly before blending to achieve a smoother consistency. Additionally, reserving some chickpea liquid allows you to adjust thickness as you blend.
- Skipping the tahini rinse technique means you leave valuable sesame paste stuck to the bottom of the jar. Instead, measure tahini into your food processor, then rinse the measuring cup with lemon juice to capture every last drop. This small step ensures full tahini flavor and reduces waste in your Greek Style Loaded Hummus.
- Under-blending the hummus produces a chunky, uneven texture that detracts from the luxurious experience this Greek Style Loaded Hummus should provide. Run your food processor for a full three to five minutes, scraping down the sides occasionally. Patience during blending rewards you with silky, restaurant-quality hummus every time.
- Adding all the liquid at once can create soupy hummus that lacks body and structure. Pour the chickpea liquid and olive oil gradually while the processor runs, stopping when you reach your desired consistency. This controlled approach gives you perfect results with your Greek Style Loaded Hummus.
- Topping the hummus too far in advance causes vegetables to release moisture and make the surface soggy. Add fresh toppings like cucumber and tomato immediately before serving to maintain ideal texture. You can prepare the hummus base and chop vegetables ahead, then assemble quickly at the last moment.
- Neglecting to season the hummus base adequately leaves the entire dish tasting flat despite beautiful toppings. Taste the hummus before spreading it on your platter and adjust salt, lemon, and garlic as needed. Remember that cold foods need slightly more seasoning than warm foods to taste properly balanced.
- Choosing low-quality olive oil for drizzling undermines the flavor of your Greek Style Loaded Hummus significantly. Since the olive oil appears prominently as a finishing element, use your best extra virgin variety for the drizzle. The peppery, fruity notes of quality Greek olive oil elevate this dish to extraordinary heights.
- Overloading the toppings creates a messy, unbalanced presentation that buries the creamy hummus beneath too many ingredients. Arrange toppings thoughtfully in sections or rows rather than piling everything randomly. This intentional approach allows each element to shine and makes your Greek Style Loaded Hummus visually stunning.
- Serving the hummus ice cold mutes the flavors and creates an unpleasant temperature contrast with fresh toppings. Let your Greek Style Loaded Hummus sit at room temperature for fifteen to twenty minutes before serving. This brief resting period allows the garlic, lemon, and tahini flavors to bloom and meld beautifully together.
Essential Techniques
Achieving ultra-smooth hummus texture ranks as the most important technique for perfect Greek Style Loaded Hummus because the base must feel luxurious to support the chunky toppings. To master this technique, process the tahini and lemon juice alone for a full minute before adding chickpeas, which lightens the tahini and creates a whipped foundation. Then add chickpeas gradually while the processor runs, followed by ice water one tablespoon at a time until the mixture turns silky. A common pitfall involves adding too much water too quickly, which creates soup instead of spreadable hummus. You know you have succeeded when the hummus looks glossy, holds soft peaks, and feels completely smooth between your fingers.
Properly balancing flavors ensures your Greek Style Loaded Hummus tastes vibrant rather than flat or overpowering. Start by tasting each component separately so you understand how the lemon, garlic, salt, and tahini contribute to the whole. Then adjust the finished hummus by adding small amounts of salt for overall brightness, lemon for acidity, or tahini for richness until the flavor sings. The biggest pitfall here involves under-seasoning because cold temperatures dull flavors, so err on the side of bold seasoning. Your hummus tastes perfect when it makes you want to take another bite immediately and the flavors feel bright and alive rather than muddy.
Layering toppings artfully transforms a simple bowl of hummus into the stunning Greek Style Loaded Hummus that impresses every guest. Begin by spreading the hummus in a wide, shallow bowl with a swoosh that creates valleys for olive oil to pool. Then arrange toppings in clusters or rows rather than scattering randomly, which creates visual order and allows guests to customize their scoops. A common mistake involves burying the hummus completely under toppings, so leave some creamy base visible for contrast. Success looks like a colorful, organized mosaic where every ingredient remains identifiable and the overall composition feels balanced and intentional.
Pro Tips for Perfect Greek Style Loaded Hummus
Warm your chickpeas in the microwave for thirty seconds before blending to achieve noticeably creamier results. Warm chickpeas break down more easily and create a smoother emulsion with tahini and olive oil. This simple step takes minimal effort but dramatically improves the texture of your Greek Style Loaded Hummus.
Reserve the chickpea liquid from the can and use it as your blending liquid instead of plain water. This aquafaba contains natural starches that add body and silkiness to the hummus. Furthermore, you reduce waste by using every part of the ingredient in your Greek Style Loaded Hummus.
Crush and peel your garlic cloves, then let them sit for ten minutes before adding to the food processor. This resting period allows beneficial compounds to develop fully and mellows the raw garlic bite. As a result, your Greek Style Loaded Hummus tastes garlicky without overwhelming heat.
Toast pine nuts in a dry skillet over medium heat for two to three minutes until golden and fragrant. This quick technique transforms bland nuts into crispy, buttery garnishes that elevate your Greek Style Loaded Hummus. Watch carefully because pine nuts burn quickly once they start browning.
Pat all vegetables completely dry before arranging them on your hummus platter. Excess moisture causes the hummus surface to become watery and dilutes the vibrant flavors. Therefore, take an extra minute with paper towels to ensure your Greek Style Loaded Hummus stays pristine.
Make the hummus base one to five days ahead and store it covered in the refrigerator for stress-free entertaining. The flavors actually deepen and improve overnight as garlic and lemon meld with the chickpeas. Then simply spread, top, and serve your Greek Style Loaded Hummus when guests arrive.
Use a microplane or zester to create feather-light lemon zest and garlic paste that distribute evenly throughout the hummus. These fine particles blend seamlessly and provide consistent flavor in every scoop. This small tool makes a big difference in the final quality of your Greek Style Loaded Hummus.
Drizzle your best olive oil generously over the finished dish right before serving for maximum flavor impact. The oil carries aromas, adds richness, and creates a beautiful glossy finish on your Greek Style Loaded Hummus. Do not skip this final flourish because it completes the dish beautifully.
Variations and Adaptations
Regional variations of loaded hummus reflect the diverse culinary traditions across Greece and the broader Mediterranean. A Cretan version might feature wild greens, myzithra cheese, and carob rusks crumbled over the top. Meanwhile, a version from Thessaloniki could include roasted red peppers, spicy boukovo pepper flakes, and smoked paprika. Island versions often incorporate capers, sun-dried tomatoes, and fresh seafood like shrimp or octopus. Each region celebrates its local ingredients, so feel free to explore these regional inspirations when making your Greek Style Loaded Hummus.
Seasonal adaptations allow you to enjoy this Greek Style Loaded Hummus year-round with the freshest possible ingredients. Spring versions shine with peas, radishes, and fresh mint while summer brings peak tomatoes, cucumbers, and basil. Autumn adaptations feature roasted squash, pomegranate seeds, and sage, while winter versions incorporate roasted root vegetables and preserved lemons. By following the seasons, you ensure your Greek Style Loaded Hummus always tastes vibrant and celebrates the best available produce.
Dietary modifications make this Greek Style Loaded Hummus accessible to almost everyone at your table. For a vegan version, simply omit the feta cheese and add extra olives, roasted peppers, or nutritional yeast for umami depth. Dairy-free eaters can substitute a cashew-based feta alternative or skip cheese entirely. Low-carb and keto diners can serve the hummus with celery, cucumber slices, and bell pepper strips instead of pita. These simple swaps keep your Greek Style Loaded Hummus inclusive for every guest.
Flavor variations let you customize this Greek Style Loaded Hummus to match any menu or mood. Add roasted garlic for deeper sweetness, harissa for spicy warmth, or za’atar for herbal complexity. A pesto-swirled version appeals to basil lovers, while a smoked paprika version suits those who enjoy bold, earthy notes. You can even create a spicy version with jalapeños and cayenne for guests who crave heat. The possibilities remain endless with this versatile Greek Style Loaded Hummus base.
Texture modifications accommodate different preferences and dietary needs. For a chunkier hummus, pulse the chickpeas less and leave some texture intact. A thinner consistency works better as a dip for delicate chips or vegetables. You can also add whipped ricotta or Greek yogurt to the base for extra creaminess. These adjustments ensure your Greek Style Loaded Hummus matches exactly what you and your guests enjoy most.
Presentation alternatives range from rustic to elegant depending on your occasion. A large shallow bowl creates a dramatic centerpiece while individual ramekins offer elegant portioned servings. You can spread hummus on a wooden board for a rustic mezze presentation or pipe it into cucumber cups for passed appetizers. Layering hummus in a glass trifle dish creates a stunning layered effect. Choose the presentation that best fits your Greek Style Loaded Hummus occasion.
Serving and Presentation Guide
Plating techniques for this Greek Style Loaded Hummus start with selecting the right vessel, ideally a wide, shallow bowl or rimmed platter that gives the hummus room to spread. Use the back of a spoon to create gentle swooshes and swirls across the surface, which catch olive oil and create visual interest. Then build height with toppings by clustering them in distinct sections rather than scattering randomly. This thoughtful approach transforms your Greek Style Loaded Hummus into a professional-looking dish that photographs beautifully.
Garnishing ideas elevate your Greek Style Loaded Hummus from delicious to unforgettable with just a few final touches. Scatter fresh microgreens, edible flowers, or delicate herb sprigs across the top for a garden-fresh appearance. A sprinkle of sumac or paprika adds vibrant color and a subtle flavor boost. Toasted sesame seeds, crushed pistachios, or pine nuts provide textural contrast and visual appeal. These garnishes make your Greek Style Loaded Hummus look as impressive as it tastes.
Traditional accompaniments for this Greek Style Loaded Hummus include warm pita bread cut into triangles, crusty baguette slices, or sesame crackers. Raw vegetables like cucumber rounds, bell pepper strips, and radishes offer lighter dipping options. Some Greeks serve hummus alongside other mezze items like dolmades, spanakopita, and tzatziki for a complete spread. These traditional pairings create an authentic Mediterranean experience around your Greek Style Loaded Hummus.
Modern serving suggestions include using this Greek Style Loaded Hummus as a base for grain bowls, a spread for wraps and sandwiches, or a topping for grilled chicken and fish. You can thin leftover hummus with water and olive oil to create a creamy salad dressing. Some creative hosts even use it as a dip for French fries or a sauce for roasted vegetables. These contemporary applications give your Greek Style Loaded Hummus new life beyond the appetizer table.
Temperature considerations matter significantly for optimal enjoyment of this Greek Style Loaded Hummus. Serve it at room temperature for the fullest flavor expression, allowing the garlic, lemon, and tahini notes to bloom completely. If you prepare it ahead and refrigerate, remove it thirty minutes before serving to take the chill off. The fresh vegetable toppings should remain cool, so add them just before serving to maintain their crisp texture. This temperature balance makes your Greek Style Loaded Hummus taste perfect.
Portion control tips help you plan accurately for gatherings of any size. One batch of this Greek Style Loaded Hummus serves six as an appetizer when paired with pita and vegetables. For larger crowds, double the recipe and use a bigger platter to accommodate the increased volume. Each guest typically enjoys about one-third cup of hummus with toppings and dippers. These guidelines ensure you always prepare the right amount of Greek Style Loaded Hummus for your event.
Wine and Beverage Pairing
Wine pairings for this Greek Style Loaded Hummus focus on crisp, bright whites and light reds that complement Mediterranean flavors. An Assyrtiko from Santorini offers citrus and mineral notes that cut through the creamy hummus beautifully. Alternatively, a dry rosé from Provence provides refreshing acidity and red fruit notes that pair wonderfully with the tomatoes and olives. For red wine lovers, a light-bodied Pinot Noir or Beaujolais works well without overpowering the delicate flavors. These wine choices enhance every bite of your Greek Style Loaded Hummus.
Non-alcoholic alternatives ensure everyone at your gathering can enjoy a complementary beverage with this Greek Style Loaded Hummus. Sparkling water with lemon and fresh mint offers refreshing effervescence that cleanses the palate between bites. A homemade lemonade with rosemary or basil adds herbal interest that echoes the Mediterranean herbs in the dish. Iced green tea with mint provides gentle tannins and antioxidants that pair surprisingly well with hummus. These alcohol-free options keep your Greek Style Loaded Hummus gathering inclusive and refreshing.
Coffee and tea pairings might seem unconventional with hummus, but certain varieties work beautifully. A light-roasted Greek coffee with subtle sweetness complements the nutty tahini notes in the hummus. Mint tea, a staple in Mediterranean households, refreshes the palate and aids digestion after enjoying this Greek Style Loaded Hummus. Chamomile tea offers a gentle floral quality that harmonizes with the fresh herbs in the toppings. These warm beverages create cozy pairings for casual Greek Style Loaded Hummus enjoyment.
Temperature considerations for beverages matter when serving this Greek Style Loaded Hummus because the dish itself tastes best at room temperature. Serve white wines and rosés well-chilled at around forty-five to fifty degrees Fahrenheit for maximum refreshment. Red wines should be slightly cool at fifty-five to sixty degrees to avoid overwhelming the food. Non-alcoholic beverages taste best ice-cold with plenty of ice to maintain crispness throughout your Greek Style Loaded Hummus experience.
Serving suggestions for beverages include offering a selection of options so guests can choose their preference. Set up a self-serve beverage station with wine, sparkling water, and tea so people can refill at their leisure. Provide elegant glassware and plenty of ice to elevate the experience. These thoughtful touches transform your Greek Style Loaded Hummus gathering into a memorable occasion that guests will want to repeat.
Storage and Shelf Life
Storage methods for this Greek Style Loaded Hummus vary depending on whether you store the hummus base alone or the fully assembled dish. Always store the hummus base separately from the toppings to prevent sogginess and maintain optimal texture. Transfer leftover hummus to an airtight container and press plastic wrap directly onto the surface to prevent oxidation. Then refrigerate the toppings in separate containers until ready to serve again. This separation keeps every component of your Greek Style Loaded Hummus tasting fresh.
Temperature requirements for food safety dictate that hummus should remain refrigerated at forty degrees Fahrenheit or below. Never leave this Greek Style Loaded Hummus at room temperature for more than two hours, or one hour if the ambient temperature exceeds ninety degrees. When serving outdoors, set the bowl over a bed of ice to maintain safe temperatures. These precautions ensure your Greek Style Loaded Hummus remains safe to enjoy for days.
Container recommendations include glass containers with tight-fitting lids, which preserve flavor better than plastic. Wide, shallow containers allow the hummus to cool quickly and evenly in the refrigerator. For the hummus base, choose a container that minimizes air space to reduce oxidation. Smaller containers work well for individual toppings so you can grab only what you need. Proper containers extend the shelf life of your Greek Style Loaded Hummus significantly.
Signs of spoilage in hummus include sour odors, discoloration, mold growth, or an unusually dry, cracked surface. Fresh hummus smells nutty and lemony with no off-putting notes whatsoever. If you notice any questionable changes, discard the hummus immediately rather than risk illness. The fresh vegetable toppings spoil faster than the hummus base, so check them separately. Always trust your senses when evaluating whether your Greek Style Loaded Hummus remains safe.
Reheating instructions rarely apply to hummus because it tastes best cold or at room temperature. However, if the hummus feels too thick after refrigeration, stir in a tablespoon of warm water or olive oil until smooth. Never microwave hummus because heat damages the emulsion and creates an unpleasant texture. Simply let refrigerated hummus sit at room temperature for fifteen to twenty minutes before serving your Greek Style Loaded Hummus again.
Freezing guidelines allow you to store hummus base for up to four months in the freezer. Transfer cooled hummus to a freezer-safe container, leaving headspace for expansion, and press plastic wrap onto the surface. Thaw frozen hummus overnight in the refrigerator, then stir well and adjust seasonings before serving. Do not freeze the fresh toppings because they become mushy upon thawing. This freezing strategy lets you prepare Greek Style Loaded Hummus components well in advance.
Make Ahead Strategies
Prep timeline for this Greek Style Loaded Hummus allows Print
Greek Style Loaded Hummus
- Total Time: 15 minutes
- Yield: 4
Description
Creamy hummus topped with Greek-inspired ingredients like feta, olives, cucumber, tomato, and red onion, drizzled with olive oil and served with pita.
Ingredients
- 2 cups hummus
- 1/2 cup crumbled feta cheese
- 1/4 cup Kalamata olives, pitted and sliced
- 1/2 cup diced cucumber
- 1/2 cup diced tomato
- 1/4 cup diced red onion
- 2 tablespoons extra virgin olive oil
- 1 tablespoon chopped fresh parsley
- 1 teaspoon dried oregano
- Salt and pepper to taste
- Pita bread or pita chips for serving
Instructions
- Spread the hummus evenly on a large serving plate or shallow bowl, creating a slight well in the center.
- Top with crumbled feta, Kalamata olives, cucumber, tomato, and red onion.
- Drizzle with olive oil and sprinkle with parsley, oregano, salt, and pepper.
- Serve immediately with pita bread or pita chips.
Notes
You can customize the seasonings to taste.
- Prep Time: 15 minutes
- Cook Time: 0 minutes
- Method: Appetizer
- Cuisine: Greek