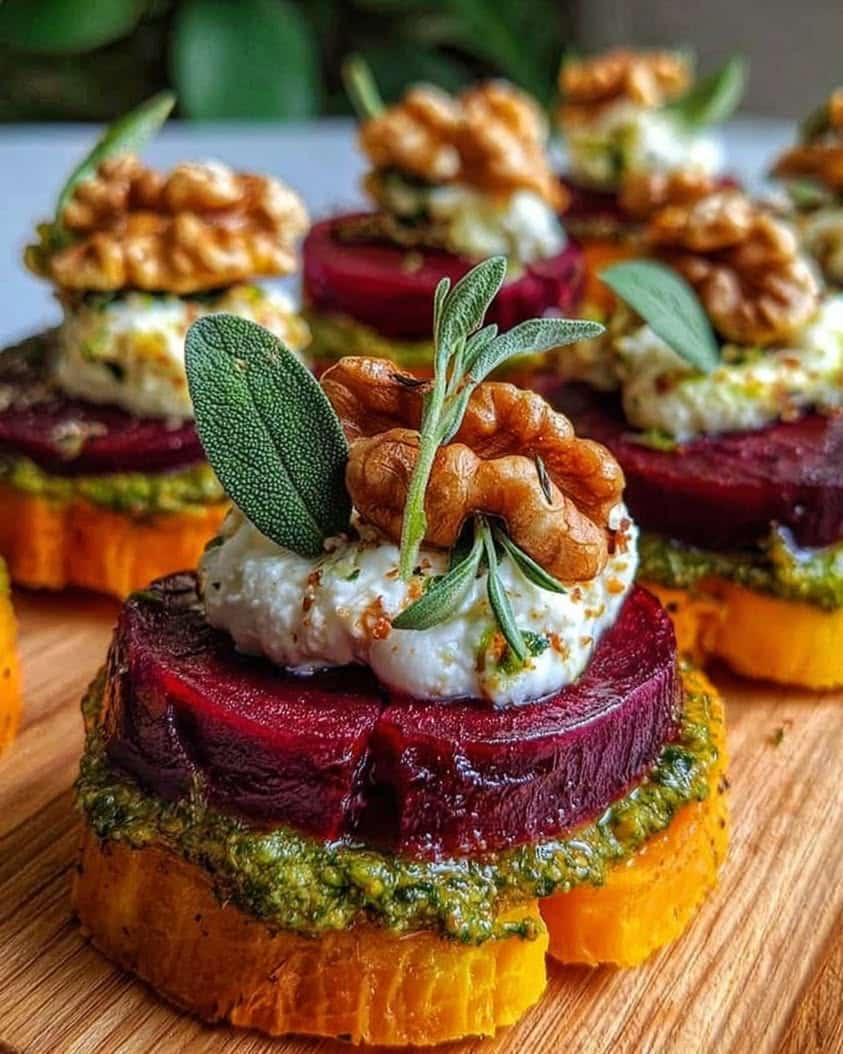
Black Forest Cookie Dough Brownie Bombs: An Irresistible Dessert
Imagine the ultimate dessert mashup, a treat that combines three beloved classics into one perfect bite. That is the magic of Black Forest Cookie Dough Brownie Bombs. These decadent spheres feature a rich, fudgy brownie center, a layer of edible cherry-studded cookie dough, and a luxurious chocolate shell. Ultimately, they deliver an explosion of flavor and texture that is simply unforgettable. This recipe is a showstopper, perfect for impressing guests or satisfying a serious chocolate craving.
The journey to creating these bombs is as fun as eating them. You start with a batch of deeply chocolatey brownies, bake them until just set, and then crumble them into a fine base. Next, you mix a safe-to-eat cookie dough bursting with tart dried cherries. Then, you assemble each bomb by hand, rolling the brownie and dough mixture into perfect spheres. Finally, a dunk in melted chocolate and a sprinkle of festive toppings creates the final, gorgeous product. The result is a handheld dessert that feels both gourmet and incredibly fun.
These Black Forest Cookie Dough Brownie Bombs are more than just a dessert; they are an experience. The combination of flavors pays direct homage to the iconic Black Forest cake, but in a fun, portable format. Each component complements the others perfectly, from the bitter-sweet chocolate to the bright, chewy cherries. Moreover, they are incredibly versatile for different occasions, from holiday cookie plates to birthday party favors. Get ready to fall in love with this innovative and utterly delicious treat.
Quick Recipe Highlights
- Flavor Profile: These bombs deliver a powerful trio of deep, fudgy chocolate, sweet vanilla cookie dough, and the bright, tangy punch of cherries. The flavor is intensely chocolate-forward with delightful fruity notes that cut through the richness, creating a perfectly balanced bite reminiscent of the classic German dessert.
- Texture: Experience a fantastic textural journey. You get a dense, moist brownie crumb, the soft and slightly chewy edible cookie dough, and the definitive snap of a tempered chocolate shell. The dried cherries add pleasant bursts of chewiness, making every mouthful exciting.
- Aroma: As you prepare these, your kitchen will fill with the warm, comforting scent of baking cocoa and brown sugar. After dipping, the aroma of premium chocolate takes over, complemented by the subtle, fruity fragrance of the cherries, creating an irresistible olfactory preview.
- Visual Appeal: These are stunning little confections. The glossy chocolate coating looks professional, while the cherry pieces and optional white drizzle or sprinkles add beautiful color contrast. They look elegant on a platter and promise a decadent treat within.
- Skill Level Needed: This is an intermediate-level recipe due to the multi-step process and hand-forming technique. However, it requires no advanced pastry skills. Patience and a willingness to get your hands a little messy are the main requirements for success.
- Special Equipment: A standard muffin tin or baking sheet for the brownies, a medium cookie scoop for consistent portioning, and a fork or dipping tools for coating the bombs in chocolate are very helpful. Parchment paper is essential for easy cleanup and setting.
Recipe Overview
- Difficulty Level: We rate this recipe as intermediate. While each individual component is straightforward, the assembly involves several stages: baking and cooling brownies, making the edible dough, forming the bombs, and tempering chocolate for dipping. Consequently, it requires organization and a bit of time, but the techniques are all beginner-friendly with careful guidance.
- Category: This dessert falls squarely into the category of confections or hand-held treats. It blends elements of brownies, cookie dough truffles, and chocolate-dipped candies. They are perfect for dessert tables, gift boxes, and fancy snack occasions where a fork is not required.
- Cuisine: The flavor inspiration is distinctly German, drawing from the world-famous Schwarzwälder Kirschtorte (Black Forest Cake). The technique, however, is modern and playful, fitting into the contemporary American trend of dessert mashups and gourmet stuffed treats.
- Cost: The cost is moderate, primarily driven by the quality of chocolate and cocoa powder. Using good chocolate for the shell makes a significant difference. Dried cherries can be pricey but are a key flavor component. Overall, the yield of 16 impressive bombs makes them cost-effective for special events.
- Season: These bombs are fantastic year-round but feel particularly special during the holiday season. Their rich, indulgent nature suits fall and winter, while the cherry flavor can make them a hit for Valentine’s Day or summer picnics if kept cool.
- Occasion: They are ideal for potlucks, bake sales, holiday gifting, birthday parties, or as a impressive finish to a dinner party. Their individual serving size and stunning look make them a versatile choice for many celebrations.
Why You’ll Love This Recipe
First and foremost, the taste and texture combination is absolutely divine. Each Black Forest Cookie Dough Brownie Bomb delivers a complex symphony in your mouth. You experience the initial crisp break of the chocolate shell, followed by the soft, vanilla-scented cookie dough, and finally the dense, fudgy heart of chocolate brownie. The chewy, tart dried cherries provide a necessary acidic contrast that keeps each bite from being overly sweet. Ultimately, this dessert satisfies multiple cravings at once, making it a true crowd-pleaser for any chocolate lover.
From a convenience standpoint, these bombs offer excellent make-ahead potential. You can bake the brownie base a day in advance. Similarly, you can assemble the bombs and chill them before the final chocolate coating. This staging breaks the recipe into manageable tasks. Furthermore, they are perfectly portable and require no last-minute plating, which is a huge bonus for entertaining. You simply arrange them on a platter straight from the fridge.
While not a health food, this recipe allows for control over ingredients. You can use high-quality cocoa and chocolate with simpler ingredient lists. By making the cookie dough egg-free, you ensure it’s safe to eat raw, addressing a common concern. Additionally, you can source dried cherries without added sugars or oils if desired. Portion control is also built-in; each bomb is a complete, satisfying dessert serving, which can help prevent overindulgence compared to cutting slices from a large cake.
The social and entertaining value of these treats is incredibly high. They look professionally made and never fail to elicit “wows” from guests. They are fantastic conversation starters at parties. Moreover, they make thoughtful, personalized gifts when packaged in a cute box or tin. For bake sales or fundraisers, they command a higher price point due to their gourmet appearance. In short, they are a surefire way to showcase your baking skills and generosity.
Finally, these Black Forest Cookie Dough Brownie Bombs are surprisingly accessible and cost-effective. The ingredient list is composed mostly of pantry staples like flour, sugar, butter, and cocoa. The special items—dried cherries and dipping chocolate—are one-time investments that yield a large batch. Compared to buying similar artisan chocolates from a boutique, making them at home saves a considerable amount of money. You also get the joy and pride of creating something spectacular with your own hands.
Historical Background and Cultural Significance
The direct inspiration for these bombs is the Black Forest cake, or Schwarzwälder Kirschtorte. This iconic German dessert originated in the Black Forest region (Schwarzwald) in the early 20th century. Traditional versions feature layers of chocolate sponge cake soaked in Kirschwasser (a clear cherry brandy), whipped cream, and sour cherries. The combination of chocolate and cherry became legendary, symbolizing the region’s culinary identity. Our recipe captures this classic pairing but reimagines it in a modern, playful format that forgoes the alcohol and intricate layering for a more casual, fun presentation.
Culturally, the Black Forest cake is one of Germany’s most famous culinary exports. It is so revered that precise guidelines for the dessert are part of German food law. While our bombs take creative liberties, they honor the spirit of the original by prioritizing the essential chocolate-cherry harmony. This adaptation reflects a broader trend in global baking: deconstructing classic desserts into new, shareable forms like bombs, truffles, and bars. It makes a traditional flavor profile more approachable and interactive for today’s bakers and eaters.
The evolution of this specific recipe format stems from the popular “cake pop” and “truffle” trends. Bakers began experimenting with crumbling baked goods and binding them with frosting or dough to create rollable centers. The addition of edible cookie dough as a layer is a more recent innovation, capitalizing on the widespread love for safe-to-eat dough. The “bomb” concept implies an explosive flavor experience, which perfectly describes the multi-textural, multi-layered delight of this treat. It represents the ongoing creativity in home baking and dessert culture.
Regional variations of the core concept are easy to imagine. For instance, using orange zest and dried cranberries could create a “Chocolate Orange” bomb. Incorporating peanut butter into the dough and using Reese’s pieces would appeal to different tastes. The basic formula of a baked crumb base, a flavored binding layer, and a chocolate shell is incredibly versatile. This adaptability ensures the Black Forest Cookie Dough Brownie Bombs can serve as a template for endless seasonal and regional flavor explorations, keeping the idea fresh and exciting.
Ingredient Deep Dive
Unsweetened Cocoa Powder: This is the soul of the brownie layer, providing intense chocolate flavor without sweetness. Opt for natural cocoa powder for a classic, slightly acidic taste. It’s rich in flavonoids, which are antioxidants. For best results, sift it with your flour to prevent lumps. Store cocoa in a cool, dark place to maintain its potency. In a pinch, you could use Dutch-processed cocoa, but note it reacts differently with leaveners and may yield a denser brownie.
Dried Tart Cherries: These are the non-negotiable “Black Forest” element. Tart Montmorency cherries are ideal for their bright, acidic flavor that balances the sweet chocolate. They are a good source of fiber and vitamin A. Look for cherries dried without excessive added sugar or oil. If they are very hard, soak them in warm water for 10 minutes and pat dry before chopping. As a substitute, you could use high-quality cherry jam or finely chopped maraschino cherries, though the texture and sweetness will differ.
Sweetened Condensed Milk: This is the magic binder for the edible cookie dough. It provides sweetness, creaminess, and the perfect sticky texture to hold the dough together without eggs. It’s a shelf-stable product made by removing water from milk and adding sugar. For a richer flavor, you could use dulce de leche. There is no direct one-to-one substitute that provides the same texture; alternatives would require re-engineering the dough recipe significantly.
Chocolate for Dipping: This creates the professional-looking shell. Use high-quality chocolate bars or melting wafers labeled for confectionery use. Chocolate chips contain stabilizers and may not melt as smoothly for dipping. Good chocolate contains cocoa butter, which sets firmly and has a satisfying snap. Tempering it (a process of precise heating and cooling) ensures a glossy finish that doesn’t melt in your hands. Store all chocolate away from heat and moisture to prevent bloom (those white streaks).
All-Purpose Flour: For the edible dough, the flour must be heat-treated to kill any potential bacteria since it won’t be baked. Simply spread it on a baking sheet and bake at 350°F for 5-7 minutes, then let it cool completely before using. This step is crucial for food safety. For a gluten-free version, use a 1:1 gluten-free flour blend and ensure it is also heat-treated using the same method.
Common Mistakes to Avoid
- Overbaking the Brownie Base: The brownies should be just set in the center when you take them out. Overbaking creates a dry, crumbly texture that won’t bind well. Remember, they will continue to cook slightly in the hot pan as they cool. A toothpick inserted should have a few moist crumbs attached, not come out completely clean.
- Skipping the Flour Heat-Treatment: This is a major food safety step for the edible cookie dough. Do not use raw, untreated flour. Simply baking it for a few minutes kills any potential pathogens. Let the flour cool completely before adding it to your wet ingredients, or it could melt the butter and alter the dough texture.
- Using Cold Brownie Crumbs: The brownie crumbs should be at room temperature when you mix them with the other bomb ingredients. If they are still warm, they can melt the butter in the dough mixture. If they are fridge-cold, they won’t incorporate evenly, leading to a crumbly, difficult-to-roll mixture.
- Forming Bombs That Are Too Large: It’s tempting to make big bombs, but they become difficult to coat in chocolate and are overly rich to eat. Use a medium cookie scoop (about 1.5 tablespoons) for portioning to ensure consistent, bite-sized treats that are easy to handle and enjoy.
- Dipping with Warm Bombs: The assembled bombs must be thoroughly chilled and firm before dipping. If the center is even slightly soft, it can fall apart in the warm chocolate or cause the shell to crack as it sets. Chill them for at least 30-60 minutes until very firm.
- Overheating the Dipping Chocolate: Chocolate burns easily. Always melt it gently using a double boiler or in short bursts in the microwave, stirring frequently. Overheated chocolate will become thick, grainy, and unusable. If using melting wafers, follow the package instructions precisely for the best fluidity.
- Not Tapping Off Excess Chocolate: When you lift a bomb from the melted chocolate, gently tap your fork or tool on the side of the bowl. This removes the excess chocolate, preventing a thick, clumsy foot from forming on the bottom and giving you a smoother, more professional finish.
- Rushing the Setting Process: Allow the dipped bombs to set completely at room temperature or in the fridge before moving or packaging them. Touching them too soon will leave fingerprints in the shell. Patience here ensures a perfect glossy finish.
Essential Techniques
Creating the Brownie Crumbs: The goal is fine, uniform crumbs that will bind seamlessly with the cookie dough. First, ensure your brownies are completely cool. Then, use your fingers or a fork to break them apart in a large bowl. You can also pulse them briefly in a food processor, but be careful not to turn them into a paste. The crumbs should resemble coarse sand. This texture is crucial because it allows the dough to act as a binder, creating a moldable mixture that isn’t pasty or dry.
Making Edible Cookie Dough: This technique hinges on food safety and texture. Always heat-treat your flour first. Cream your room-temperature butter and sugars until light and fluffy; this incorporates air and prevents graininess. Then, stream in the condensed milk slowly while mixing to create an emulsion. Finally, fold in the dry ingredients and cherries just until combined. Overmixing can develop the wheat proteins, making the dough tough. The final dough should be soft, pliable, and hold together when pinched.
Forming and Chilling the Bombs: Portion the mixture using a scoop for consistency. Roll each portion firmly between your palms to create a smooth, round sphere. Apply even pressure to ensure there are no cracks or seams. If the mixture sticks to your hands, dampen them slightly with water. Immediately place each formed bomb on a parchment-lined tray. The chilling step is non-negotiable; it solidifies the fats (butter and chocolate in the brownie), making the bombs rigid enough to withstand dipping without losing shape.
Tempering Chocolate for Dipping: Proper tempering gives chocolate its snap, shine, and stability. The seed method is reliable for home bakers: melt two-thirds of your chocolate to 115°F (for dark), then remove from heat and stir in the remaining one-third (the “seed”) until it melts and the temperature drops to 88-90°F. This process aligns the cocoa butter crystals. Test by spreading a thin smear on parchment; it should set firm and glossy in minutes. Correctly tempered chocolate contracts as it sets, making it easy to release from parchment paper.
Pro Tips for Perfect Black Forest Cookie Dough Brownie Bombs
First, line every pan and tray with parchment paper. This prevents sticking during every stage, from baking the brownies to setting the dipped bombs, and makes cleanup effortless.
For the most flavorful brownie base, use a combination of cocoa powder and melted dark chocolate. This double chocolate hit creates a deeper, more complex flavor foundation for your bombs.
Chop your dried cherries into small, pea-sized pieces. Larger chunks can make the bombs difficult to roll smoothly and may poke through the chocolate shell during dipping.
If your bomb mixture feels too dry and crumbly to roll, add an extra teaspoon of condensed milk. Conversely, if it feels too sticky, add a tiny bit more heat-treated flour until it’s workable.
For a flawless chocolate coating, use a fork or specialty dipping tools. Spear a chilled bomb, dip it, let the excess drip off, then gently slide it onto the parchment paper using a toothpick to push it off the fork.
Add a teaspoon of coconut oil or paramount crystals to your melting chocolate if you find it too thick for dipping. This thins the consistency slightly for a smoother, thinner shell.
Decorate immediately after dipping while the chocolate is still wet. Sprinkle with extra chopped cherries, sea salt, or festive sprinkles for visual appeal and extra texture.
For a true Black Forest touch, add a tiny drop of almond extract (not imitation) to the cookie dough. Almond is a traditional flavor pairing with cherries and chocolate in the classic cake.
Variations and Adaptations
Regional Variations: For a Rocky Road twist, add mini marshmallows and chopped walnuts to the mixture. A Salted Caramel version could involve a caramel center or a drizzle after dipping. To mimic a Turtle candy, incorporate pecans and use caramel in the dough.
Seasonal Adaptations: In fall, use dried cranberries and orange zest for a chocolate-orange cranberry bomb. For winter holidays, add peppermint extract to the dough and crush candy canes for topping. In spring, try a lemon-white chocolate combo with dried blueberries.
Dietary Modifications: For gluten-free, use a certified GF flour blend and heat-treat it. For dairy-free, use plant-based butter and condensed coconut milk, and ensure your chocolate is dairy-free. Vegan adaptations would also require a flax egg or similar binder for the brownie layer.
Flavor Variations: Replace the cherries with an equal amount of chopped dried apricots and add a hint of cardamom. For a coffee lovers’ version, add instant espresso powder to the brownie batter and use chocolate-covered espresso beans as garnish.
Texture Modifications: For added crunch, roll the formed bombs in crushed pretzels or toffee bits before the final chill. For a smoother interior, process the brownie crumbs very finely and consider adding a tablespoon of cream cheese to the dough mixture.
Presentation Alternatives: Instead of a full dip, simply drizzle melted chocolate over the bombs for a more rustic look. You can also roll the finished bombs in cocoa powder, powdered sugar, or colored sanding sugar for a different aesthetic.
Serving and Presentation Guide
Plating is key for these elegant treats. Arrange them in a single layer on a decorative platter or cake stand. Consider using mini cupcake liners for a polished, individual presentation that also keeps them from sticking together. For a tiered effect, place a small cup or bowl upside down in the center of a plate and arrange the bombs around it, creating height and visual interest.
Garnishing elevates their appearance. After the chocolate sets, a delicate drizzle of white chocolate or pink-tinted chocolate creates beautiful contrast. A light dusting of edible gold luster dust or a single freeze-dried cherry piece on top looks stunning. A tiny sprinkle of flaky sea salt just before the shell sets enhances both flavor and sophistication.
Traditional accompaniments would mirror Black Forest cake: a dollop of lightly sweetened whipped cream or a side of cherry compote for dipping. For a modern twist, serve with a small glass of cold milk, a shot of espresso, or even a glass of cherry-infused port for adults.
Consider temperature when serving. These bombs are best served slightly cool, straight from the refrigerator, especially if your kitchen is warm. This ensures the chocolate shell retains its snap and the interior stays firm. However, let them sit for 5 minutes before serving to allow the full flavor profile to emerge.
For portion control, one bomb per person is a perfect dessert serving. If serving as part of a larger dessert buffet alongside other sweets, you can halve them with a sharp knife to create beautiful cross-sections that showcase the layers, allowing guests to sample a bite without commitment.
Wine and Beverage Pairing
Wine pairings should complement the rich chocolate and bright cherry. A Brachetto d’Acqui, a lightly sparkling red Italian wine with sweet berry notes, is a fantastic match. Alternatively, a late-harvest Zinfandel or a Port with its own dark fruit flavors can stand up to the intensity. For a classic pairing, a German Riesling Auslese, with its balance of sweetness and acidity, mirrors the dessert’s own sweet-tart profile beautifully.
Non-alcoholic alternatives are just as important. A glass of cold, whole milk is a timeless partner for chocolate. Cherry-flavored sparkling water or a homemade cherry-vanilla cream soda can echo the dessert’s flavors. A rich, cold-brew coffee or a dark roast espresso provides a bitter counterpoint that cleanses the palate between bites.
Coffee and tea pairings work wonderfully. A medium-roast coffee with chocolatey notes enhances the brownie element. A black tea like Ceylon or an Earl Grey with its citrusy bergamot can cut through the sweetness. For a more adventurous match, try a cherry-infused herbal tea served iced.
Always consider temperature. Chilled beverages like milk, sparkling water, or white wine provide a refreshing contrast to the rich, room-temperature bomb. Warm beverages like coffee or tea offer a comforting contrast. Ultimately, the goal is to provide a cleansing sip that prepares the palate for the next decadent bite.
Storage and Shelf Life
Proper storage is essential for maintaining texture and flavor. Store the completely set Black Forest Cookie Dough Brownie Bombs in a single layer in an airtight container. Place parchment paper between layers if you must stack them. Keep them in the refrigerator for up to 7 days. The cool temperature keeps the chocolate shell firm and prevents the interior from becoming too soft.
For longer storage, these bombs freeze exceptionally well. Place them in a single layer on a baking sheet to flash-freeze until solid (about 2 hours). Then, transfer them to a freezer-safe bag or container, separating layers with parchment. They will keep for up to 2 months. Thaw overnight in the refrigerator before serving. Do not thaw at room temperature, as condensation will form on the chocolate shell, causing bloom and a sticky surface.
Signs of spoilage are rare due to the sugar content but watch for any off odors, significant changes in texture (like excessive hardness or sogginess), or mold growth, especially if fresh fruit was incorporated incorrectly. The chocolate may develop a whitish bloom from temperature changes; this is safe to eat but indicates the fat has separated and the texture may be less perfect.
Reheating is not recommended, as the structure will collapse. However, if a bomb has been refrigerated and the chocolate is too hard for your liking, let it sit at room temperature for 10-15 minutes before eating to slightly soften the interior layers while keeping the shell intact.
Make Ahead Strategies
These bombs are ideal for advanced preparation. You can bake and cool the brownie base up to 2 days in advance. Simply wrap the cooled pan in plastic wrap and store at room temperature. You can also prepare the edible cookie dough and store it, covered, in the refrigerator for up to 3 days. Let it come to room temperature for easy mixing with the brownie crumbs when you’re ready to assemble.
The full assembly can be completed in stages. Form the bombs and chill them on a tray for up to 24 hours before dipping. You can even freeze the un-dipped bombs at this stage for a month. When ready, let them thaw slightly in the fridge before dipping. The chocolate dipping is best done the day you plan to serve or gift them for the freshest taste and shiniest appearance.
Assessing quality impact is straightforward. The flavors actually meld and improve after a day in the fridge, making them even better. The main concern is the chocolate shell losing its glossy sheen over days in the fridge, but the taste remains excellent. For optimal presentation, dip within a day of serving.
If you need to store dipped bombs for more than a day, ensure your container is completely airtight to prevent refrigerator odors from affecting them. Consider adding a small piece of parchment paper on top before sealing the lid to minimize condensation on the chocolate when you take the container out of the cold fridge.
Scaling Instructions
Halving the recipe is straightforward for a smaller batch. Simply divide all ingredients by two. Use a smaller baking dish (like an 8×8 inch) for the brownies, adjusting the bake time slightly downward. The assembly process remains the same. This is perfect for testing the recipe or making a treat for a small household.
Doubling or tripling the recipe is excellent for events or gifting. Use multiple baking pans or bake in batches to ensure even cooking. When mixing the dough, you may need to use a stand mixer or mix in very large batches by hand. Allow extra time for chilling and dipping, as working with a large quantity of bombs can be time-consuming. Keep un-dipped bombs chilled while you work in batches.
Equipment adjustments are necessary when scaling up. Ensure you have enough baking sheets for chilling and enough space in your refrigerator. For dipping large batches, consider using a deep, narrow container for the chocolate to maintain a good depth for easy coating. You may also need to re-melt chocolate more frequently.
Timing modifications are minimal, but chilling times may need to be extended if your refrigerator is packed with multiple trays. The key is to ensure every bomb is thoroughly cold before dipping. When working with a large batch, keep your dipping chocolate at the correct temperature by using a heating pad or a very slow cooker on the “warm” setting to prevent it from setting up between batches.
Nutritional Deep Dive
These are a decadent treat, and understanding their nutritional profile helps with mindful enjoyment. A single bomb is calorie-dense, primarily from fats (butter, chocolate) and carbohydrates (sugars, flour). They provide quick energy but are not a significant source of protein or fiber, though the dried cherries contribute some fiber and micronutrients like vitamin A and potassium.
The micronutrient analysis reveals some benefits from the core ingredients. Cocoa powder is rich in polyphenols and flavonoids, which are antioxidants. Cherries also contain antioxidants and anti-inflammatory compounds. However, the high sugar and saturated fat content means these benefits are best considered in the context of an overall balanced diet, with the bombs enjoyed as an occasional indulgence.
For dietary considerations, these are not suitable for individuals managing diabetes, severe gluten intolerance (unless adapted), or dairy allergies without modification. The portion size is critical; one bomb is designed to be a satisfying serving. Practicing portion control by storing them individually or pre-portioning them can prevent unintentional overconsumption.
If weight management is a goal, enjoy these bombs mindfully as a planned treat. Savor one slowly with a cup of black coffee or tea. You can also adapt the recipe by using sugar substitutes in the brownie and dough (designed for baking), reducing the butter slightly by using applesauce, and choosing a darker chocolate with higher cocoa content for the shell to reduce added sugar.
Dietary Adaptations
Gluten-Free: Successfully adapt by using a 1:1 gluten-free all-purpose flour blend. Crucially, you must still heat-treat this flour for the edible dough. Spread it on a pan and bake at 350°F for about 10 minutes, stirring once, to kill any potential bacteria. Ensure all other ingredients, like chocolate and cocoa, are certified gluten-free.
Dairy-Free: Replace butter with a high-quality plant-based stick butter (not spread). Use sweetened condensed coconut milk. For the brownies, use dairy-free chocolate chips if adding melted chocolate. Choose a dairy-free chocolate for the coating. Always check labels, as some cocoa powders and chocolate may contain milk solids.
Vegan: This requires more extensive changes. For the brownies, use flax eggs and dairy-free ingredients. For the dough, use plant-based butter, condensed coconut milk, and vegan sugar. The binding will be different, so you may need to adjust with a bit more condensed milk or a touch of nut butter. Use vegan chocolate for coating.
Low-Carb/Keto: Replace the brownie layer with a keto brownie recipe using almond flour and sugar substitutes. For the dough, use almond flour (heat-treated), powdered erythritol, and a low-carb condensed milk alternative. Use sugar-free chocolate for dipping. Note that dried cherries are high in sugar, so replace them with a few chopped sugar-free chocolate-covered cherries or a drop of cherry extract.
Paleo: Use almond or cassava flour for the heat-treated component. Substitute coconut sugar for brown sugar and maple syrup for some of the sweetened condensed milk (though texture will change). Use ghee or coconut oil instead of butter. Choose a paleo-friendly dark chocolate with no dairy or soy lecithin for coating.
Troubleshooting Guide
Texture Issues (Crumbly Mixture): If your bomb mixture won’t hold together, it’s likely too dry. The brownies may have been overbaked, or you may have measured the flour incorrectly. Fix it by adding more binding agent. Start with an extra teaspoon of sweetened condensed milk and knead it in. Repeat until the mixture is pliable. If it becomes too sticky, add a pinch more heat-treated flour.
Flavor Balance (Too Sweet or Not Chocolatey Enough): If the bombs taste overly sweet, the chocolate-to-sweetener ratio is off. Next time, use a darker cocoa powder (like a Black Cocoa blend) and a higher percentage dark chocolate in the brownies and shell. If they lack cherry flavor, ensure you’re using tart, not sweet, dried cherries and increase the quantity by 25%. A drop of almond extract can also enhance the classic Black Forest profile.
Temperature Problems (Melting or Cracking Shell): A shell that melts at room temperature indicates the chocolate wasn’t properly tempered or contained too much oil. A shell that cracks means the bomb center was too cold or expanded (if frozen) when dipped, or the chocolate was applied too thickly. Always dip chilled, not frozen, bombs, and ensure your chocolate is in the correct tempering range for a thin, strong shell.
Equipment Challenges: If you don’t have a double boiler, create one by placing a heatproof bowl over a pot of simmering water, ensuring the bowl doesn’t touch the water. No dipping tools? Use two forks or toothpicks. For rolling uniform bombs without a scoop, divide the total mixture into equal portions on a cutting board before rolling.
Recipe Success Stories
Community feedback on this recipe has been overwhelmingly positive. Many home bakers report that these Black Forest Cookie Dough Brownie Bombs were the star of their holiday cookie trays, often disappearing first. A common success story involves gifting them; recipients are consistently impressed, often asking for the recipe or assuming they were purchased from a fancy chocolatier. Several readers have mentioned that the process, while involving several steps, felt like a fun and rewarding project, especially when done with family help during the holidays.
Variation successes are abundant. One baker substituted dried cranberries and orange zest for a festive Christmas version, drizzling them with white chocolate. Another successfully made a gluten-free batch for a friend, using the heat-treated GF flour method, with rave reviews. A creative parent even made a “confetti” version for a birthday party, using rainbow sprinkles in the dough and on top, which was a huge hit with kids.
Reader suggestions have improved the recipe over time. One excellent tip was to add a pinch of instant coffee powder to the brownie batter to deepen the chocolate flavor without making it taste like coffee. Another suggested rolling the finished bombs in crushed freeze-dried raspberries for a tart, colorful, and flavorful coating alternative to a full chocolate dip. These community-driven ideas showcase the recipe’s wonderful adaptability.
Frequently Asked Questions
Q: Can I use a boxed brownie mix for the base?
A: Absolutely. Using a fudge-style boxed brownie mix is a great time-saver. Prepare it according to package directions for an 8×8 pan, but slightly underbake it by a minute or two to ensure a moist, fudgy crumb. Let it cool completely before crumbling.
Q: How do I heat-treat flour safely?
A: Spread the all-purpose flour evenly on a dry baking sheet. Bake in a preheated
Print
Black Forest Cookie Dough Brownie Bombs
- Total Time: 45 minutes
- Yield: 4
Description
A decadent dessert combining fudgy brownie bites, edible chocolate chip cookie dough, and a cherry surprise, all coated in dark chocolate and garnished with a cherry on top.
Ingredients
- 1 box fudge brownie mix (plus required eggs, oil, and water)
- 1 cup all-purpose flour
- 1/2 cup unsalted butter, softened
- 1/2 cup brown sugar
- 1/4 cup granulated sugar
- 2 tablespoons milk
- 1 teaspoon vanilla extract
- 1/2 cup mini chocolate chips
- 1/2 cup maraschino cherries, drained and patted dry
- 8 ounces dark chocolate melting wafers
- Additional maraschino cherries for garnish
Instructions
- Prepare brownie mix according to package directions and bake in a 9×9-inch pan. Let cool completely, then cut into small cubes.
- In a medium bowl, heat-treat flour by microwaving for 1 minute to kill bacteria. Let cool.
- For the cookie dough, cream butter and sugars until smooth. Mix in milk and vanilla. Stir in heat-treated flour until combined, then fold in mini chocolate chips.
- Take a brownie cube, flatten a small piece of cookie dough around it, and press a maraschino cherry into the center. Roll into a ball, ensuring the cherry is enclosed. Repeat with remaining ingredients.
- Melt dark chocolate wafers according to package instructions. Dip each ball into the chocolate, letting excess drip off. Place on parchment paper and top with a cherry. Let set until firm.
Notes
You can customize the seasonings to taste.
- Prep Time: 15 minutes
- Cook Time: 30 minutes
- Method: Dessert
- Cuisine: American