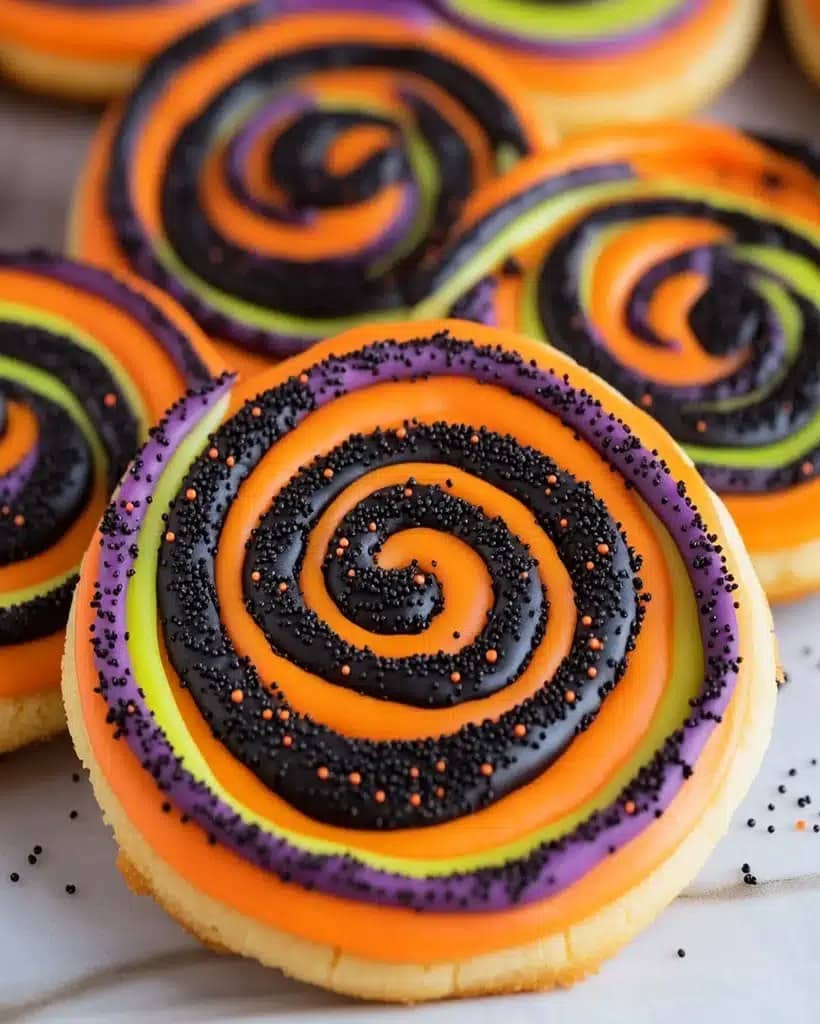
Halloween Swirl Sugar Cookies: Spooky, Colorful, and Easy to Make
Halloween Swirl Sugar Cookies: Spooky, Colorful, and Easy to Make bring the magic of the season right into your kitchen. These buttery cookies feature vibrant swirls of orange, purple, and black dough that twist together into mesmerizing marble patterns. As you roll the dough and watch the colors blend, you create edible art that captures the playful spirit of Halloween. The sweet vanilla aroma fills your home and signals to everyone that a celebration is near.
These Halloween Swirl Sugar Cookies deliver a crisp edge and a tender center that melts in your mouth. Each bite offers a rich, buttery flavor with a hint of vanilla that balances the festive colors perfectly. The royal icing drizzle adds a glossy finish and an extra touch of sweetness that kids and adults adore. You do not need professional baking skills to achieve bakery-quality results because the marbling technique hides imperfections and rewards creativity.
Families love these Halloween Swirl Sugar Cookies because they encourage hands-on fun. Children can help twist the dough ropes and cut out shapes with Halloween cookie cutters. Meanwhile, adults appreciate the straightforward ingredient list and the reliable results. The recipe uses pantry staples, so you can whip up a batch on short notice. Furthermore, these cookies make wonderful gifts for neighbors, teachers, and party hosts. Whether you host a costume party or simply want a festive treat, Halloween Swirl Sugar Cookies deliver spooky charm and delicious flavor every time.
Quick Recipe Highlights
- Flavor Profile: These cookies offer a rich, buttery vanilla taste that pairs beautifully with the sweet royal icing drizzle. The flavor remains classic and crowd-pleasing, so even picky eaters enjoy each bite. A subtle hint of almond extract enhances the overall sweetness and adds complexity.
- Texture: Expect a crisp outer edge that gives way to a soft, tender crumb inside. The cookies hold their shape well, which makes them ideal for decorating and stacking. A light glaze adds a smooth, glossy finish that contrasts the slightly crumbly texture.
- Aroma: Warm vanilla and butter notes fill the kitchen as the cookies bake. The scent evokes nostalgic holiday memories and draws family members to the oven. A faint citrus zest in the dough brightens the aroma and keeps it from feeling heavy.
- Visual Appeal: Bold swirls of orange, purple, and black create a striking marbled effect that looks impressive yet effortless. The colors remain vibrant after baking and never turn muddy. A white royal icing drizzle adds contrast and a polished, professional look.
- Skill Level Needed: Beginners can master this recipe because it relies on basic creaming and chilling techniques. The marbling process is forgiving and hides any mistakes with flair. No special decorating skills are required beyond simple piping or drizzling.
- Special Equipment: You need a stand mixer or hand mixer, mixing bowls, and a rolling pin. Halloween cookie cutters add festive shapes, though a knife works for freeform designs. Parchment paper and baking sheets ensure even baking and easy cleanup.
Recipe Overview
- Difficulty Level: I rate this recipe as easy because it uses standard sugar cookie techniques that most home bakers already know. The only slightly tricky step involves dividing and coloring the dough, which takes just a few minutes. Chilling the dough firms it up and makes rolling simple. Even first-time bakers achieve beautiful results without stress.
- Category: These cookies fit perfectly into the dessert and holiday baking category. They work as party favors, cookie exchange contributions, or after-school treats. You can also serve them alongside ice cream for a festive dessert sundae.
- Cuisine: The recipe draws from classic American sugar cookie traditions with a modern Halloween twist. European baking techniques influence the buttery dough and the royal icing finish. The marbling concept borrows from Italian glasswork and modern pastry art. Together, these influences create a cookie that feels both familiar and fresh.
- Cost: The ingredients cost very little because they rely on pantry staples like flour, sugar, butter, and eggs. Food coloring and sprinkles add a small expense, but a little goes a long way. Overall, you spend far less than you would on bakery cookies, and you make a larger batch.
- Season: Fall is the ideal season for these cookies because Halloween inspires the color palette and shapes. The warm, buttery flavor suits cooler weather and cozy gatherings. You can easily adapt the colors for other holidays, too, which makes the recipe year-round friendly.
- Occasion: Halloween parties, classroom celebrations, and neighborhood potlucks all benefit from these festive cookies. They also shine at bake sales and cookie exchanges because they look impressive on a platter. Families enjoy making them as a weekend activity leading up to trick-or-treat night.
Why You’ll Love This Recipe
The taste and texture of these Halloween Swirl Sugar Cookies win people over instantly. The dough combines butter, sugar, and vanilla into a classic flavor profile that never disappoints. Each cookie delivers a crisp rim and a soft center, creating a satisfying contrast. The royal icing drizzle adds a gentle sweetness that complements the buttery base. Because the recipe avoids overpowering spices, the cookies appeal to a wide range of palates. Kids and adults alike reach for a second cookie without hesitation.
Convenience sets this recipe apart from fussy holiday desserts. You likely already have most ingredients in your pantry, so a trip to the store stays short. The dough comes together in one bowl with a mixer, which reduces cleanup. Chilling requires no attention, so you can wrap the dough and move on with your day. The marbling technique takes just minutes and looks far more complicated than it is. Therefore, busy families can fit this baking project into a hectic schedule without stress.
Nutritionally, these cookies offer a moderate treat that fits a balanced lifestyle. Portion control comes naturally because the recipe yields two dozen cookies, and each one satisfies a sweet craving. You control the sugar level by adjusting the icing drizzle or skipping it entirely. The recipe contains no artificial preservatives, so you know exactly what goes into each cookie. Compared to store-bought options, homemade cookies give you transparency and peace of mind.
Social and entertaining value makes these Halloween Swirl Sugar Cookies a party favorite. The vibrant swirls spark conversation and compliments at any gathering. Children love helping with the colorful dough, which keeps them engaged and entertained. You can package the cookies in clear bags with ribbon for charming party favors. Hosts appreciate a dessert that doubles as a centerpiece and a take-home gift. Ultimately, these cookies create memorable moments and happy taste buds.
Cost-effectiveness and accessibility round out the list of reasons to love this recipe. The ingredient list stays short and budget-friendly, which matters during the busy holiday season. You avoid specialty tools and expensive extracts, so the barrier to entry stays low. The recipe scales easily for larger crowds without multiplying the effort unfairly. As a result, you feed a crowd generously while keeping your grocery bill in check. These Halloween Swirl Sugar Cookies prove that festive baking does not require a big budget.
Historical Background and Cultural Significance
The origin story of sugar cookies traces back to European bakers who experimented with sweetened dough in the seventeenth century. Dutch and German immigrants brought their cookie traditions to America, where sugar cookies became a staple. Halloween celebrations grew popular in the twentieth century, and bakers began shaping cookies into festive themes. The swirl technique emerged from modern baking creativity, as home bakers sought eye-catching designs without advanced skills. Consequently, Halloween Swirl Sugar Cookies represent a natural evolution of an American classic.
Cultural importance surrounds Halloween as a night of costumes, storytelling, and community fun. Food plays a central role in these celebrations, and themed cookies connect generations. Grandparents bake with grandchildren, passing down techniques and creating traditions. Schools and community centers host cookie decorating events that strengthen neighborhood bonds. Therefore, these cookies carry meaning beyond their sweet taste. They symbolize togetherness and the playful spirit of the season.
The evolution of the recipe reflects changing baking trends and accessibility. Early sugar cookie recipes used simple ingredients and hand mixing, while modern versions benefit from electric mixers and food coloring. The marbling technique gained popularity through social media, where photogenic desserts attract attention. Food bloggers and home cooks share variations that inspire others to experiment. As a result, the recipe continues to adapt and improve with each generation of bakers.
Regional variations add richness to the story of Halloween Swirl Sugar Cookies. Southern bakers often add a touch of nutmeg or cinnamon for warmth, while West Coast cooks favor citrus zest for brightness. Some families dye the dough with natural ingredients like turmeric and beet powder instead of food coloring. Others skip the icing and press sprinkles into the dough before baking. These regional twists showcase creativity and prove that the recipe welcomes personal touches.
Ingredient Deep Dive
All-purpose flour forms the backbone of these cookies and provides structure and stability. Wheat flour has nourished communities for thousands of years and remains a pantry staple worldwide. Nutritionally, flour supplies carbohydrates for energy and small amounts of protein and B vitamins. Choose a reputable brand with consistent protein content for reliable results. Store flour in an airtight container away from moisture and heat. For substitutions, gluten-free flour blends work well when you add a binder like xanthan gum.
Unsalted butter delivers the rich, tender texture that defines a quality sugar cookie. Butter has a long culinary history in European baking and remains central to American desserts. It contributes fat-soluble vitamins and a satisfying mouthfeel, though moderation matters. Select fresh butter with a clean, sweet aroma and avoid any hint of rancidity. Keep butter refrigerated and use it within a few weeks of purchase. Coconut oil or plant-based butter offer solid substitutes for dairy-free bakers.
Granulated sugar sweetens the dough and helps create crisp edges during baking. Sugar production dates back centuries and shaped global trade and cuisine. While sugar offers little nutritional value, it plays an essential role in texture and browning. Choose fresh, free-flowing sugar without clumps for even mixing. Store sugar in a sealed container to prevent hardening. Honey or maple syrup can replace part of the sugar, though you must adjust the liquid content.
Eggs bind the dough and add moisture that keeps cookies tender. Eggs have fed cultures around the world and provide high-quality protein and choline. Use large, fresh eggs at room temperature for the best emulsion. Check the expiration date and store eggs in the refrigerator. Flax eggs made from ground flaxseed and water substitute well for vegan versions, though the texture shifts slightly.
Vanilla extract deepens the flavor and enhances the buttery notes in the dough. Vanilla cultivation began in Mexico and spread through Madagascar and Tahiti. The extract contributes antioxidants and a beloved aroma, though the amount remains small. Choose pure vanilla extract over imitation for a richer taste. Store the bottle tightly capped in a cool, dark place. Almond extract or citrus zest offer delightful alternatives.
Food coloring creates the signature swirls and transforms plain dough into Halloween art. Modern food dyes offer vibrant, consistent results and come in gel and liquid forms. Always check labels for allergens and use dyes sparingly to avoid altering the dough texture. Gel colors deliver the most intense hues with the least liquid. Store dyes in a cool cabinet away from sunlight. Natural alternatives like spirulina and beet powder provide plant-based color options.
Common Mistakes to Avoid
- Overmixing the dough develops too much gluten and yields tough, dense cookies. Stop mixing as soon as the flour disappears into the dough. A gentle hand keeps the texture tender and light.
- Skipping the chill time causes the dough to spread and lose its shape in the oven. Chill the dough for at least one hour, or up to overnight. Cold dough holds swirls and cutout shapes far better.
- Using too much food coloring makes the dough sticky and can stain hands and surfaces. Add color a drop at a time until you reach the desired hue. Gel colors deliver strong pigment with minimal liquid.
- Rolling the dough too thin produces brittle cookies that crumble easily. Aim for a quarter-inch thickness, which balances crispness and tenderness. A rolling pin with guide rings helps maintain even thickness.
- Baking at the wrong temperature causes uneven browning or raw centers. Preheat the oven fully and use an oven thermometer to verify accuracy. Even heat produces consistent, golden results.
- Overbaking by even a minute dries out the cookies and dulls the flavor. Pull the cookies when the edges turn lightly golden, then let them finish on the hot pan. Residual heat completes the baking gently.
- Crowding the baking sheet traps steam and prevents even browning. Space cookies two inches apart and bake one sheet at a time. Proper airflow delivers crisp, evenly baked results.
- Adding icing while cookies stay warm causes melting and a messy finish. Wait until cookies cool completely before drizzling. Patience ensures a clean, professional appearance.
- Ignoring ingredient temperatures affects the creaming process and dough consistency. Bring butter and eggs to room temperature before mixing. Room-temperature ingredients blend smoothly and create a stable dough.
- Storing cookies before the icing sets leads to smudged designs and stuck layers. Let the icing harden fully, then store cookies in single layers with parchment between. Proper storage preserves both beauty and texture.
Essential Techniques
Creaming butter and sugar together creates the foundation for a light, tender cookie. This step incorporates air into the mixture, which helps the cookies rise and develop a pleasant texture. Beat the butter and sugar for two to three minutes until the mixture looks pale and fluffy. Stop scraping the bowl constantly, and instead let the mixer do the work. Visual cues matter here because the color change signals readiness. If the mixture looks grainy, keep beating until it smooths out.
Dividing and coloring the dough requires a gentle hand and a bit of patience. Split the dough into three equal portions, then work color into each portion separately. Knead the color in with your hands or a spatula until the hue looks even. Avoid overworking the dough, which toughens the final cookies. Wear gloves to protect your hands from dye stains. When the colors look vibrant and uniform, the dough is ready for the next step.
The marbling technique transforms three colored doughs into a beautiful swirl pattern. Roll each portion into a rope, then press the ropes together and twist gently. Fold the twisted rope and roll it into a log or flatten it for cutouts. Do not overtwist, or the colors will blend into muddy tones. Stop while distinct streaks remain visible. This technique rewards a light touch and a playful attitude.
Chilling the dough firms the butter and prevents spreading during baking. Wrap the dough tightly in plastic wrap and refrigerate for at least one hour. This rest also allows the flour to hydrate and the flavors to meld. Cold dough rolls out cleanly and holds cutout shapes with crisp edges. If the dough becomes too firm, let it soften at room temperature for a few minutes. Patience during chilling pays off with beautiful, well-defined cookies.
Rolling the dough to an even thickness ensures uniform baking and a professional look. Place the chilled dough between two sheets of parchment paper for easy rolling. Apply steady pressure and rotate the dough occasionally to prevent sticking. Aim for a quarter-inch thickness, which bakes evenly and holds shapes. Check the thickness with a ruler or use guide rings on your rolling pin. Even thickness prevents burnt edges and underbaked centers.
Royal icing drizzling adds a glossy finish and a touch of elegance to the cookies. Mix powdered sugar with a small amount of milk or water until the icing flows smoothly. Transfer the icing to a piping bag or a zip-top bag with a tiny corner cut off. Drizzle in quick, sweeping motions across the cooled cookies. Let the icing set completely before stacking or storing. A steady hand and a light touch produce beautiful results.
Pro Tips for Perfect Halloween Swirl Sugar Cookies
Use gel food coloring instead of liquid dyes for the most vibrant swirls. Gel colors deliver intense pigment without adding extra liquid that can alter the dough. Start with a small amount and add more as needed. The colors stay bright even after baking.
Chill the dough thoroughly before rolling and cutting to prevent sticking and spreading. A firm dough holds intricate shapes and keeps the swirl pattern crisp. If you rush this step, the cookies lose their definition in the oven.
Roll the dough evenly between parchment paper for smooth, consistent cookies. Parchment prevents sticking and makes cleanup easy. Even thickness guarantees uniform baking and a polished appearance.
Bake one sheet at a time on the center rack for even heat distribution. Crowding the oven with multiple sheets causes uneven browning. Patience here delivers consistently golden cookies.
Watch the cookies closely during the final minute of baking to avoid overbrowning. Ovens vary, so trust your eyes over the timer. Pull the cookies when the edges just begin to turn golden.
Let the cookies cool completely before drizzling icing or adding sprinkles. Warm cookies melt the icing and create a messy finish. Cooling on a wire rack speeds the process and keeps the bottoms crisp.
Experiment with color combinations beyond the classic Halloween palette. Lime green and purple, or deep red and black, create dramatic effects for other holidays. The technique adapts easily to any theme.
Store finished cookies in an airtight container with parchment between layers. This method preserves the icing design and keeps the cookies fresh for days. Avoid stacking directly on top of each other.
Variations and Adaptations
Regional variations of Halloween Swirl Sugar Cookies highlight local flavors and traditions. Southern bakers sometimes add a pinch of cinnamon or nutmeg to the dough for warmth. New England cooks may incorporate maple extract for a cozy autumn note. Southwestern families occasionally add a hint of ancho chili powder for subtle heat. These regional twists celebrate local palates while keeping the festive spirit intact.
Seasonal adaptations let you enjoy this recipe year-round with different color schemes. Use red and green for Christmas, pastel shades for Easter, or red and pink for Valentine’s Day. The marbling technique works beautifully with any palette. Simply swap the food coloring and matching sprinkles to suit the occasion.
Dietary modifications make the recipe accessible to more guests. Gluten-free flour blends with xanthan gum create a workable dough for celiac-friendly cookies. Plant-based butter and flax eggs deliver vegan-friendly results with a slightly different texture. Sugar substitutes like monk fruit sweetener reduce the sugar content, though the texture may shift. Always test small batches when adapting the recipe.
Flavor variations expand the recipe’s range beyond vanilla. Almond extract adds a sophisticated marzipan-like note, while lemon zest brightens the dough. A teaspoon of espresso powder deepens the flavor for adult palates. Pumpkin pie spice brings cozy autumn warmth. Taste the dough before baking and adjust the extracts to your preference.
Texture modifications let you customize the cookie’s bite. For a softer cookie, reduce the baking time by one minute and store the cookies with a slice of bread. For a crispier cookie, roll the dough slightly thinner and bake a minute longer. A brush of melted butter before baking adds richness and promotes browning.
Presentation alternatives make these cookies versatile for any event. Instead of cutouts, shape the dough into balls and press with a patterned glass. Sandwich two cookies with buttercream for a festive whoopie pie. Dip half of each cookie in white chocolate for an elegant finish. The options invite creativity and personal style.
Serving and Presentation Guide
Plating techniques elevate these Halloween Swirl Sugar Cookies from simple treats to centerpiece desserts. Arrange the cookies on a black slate or a wooden board for dramatic contrast. Group them by shape and color to create visual rhythm. Add height by stacking a few cookies on a small pedestal. Fresh autumn leaves or small pumpkins make charming edible-adjacent accents. A clean, uncluttered arrangement lets the vibrant swirls shine.
Garnishing ideas add the perfect finishing touch to the presentation. A dusting of powdered sugar creates a ghostly effect that suits the Halloween theme. Edible glitter adds sparkle and catches the light. Mini chocolate chips pressed into the icing create spider-like dots. A few candy eyes turn plain cookies into playful monsters. Keep garnishes simple so the swirl design remains the star.
Traditional accompaniments round out the serving experience. A glass of cold milk remains the classic pairing for sugar cookies. Hot apple cider adds seasonal warmth and complements the buttery flavor. A scoop of vanilla ice cream turns the cookies into a festive dessert sandwich. For adult gatherings, a spiced rum cocktail or mulled wine pairs wonderfully. These accompaniments enhance the festive mood.
Modern serving suggestions bring a fresh twist to the cookie platter. Crush a few cookies over yogurt or ice cream for a crunchy topping. Use the cookies as the base for a Halloween trifle with whipped cream and berries. Crumble them into a no-bake cheesecake crust for a spooky dessert. These creative ideas extend the recipe beyond a simple cookie.
Temperature considerations affect the cookie’s taste and texture. Serve the cookies at room temperature for the best flavor and mouthfeel. Slightly warm cookies offer a softer bite and a more intense aroma. Chilled cookies taste firmer and travel well to parties. Choose the temperature based on the setting and your guests’ preferences.
Portion control tips help guests enjoy the treats without overindulging. Offer small cookies or cut larger cookies in half for lighter servings. Present the cookies on a platter with fresh fruit for a balanced dessert table. Wrap individual cookies in clear bags so guests can take one home. These strategies keep the celebration fun and mindful.
Wine and Beverage Pairing
Wine pairings for these Halloween Swirl Sugar Cookies should balance sweetness and richness. A glass of Moscato d’Asti offers light bubbles and floral notes that complement the buttery dough. Riesling with a touch of sweetness echoes the vanilla and icing flavors. For a festive twist, a sparkling rosé adds color and celebration. Avoid heavily oaked wines, which overpower the delicate cookie flavors.
Non-alcoholic alternatives keep the celebration inclusive and family friendly. Sparkling apple cider delivers bubbles and autumn flavor that mirror the Halloween theme. A chilled glass of chocolate milk creates a nostalgic pairing that kids adore. Cranberry spritzers add tartness that balances the cookie’s sweetness. Herbal iced tea with a hint of orange offers a refreshing option.
Coffee and tea pairings suit cozy evening gatherings around a fire. A medium-roast coffee with caramel notes complements the buttery richness of the cookies. Chai tea brings warm spices that echo the season. A lightly sweetened Earl Grey tea adds citrus and floral notes. These warm beverages make the cookies feel especially comforting.
Temperature considerations matter when serving beverages alongside the cookies. Serve white wines and sparkling options well chilled to refresh the palate. Coffee and tea should stay hot but not scalding, which dulls the flavor. Cold milk and cider taste best when properly chilled. Matching temperatures to the cookie experience enhances the whole event.
Serving suggestions create a cohesive beverage station for parties. Set up a self-serve tray with glasses, napkins, and a few drink options. Label the beverages with small cards to help guests choose. Keep refills handy and consider a mix of hot and cold choices. A well-organized station lets guests mingle and enjoy without fuss.
Storage and Shelf Life
Storage methods determine how long these Halloween Swirl Sugar Cookies stay fresh and beautiful. Store cooled, iced cookies in a single layer inside an airtight container. Place parchment paper between layers if you must stack them. Keep the container in a cool, dry place away from direct sunlight and heat. Properly stored cookies retain their texture and appearance for up to one week.
Temperature requirements play a key role in preserving quality. Room temperature storage works well for plain and iced cookies when the environment stays below seventy-five degrees. Avoid storing cookies near the stove, radiator, or a sunny window. In humid climates, add a food-safe desiccant packet to the container. Refrigeration is not necessary for short-term storage and can introduce unwanted moisture.
Container recommendations help protect the cookies from damage and staleness. Choose a stiff-sided container over a flimsy bag to prevent crushing. Glass and sturdy plastic containers with tight-sealing lids work best. Line the bottom with parchment paper to cushion the cookies. Label the container with the date so you know how long the cookies have been stored.
Signs of spoilage help you know when to discard the cookies. Stale cookies smell flat and taste dry or tough. Any visible mold or a sour, off odor means you should throw the batch away. Icing that looks wet or sticky after storage suggests moisture problems. When in doubt, err on the side of caution and bake a fresh batch.
Reheating instructions restore a fresh-baked taste to stored cookies. Place cookies on a baking sheet in a three-hundred-degree oven for three to four minutes. This brief warm-up crisps the edges and revives the buttery aroma. Let the cookies cool slightly before serving. Avoid reheating iced cookies, since the icing may melt.
Freezing guidelines extend the shelf life for weeks. Freeze baked, undecorated cookies in a single layer until solid, then transfer to a freezer bag. Plain dough also freezes beautifully when wrapped tightly in plastic and foil. Thaw overnight in the refrigerator before baking or decorating. Frozen cookies retain their taste and texture for up to three months.
Make Ahead Strategies
A prep timeline makes holiday baking stress-free and enjoyable. Make the dough up to three days in advance and store it tightly wrapped in the refrigerator. Color the dough portions and marble them on the day of baking for the freshest look. Prepare the royal icing a day ahead and store it in a sealed container. This staggered approach spreads the work across several days.
Storage between steps preserves quality and prevents mishaps. Wrap the dough logs individually in plastic wrap and place them in a zip-top bag. Refrigerate cutout shapes on a parchment-lined sheet for up to one day. Keep icing at room temperature in a covered bowl and stir before use. Proper storage between steps keeps the project manageable.
Quality impact assessment helps you plan realistic expectations. Dough stored for one to two days actually improves in flavor and workability. Icing made ahead keeps well but may need a splash of milk to loosen. Baked cookies lose a bit of crispness after two days, so bake close to serving time for the best results. Understanding these trade-offs helps you plan effectively.
Assembly tips streamline the final steps on the day of your event. Set up a decorating station with icing bags, sprinkles, and cooling racks. Roll, cut, and bake in batches to keep the process moving. Drizzle icing while cookies cool on the rack for maximum efficiency. A well-organized station turns the final step into a fun activity.
Reheating guidelines apply when you assemble cookies ahead of time. If you freeze baked cookies, thaw them and refresh in a low oven before serving. For iced cookies, serve at room temperature and skip the oven. A quick warm-up restores the freshly baked texture without compromising the icing.
Fresh element additions keep make-ahead cookies tasting vibrant. Add the icing and sprinkles on the day of serving for the best appearance. A few fresh mint leaves or a dusting of powdered sugar brightens the presentation. Pair the cookies with fresh fruit or a warm beverage for contrast. These small touches keep the final result feeling fresh and special.
Scaling Instructions
Halving the recipe works well when you need a small batch for a family treat. Divide all ingredients in half, including the egg, which you can beat and measure by weight. Use a smaller mixing bowl and a hand mixer for efficient mixing. Bake the cookies on a single sheet in two batches. Half batches fit easily into busy weeknights and reduce waste.
Doubling or tripling the recipe serves large parties and bake sales. Work in batches if your mixer bowl cannot handle the full volume. Mix the dough in two separate batches for consistent texture. Chilling space becomes the main constraint, so clear space in the refrigerator ahead of time. Larger batches reward organization and patience.
Equipment adjustments keep the process smooth when scaling. A larger stand mixer handles double batches with ease. You may need extra baking sheets and cooling racks for larger yields. Invest in a second rolling pin if helpers join the fun. Adjusting equipment to match the batch size prevents bottlenecks.
Timing modifications prevent overbaking when the oven stays full. Bake one sheet at a time and extend the chilling time for larger dough batches. Allow extra time for rolling and cutting when producing dozens of cookies. Start earlier than you think necessary to avoid rushing. A relaxed timeline produces better results.
Storage considerations grow with larger batches. Invest in stackable airtight containers and freezer bags for long-term storage. Label everything with dates and contents. Divide the cookies into smaller portions for easier gifting and serving. Smart storage keeps large batches fresh and organized.
Nutritional Deep Dive
The macro breakdown of Halloween Swirl Sugar Cookies reflects a classic dessert profile. Each cookie provides roughly one hundred to one hundred twenty calories, with most calories coming from butter and sugar. Carbohydrates dominate the macros at around fifteen grams per cookie, while fat contributes about five grams. Protein stays low at roughly one gram per cookie. These numbers help you plan portions within a balanced diet.
Micronutrient analysis reveals small but meaningful contributions. Butter supplies vitamin A and small amounts of vitamin D. Eggs contribute choline and B vitamins. Flour offers iron and B vitamins, especially when enriched. The overall micronutrient content remains modest, so pair cookies with nutrient-rich foods throughout the day.
Health benefits of homemade cookies center on control and quality. You choose the ingredients and avoid artificial preservatives found in packaged snacks. Baking at home also supports mindfulness and creativity, which benefit mental well-being. Enjoying a homemade treat in moderation fits a healthy lifestyle. The joy of sharing cookies with loved ones adds social benefits that support overall health.
Dietary considerations matter for guests with specific needs. The recipe contains gluten, dairy, and eggs, so label cookies clearly at gatherings. Offer a gluten-free or vegan alternative for guests with restrictions. Watch for nut cross-contamination if your kitchen handles nuts. Thoughtful labeling keeps everyone safe and comfortable.
Portion analysis helps you enjoy the cookies without overdoing it. Two cookies make a satisfying dessert when paired with fruit or yogurt. Serve smaller cookies for children and save larger cookies for adults. Freeze extra cookies in single portions to limit temptation. Mindful portioning keeps the treat enjoyable and balanced.
Weight management tips support a healthy relationship with sweets. Enjoy cookies as an occasional treat rather than a daily habit. Balance indulgences with regular physical activity and nutrient-dense meals. Savor each bite slowly to increase satisfaction. These habits make treats feel special rather than routine.
Dietary Adaptations
Gluten-free adaptations make these cookies accessible to celiac and gluten-sensitive guests. Use a one-to-one gluten-free flour blend that contains xanthan gum for structure. Let the dough rest for thirty minutes so the flour hydrates fully. Roll the dough gently, since gluten-free dough tears more easily. The finished cookies taste tender and delicious with no one the wiser.
Dairy-free modifications replace butter with plant-based alternatives. Choose a high-fat vegan butter for the best flavor and texture. Coconut oil also works but adds a subtle flavor that may require adjusting the extracts. Check that all other ingredients, including food coloring, are dairy-free. The cookies turn out rich and buttery without any dairy.
Vegan adaptations go beyond dairy-free by replacing eggs. Flax eggs made from ground flaxseed and water bind the dough effectively. Use three tablespoons of water per tablespoon of flaxseed for each egg. Let the mixture sit for five minutes before adding it to the dough. The cookies bake up beautifully and satisfy plant-based eaters.
Low-carb adaptations reduce the sugar content for carb-conscious guests. Swap granulated sugar for a monk fruit or erythritol blend that measures cup for cup. Use almond flour combined with coconut flour for a lower-carb base. Check the dough consistency and add a little liquid if needed. The cookies taste sweet but fit a lower-carb lifestyle.
Keto adaptations push the carb count even lower while keeping flavor high. Almond flour and coconut flour replace wheat flour, and sugar-free sweeteners replace sugar. Add a pinch of salt and vanilla to mask any sweetener aftertaste. Bake at a slightly lower temperature to prevent overbrowning. These cookies satisfy keto dieters during the holidays.
Paleo adaptations rely on natural ingredients that align with paleo principles. Use almond flour, coconut sugar, and grass-fed butter or ghee. Skip the food coloring and use natural dyes from turmeric and beet powder. The cookies taste wholesome and festive without processed ingredients. Label them clearly for paleo guests.
Low-FODMAP adaptations suit guests with sensitive digestion. Use lactose-free butter or a plant-based alternative and avoid high-FODMAP sweeteners like honey. Stick with granulated sugar, which is low in FODMAPs. Keep portions small and check all ingredient labels for hidden FODMAPs. These adjustments keep the cookies gentle on the stomach.
Other specific diets may require minor tweaks. Nut-free bakers should use seed-based flours and check labels for cross-contamination. Egg-free bakers can rely on flax or chia eggs for binding. Always label the cookies with allergens and dietary information so guests can choose confidently.
Troubleshooting Guide
Texture issues often arise from overmixing or incorrect ingredient temperatures. If the cookies turn out tough, reduce the mixing time and chill the dough thoroughly. Crumbly dough may need a splash of milk or an extra egg yolk. Cakey cookies usually mean too much flour, so weigh the flour for accuracy. Adjusting one variable at a time helps you diagnose the problem quickly.
Flavor balance problems can make the cookies taste flat or cloyingly sweet. Add a pinch of salt to enhance the butter and vanilla notes. A touch of citrus zest brightens the overall flavor. If the icing makes the cookies too sweet, reduce the sugar in the drizzle or skip it. Tasting the dough before baking helps you adjust the flavor early.
Temperature problems cause spreading, uneven baking, or burnt edges. Use an oven thermometer to confirm the temperature and adjust as needed. Chill the dough thoroughly to prevent spreading. Rotate the baking sheet halfway through for even browning. Small adjustments to temperature and timing make a big difference.
Equipment challenges can derail Print
Halloween Swirl Sugar Cookies
- Total Time: 45 minutes
- Yield: 4
Description
Festive sugar cookies with swirls of orange and black, perfect for Halloween parties or treats.
Ingredients
- 2 3/4 cups all-purpose flour
- 1 teaspoon baking soda
- 1/2 teaspoon baking powder
- 1 cup unsalted butter, softened
- 1 1/2 cups granulated sugar
- 1 large egg
- 1 teaspoon vanilla extract
- Orange gel food coloring
- Black gel food coloring
Instructions
- Preheat oven to 350°F (175°C). Line baking sheets with parchment paper.
- In a medium bowl, whisk together flour, baking soda, and baking powder. Set aside.
- In a large bowl, cream butter and sugar until light and fluffy. Beat in egg and vanilla.
- Gradually add dry ingredients to wet ingredients, mixing until just combined.
- Divide dough in half. Tint one half orange and the other half black with gel food coloring, kneading until colors are uniform.
- Pinch off small pieces of each colored dough and gently roll together to create a marbled effect. Form into 1-inch balls and place on prepared baking sheets, spacing 2 inches apart.
- Bake for 10-12 minutes, until edges are set. Allow to cool on baking sheets for 5 minutes before transferring to wire racks to cool completely.
Notes
You can customize the seasonings to taste.
- Prep Time: 15 minutes
- Cook Time: 30 minutes
- Method: Main
- Cuisine: American