Cherry Pistachio Cheesecake Bars: A Stunning Easy Dessert Recipe
These Cherry Pistachio Cheesecake Bars deliver a luxurious dessert experience that blends creamy richness with bright fruit flavor. Silky cheesecake filling meets swirls of sweet-tart cherry compote atop a buttery graham cracker crust, while toasted pistachios add a salty crunch that keeps every bite interesting. This easy dessert recipe pairs the elegance of a cheesecake with the simplicity of a bar cookie, so you get impressive results without fussing over a water bath or springform pan.
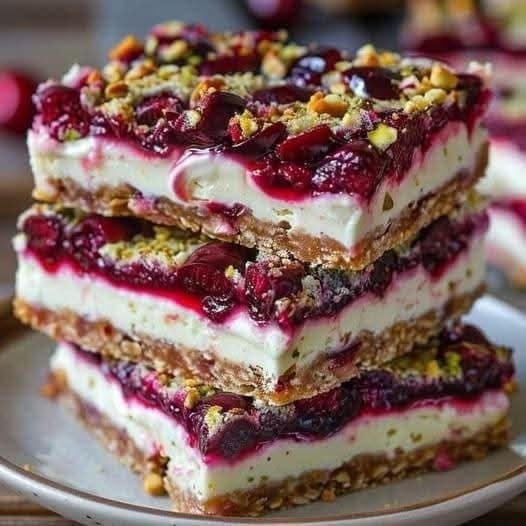
The magic of these Cherry Pistachio Cheesecake Bars comes from the contrast of flavors and textures. Each layer brings something distinct: the crust crumbles with butter, the filling melts on your tongue, the cherries burst with tangy sweetness, and the pistachios deliver a satisfying bite. Whether you serve them at a holiday gathering, a summer potluck, or a quiet weekend treat, these bars look as beautiful as they taste. The vibrant red cherry swirl against the pale golden filling is pure eye candy.
Even beginner bakers can master this cheesecake bars recipe, because it demands no special training, only patience and a few smart techniques. You press a quick crust into a square pan, beat together a smooth filling, and bake until just set. The hardest part is waiting for the bars to chill before slicing. Once you learn the method, you will want to make these cherry pistachio cheesecake bars for every occasion, and your friends will beg for the recipe.
Quick Recipe Highlights
- Flavor Profile: Sweet, tangy, and nutty notes mingle in every bite. The cream cheese filling brings mild tang, the cherries add fruity brightness, and toasted pistachios contribute a savory, salty edge. Vanilla and a hint of almond extract deepen the overall taste.
- Texture: The bars stack a crisp graham crust, a velvety smooth filling, and a jammy cherry swirl. Chopped pistachios scatter across the top and provide a crunchy counterpoint to the creamy center.
- Aroma: Warm vanilla and toasted nuts fill the kitchen as the bars bake. Fresh lemon zest in the filling lifts the aroma, and the cherry swirl adds a fruity perfume that makes the dessert irresistible.
- Visual Appeal: Deep crimson cherry ribbons wind through a creamy pale filling. Green pistachios scatter across the top like confetti. The layered colors create a striking presentation that photographs beautifully for any table.
- Skill Level Needed: This recipe suits confident beginners and anyone comfortable with mixing and baking. You need no water bath or frosting skills. Careful measuring and proper chilling time ensure success every time.
- Special Equipment: You need an 8-inch square baking pan, parchment paper, and an electric mixer. A food processor helps crush graham crackers and chop pistachios quickly. A toothpick or knife handles the swirl with ease.
Recipe Overview
- Difficulty Level: We rate this cheesecake bars recipe as easy because it uses simple mixing methods and a single pan. You cream the filling in minutes and swirl the topping with a knife. The oven handles the rest, and no advanced decorating skills come into play. Even novice bakers can produce bakery-quality bars on the first try.
- Category: These bars shine as a dessert, snack, or sweet treat at any meal. They fit bake sales, brunches, and holiday cookie trays alike. Pair them with coffee for an afternoon pick-me-up or serve them as a plated finish to dinner.
- Cuisine: This recipe draws on American cheesecake traditions and modern bar cookie trends. Cherry and pistachio combinations echo European pastry flavors from Italy and the Middle East. The result blends comforting American home baking with global flair.
- Cost: Expect moderate costs because cream cheese and pistachios rank among the pricier ingredients. A full batch typically costs about twelve to eighteen dollars depending on brand and season. The recipe yields sixteen generous bars, so each serving costs roughly one dollar or less.
- Season: These bars work year-round thanks to frozen or jarred cherries. Fresh cherries in late spring and summer make the recipe extra special. For holidays, the red and green colors bring festive charm to any dessert table.
- Occasion: Serve these cheesecake bars at birthday parties, baby showers, or casual cookouts. They travel well to potlucks and picnics because they need no refrigeration during short events. They also make a thoughtful homemade gift for neighbors and coworkers.
Why You’ll Love This Recipe
Taste and texture drive the appeal of these Cherry Pistachio Cheesecake Bars. The creamy filling delivers a melt-in-your-mouth richness, while the buttery crust offers a crisp foundation. Sweet-tart cherry swirls cut through the cheese filling, and toasted pistachios add salty crunch, which balances every bite. Each layer brings something distinct, and together they create a dessert you remember long after the plate empties.
Convenience makes this recipe a weeknight hero. You mix the crust and filling in one bowl each and swirl the cherry topping without any piping skills. The bars bake in under an hour and chill while you tend to other tasks. No springform pan, no water bath, and no fussy decoration mean less stress and more enjoyment, even on a busy schedule.
Nutritional advantages give these bars a surprising edge over heavier desserts. Pistachios supply protein, fiber, and healthy fats, while cherries bring antioxidants and vitamin C. Cream cheese and eggs add calcium and protein. Portion-controlled bars mean you enjoy a satisfying treat without overindulging, and you can lighten the recipe with a few easy swaps.
Social and entertaining value make this recipe a party favorite. The bars slice neatly and feed a crowd without last-minute plating. Their striking red and green colors attract attention on any dessert table. Guests often ask for the recipe before the plates clear, which makes these cherry pistachio cheesecake bars a reliable conversation starter at every gathering.
Cost-effectiveness rounds out the list of reasons to love this recipe. Pantry staples like sugar, flour, and butter anchor the ingredient list. A single batch yields sixteen bars, which beats the price of bakery cheesecake by a wide margin. With simple preparation and common tools, this dessert proves that impressive results need not break the budget.
Historical Background and Cultural Significance
Cheesecake traces its roots back thousands of years to ancient Greece, where cooks pressed fresh cheese into cakes and served them to athletes. Roman bakers adapted the idea and added eggs and honey. As the recipe traveled through Europe, regional styles emerged, from dense Italian ricotta cakes to creamy New York versions. These Cherry Pistachio Cheesecake Bars continue that long tradition in an approachable, modern form.
Cherries hold cultural importance across many regions. In the United States, cherry orchards in Michigan and Washington supply most of the national crop. Cherry desserts appear at county fairs and summer festivals as symbols of abundance. The fruit also carries romantic associations in folklore and art, which makes it a natural choice for celebratory baking like these cheesecake bars.
Pistachios bring their own history to the recipe. These nuts originated in the Middle East and have long symbolized health and good fortune in Persian and Mediterranean cultures. Traditional Italian and Syrian pastries pair pistachios with cherries and citrus, which inspired the flavor combination here. Using pistachios in a cheesecake bar elevates a familiar American dessert with international character.
The bar cookie itself reflects the evolution of American home baking. Busy cooks in the mid-twentieth century began pressing cheesecake fillings into square pans for easier slicing and serving. Food magazines and community cookbooks popularized the format. Today, home bakers create endless variations, and this cherry pistachio cheesecake bars recipe joins that legacy with a fresh, colorful twist.
Ingredient Deep Dive
Cream cheese forms the heart of the filling, and its history reaches back to American dairy farms in the late nineteenth century. Full-fat block cream cheese gives the silkiest texture and the richest flavor. Choose a brand you trust and let it soften fully before mixing. Store it in the refrigerator and use it within a week of opening for the best results.
Each two-hundred-calorie ounce of cream cheese supplies protein and calcium along with its creamy richness. Room-temperature cream cheese blends smoothly, while cold cream cheese creates lumps in the batter. If you forget to soften the cheese, cube it and warm it in short microwave bursts. Low-fat cream cheese can substitute in a pinch, though the filling turns slightly less velvety.
Cherries deliver the signature fruity swirl, and cherry cultivation dates back to ancient Rome and Asia Minor. Fresh cherries peak from May through August, while frozen or jarred cherries work all year. Look for bright, firm fruit with shiny skins, and store fresh cherries unwashed in the refrigerator. Frozen cherries need thawing and draining before you puree or cook them.
Cherries rank among the healthiest fruits, with antioxidants and vitamin C in every serving. They also contain natural sugars that sweeten the swirl without excess refined sugar. Pitting fresh cherries takes effort but rewards you with superior flavor. Jarred cherry pie filling offers the fastest route, and frozen cherries provide a reliable middle ground for busy cooks.
Pistachios contribute the crunch and color that make these bars distinctive, and they have fed Middle Eastern cuisines for millennia. Buy shelled, roasted pistachios to save time, and choose unsalted varieties so you control the seasoning. Store pistachios in an airtight container away from heat and light, or freeze them for long-term keeping.
These nuts bring protein, fiber, and monounsaturated fats to the recipe, which makes each bar more satisfying. Toasting pistachios for five to seven minutes deepens their flavor and improves texture. Skip the toasting only if you use already-roasted nuts. For crunch without the work, chop nuts coarsely so each bar shows visible green pieces.
Graham crackers create the crisp base, and this American staple dates back to nineteenth-century whole wheat biscuits. Use fresh, crisp crackers rather than stale ones, and pulse them into fine crumbs in a food processor. For a shortcut, buy pre-made graham crumbs. Almond flour or crushed shortbread cookies make elegant substitutes for graham crackers.
The sugar, butter, and eggs in this recipe each play a vital role. Granulated sugar dissolves easily in the filling, while butter binds the crust and adds flavor. Large eggs give structure and richness, so use room-temperature eggs for smooth blending. Vanilla extract and a touch of lemon zest round out the flavor profile and complement the cherry swirl beautifully.
Common Mistakes to Avoid
- Using cold cream cheese causes a lumpy filling, which bakes unevenly. Let the cheese sit at room temperature for at least thirty minutes, and beat it alone before adding sugar.
- Overmixing the batter after adding eggs whips in air, which leads to cracks and a puffy top. Stop mixing as soon as each egg disappears into the batter.
- Skipping the parchment sling makes removal difficult. Line the pan with parchment paper leaving overhang on two sides so you can lift the whole slab out cleanly.
- Overbaking the bars dries them out and causes cracks. Pull the pan when the center still jiggles slightly and the edges look set, then let the bars cool in the pan.
- Swirling too aggressively blends the layers into muddy pink streaks. Drag a knife lightly through the dollops just two or three times for clean, visible swirls.
- Cutting the bars too early smears the layers and ruins the presentation. Chill the bars for at least four hours, or overnight, before slicing with a sharp knife.
- Pressing the crust too firmly makes it dense and hard. Press gently and evenly with the bottom of a measuring cup so the crust stays tender.
- Forgetting to toast the pistachios wastes their flavor potential. A quick toast in the oven or a dry skillet transforms raw nuts into fragrant, crunchy accents.
- Underchilling the bars lets the filling collapse when sliced. Shorten the chilling time only if you plan to serve the bars in squares directly from the pan.
- Using salted butter without adjusting adds unwanted salt. Choose unsalted butter for the crust so the pistachios control the salty note.
Essential Techniques
Creaming the cream cheese solo comes first, and this step matters more than most bakers realize. Beat the soft cheese alone until it turns smooth and fluffy, which breaks down any lumps. Add the sugar gradually and scrape the bowl often so the mixture stays even. Master this step and your filling will bake into a silken, crack-free surface.
Baking to the jiggle point determines the final texture of these cherry pistachio cheesecake bars. The center should wobble gently like soft gelatin, while the edges look dry and set. Ovens vary, so start checking at the forty-minute mark. A thermometer helps: aim for an internal temperature near one hundred fifty degrees Fahrenheit. Residual heat finishes the job as the bars cool.
The knife swirl technique creates the signature marbled look, and practice makes it simple. Dollop small spoonfuls of cherry mixture across the filling, spacing them evenly. Draw a toothpick or knife through the dollops in one continuous motion. Stop after a few passes, because extra strokes blend the colors and erase the visual impact of the swirl.
Lifting the slab out with the parchment sling protects your hard work. Once the bars chill, grab the paper overhang and pull the whole block onto a cutting board. A warm knife cuts cleaner edges, so wipe the blade between slices. For bakery-style squares, trim the outer edges before dividing the slab into sixteen portions.
Pro Tips for Perfect Cherry Pistachio Cheesecake Bars
- Let all refrigerated ingredients sit at room temperature for thirty minutes before you begin. Soft butter and cream cheese blend faster and smoother.
- Toast the pistachios while the oven preheats, and save a few whole nuts for the top so the decoration looks intentional.
- Use a kitchen scale for the graham crumbs and cream cheese, because weight measures beat volume cups for consistency.
- Bake the crust for ten minutes before adding the filling, which sets the base and prevents sogginess.
- Cook the cherry swirl on the stove with a little cornstarch until it thickens, then cool it completely before swirling it into the batter.
- Chill the bars overnight if your schedule allows, because the flavor deepens and the texture firms beautifully.
- Dip your knife in hot water and dry it between cuts for sharp, clean squares that photograph well.
- Add a pinch of salt to the streusel-style pistachio topping if you use unsalted nuts, since salt sharpens every flavor.
Variations and Adaptations
Regional variations let you borrow flavors from around the world. Add a spoonful of Italian amaretto to the cherry swirl for an almond-accented version. A dash of rose water suited to Middle Eastern pastry traditions gives a floral lift. For a Southern twist, swap graham crumbs for pecan shortbread and add a bourbon drizzle to the top.
Seasonal adaptations keep these bars fresh all year. In summer, fold fresh pitted cherries into the swirl and garnish with mint. For autumn, replace cherries with roasted cranberries and add a cinnamon note to the crust. During the holidays, alternate red cherry swirls with green pistachio cream for a festive layered look.
Dietary modifications make the recipe work for more guests. Gluten-free graham crackers work in place of regular crumbs. Dairy-free cream cheese produces a decent substitute, though the texture turns slightly softer. For a vegan version, use a nut-based cream cheese and a flax egg, and bake at a lower temperature to protect the filling.
Flavor variations let you customize the profile to your taste. Swap vanilla for almond extract to echo the pistachios, or add orange zest to the filling for a citrus punch. A swirl of raspberry jam with the cherries adds extra complexity. Chocolate lovers can finish the bars with a drizzle of melted dark chocolate and flaky sea salt.
Texture modifications let you fine-tune the bite. A thicker graham crust adds more crunch. A dollop of whipped cream on each bar brings lightness. For extra crunch, sprinkle a pistachio streusel over the top during the last ten minutes of baking, which yields a coffee-cake style finish.
Presentation alternatives suit any event. Cut the bars small for a dessert platter, or cut them large for a bake sale. Serve each bar in a paper liner for easy picking. For a dinner party, plate a bar with a dollop of whipped mascarpone and a few fresh cherries so the dessert looks restaurant ready.
Serving and Presentation Guide
Plating techniques matter when you serve these cherry pistachio cheesecake bars at a dinner party. Place each square slightly off center on a small plate. Add a swoosh of cherry compote with the back of a spoon. A single fresh cherry and a few whole pistachios complete the picture, and the plate stays clean and modern.
Garnishing ideas range from simple to dramatic. A dusting of powdered sugar adds wintry elegance. Fresh mint leaves bring a pop of green. For celebrations, drizzle melted white chocolate across the bars in thin ribbons. Keep garnish light so the natural red and green colors of the recipe remain the star.
Traditional accompaniments pair naturally with the bars. A cup of coffee balances the richness, while a glass of cold milk pleases kids and adults alike. At brunch, add fresh fruit salad and a dollop of Greek yogurt. For holiday trays, arrange the bars beside shortbread cookies and candied nuts for a varied dessert spread.
Modern serving suggestions reflect current dessert trends. Slice the bars into bite-size squares and skewer each one with a toothpick for parties. Serve them alongside a scoop of vanilla bean ice cream for a plated dessert. A quick cherry coulis drizzle turns the bars into a restaurant-quality finale.
Temperature considerations affect flavor, so serve the bars cool rather than icy cold. Let them sit at room temperature for ten minutes before serving so the filling softens and the flavors bloom. Bring the cherries and nuts to room temperature too. Avoid serving the bars hot, because the filling needs to firm up for the best texture.
Portion control tips keep your spread manageable. Sixteen bars suit a party of twenty when sliced smaller. Cut bars into two-bite squares for buffets, and use a measuring guide so pieces stay even. Store cut bars in the refrigerator until serving time, then arrange them on a tray just before guests arrive.
Wine and Beverage Pairing
Wine pairings for these cherry pistachio cheesecake bars focus on balance. A dry sparkling wine like cava or prosecco refreshes the palate between bites. For a sweeter option, a late-harvest Riesling matches the fruit swirl. An off-dry rosé bridges both the creamy filling and the tart cherries with grace.
Non-alcoholic alternatives work just as well for family gatherings. Sparkling apple cider brings festive bubbles and fruity notes. A cherry lime spritzer echoes the swirl. Chilled hibiscus iced tea adds color and tartness that complement the dessert without competing for attention.
Coffee and tea pairings suit afternoon serving beautifully. A medium roast coffee cuts through the richness, and a light roast brings out the cherry fruit. For tea, choose a black tea with vanilla notes or a fruit-forward cherry tea. Espresso served in small cups makes a stylish finish to a dinner party.
Temperature considerations extend to drinks as well. Serve white wines and ciders well chilled, around forty to forty-five degrees. Red wines, if you choose them, stay on the lighter side and cool rather than warm. Coffee and tea serve hot, but avoid scorching, since burnt notes clash with the delicate filling.
Serving suggestions tie the menu together. Offer a beverage station with sparkling wine and cider so guests choose their own pairing. Place the bars near the drinks for easy self-service. A small card listing pairings adds a thoughtful touch for guests who enjoy experimenting with flavors.
Storage and Shelf Life
Storage methods protect these bars from drying out and absorbing refrigerator odors. Place the cut bars in a single layer in an airtight container, or separate layers with parchment paper. Press plastic wrap directly onto the surface only if the bars remain in the pan. Keep the container sealed for the best results.
Temperature requirements for cheesecake bars call for refrigeration at forty degrees or below. Remove the bars from the refrigerator only when you plan to serve them. Avoid leaving the bars at room temperature for more than two hours, because the dairy filling supports bacterial growth when warm.
Container recommendations matter for freshness. A glass container with a locking lid performs best because it seals tightly and does not hold odors. Plastic containers work too, but line the lid with plastic wrap for an extra seal. Keep the container toward the middle of the refrigerator away from the coldest spots.
Signs of spoilage help you know when to discard leftovers. Sour smells, mold, or a watery, separated filling indicate trouble. The bars keep for about five days in the refrigerator, though they taste best within three. Date the container so you remember when you made the batch.
Reheating instructions stay simple, and honestly these bars taste best cold. If you prefer a softer texture, let a bar sit at room temperature for ten minutes before eating. Never microwave the bars, because the filling turns rubbery and the crust goes soggy. Serve them chilled for the cleanest flavor and texture.
Freezing guidelines extend the shelf life to three months. Wrap individual bars tightly in plastic wrap, then place them in a freezer bag. Thaw bars overnight in the refrigerator, and blot any condensation with a paper towel. Freeze the whole slab on a parchment-lined sheet first if you prefer to cut bars after thawing.
Make Ahead Strategies
A prep timeline keeps this recipe stress free. Bake and chill the bars one or two days before your event, then garnish on the day of serving. Prepare the cherry swirl up to three days ahead and refrigerate it in a sealed jar. Toast extra pistachios and store them in a small bowl so assembly feels quick.
Storage between steps protects quality at every stage. Cool the baked bars completely in the pan before refrigerating them, because warm bars develop condensation. Keep the cherry swirl covered and cold. Once the bars firm up, you can slice them and store the squares in an airtight container for several days.
Quality impact assessment shows how far ahead you can push preparation. The bars taste freshest within three days, but they hold well for five. The crust softens slightly over time, and the pistachios lose a bit of crunch after two days. Add fresh pistachios on serving day if you prepare the bars far in advance.
Assembly tips speed up the final steps. Slice the bars while they are cold, using a hot knife wiped clean between cuts. Arrange the squares on a platter and add garnish just before guests arrive. If you store the cut bars in the pan, cover them loosely so the pistachios stay crisp.
Reheating guidelines remain consistent with this cold dessert: skip the oven and microwave. Serve the bars chilled or slightly cool. If the serving room feels warm, place the platter over a tray of ice or set out a few bars at a time and replenish from the refrigerator.
Fresh element additions lift make-ahead bars to just-baked quality. Add a drizzle of fresh cherry compote on serving day. Sprinkle toasted pistachios on top at the last moment for maximum crunch. A quick dusting of powdered sugar refreshes the look and hides small imperfections on the surface.
Scaling Instructions
Halving the recipe suits smaller households, and the method stays nearly identical. Use a loaf pan lined with parchment and cut all ingredients in half, including the eggs. Bake time shrinks by about ten minutes, so start checking the bars early. Watch the jiggle point rather than the clock for the best results.
Doubling or tripling the batch feeds a crowd at holidays and graduation parties. Bake two pans side by side on the same oven rack for even heat. Mix each batch separately rather than doubling the filling in one bowl, because overbeat batter cracks during baking. Label and date each pan before chilling.
Equipment adjustments keep the texture consistent at any scale. For large batches, rent or borrow a commercial mixer, since hand mixers strain under heavy dough. Use a food processor in batches for graham crumbs. Invest in a second square pan so both batches bake without crowding the oven.
Timing modifications matter more than most people expect. Larger batches take longer to cool and chill, so plan extra hours in the refrigerator. Rotate pans halfway through baking if your oven runs hot on one side. Start checking small pans early and large pans late.
Storage considerations change with batch size. A triple batch needs several airtight containers and a deep stretch of refrigerator space. Clear a shelf ahead of time. For gifting, pack individual bars in cellophane bags with ribbon and store them in a cool spot until delivery.
Nutritional Deep Dive
The macro breakdown of each bar reflects its rich ingredients. Each bar delivers roughly two hundred to two hundred fifty calories, with about five grams of protein, six to eight grams of fat, and twenty-plus grams of carbohydrate. The cream cheese and eggs supply protein, while the graham crust contributes most of the carbs and sugars.
Micronutrient analysis reveals real nutritional value in the dessert. Pistachios add potassium, vitamin B6, and thiamine. Cherries bring vitamin C and antioxidants like anthocyanins. Cream cheese contributes calcium and phosphorus. Eggs add choline and vitamin D, which gives each bar more than empty calories.
Health benefits justify enjoying these bars as part of a balanced approach. Pistachios support heart health with their healthy fats and fiber. Cherries provide anti-inflammatory compounds. Portion awareness keeps calories reasonable. Together, the ingredients make a dessert that satisfies better than processed sweets.
Dietary considerations matter for guests with restrictions. The bars contain dairy, wheat, and eggs, which rules out several common diets. Make the gluten-free and dairy-free swaps listed below if needed. Check chocolate and jam labels for hidden allergens, and always label the dessert tray at parties.
Portion analysis guides sensible enjoyment. At about two hundred plus calories per bar, one or two bars make a reasonable dessert. Slice smaller squares for buffets so guests sample without overshooting. Plate the bars instead of arranging them loose on a table, which encourages mindful portions while adding elegance.
Weight management tips let you enjoy these cherry pistachio cheesecake bars within your goals. Try a lighter cream cheese, though the texture changes slightly. Halve the sugar in the filling and lean on the cherry swirl for sweetness. Serve the bars with fresh fruit so the plate feels generous at lower calories.
Dietary Adaptations
Gluten-free adaptations start with the crust. Replace graham crackers with gluten-free grahams or crushed gluten-free shortbread. Check every package for certified gluten-free labeling, because cross-contamination risks lurk in many processed cookies. The filling and swirl need no changes, so the recipe converts easily for gluten-free guests.
Dairy-free modifications call for plant-based cream cheese. Choose a brand that bakes firmly, such as one made with cashew or coconut. Swap butter in the crust for a dairy-free alternative as well. Coconut cream adds richness. The bars taste slightly different but still deliver creamy texture and bright cherry flavor.
Vegan adaptations require swaps for all three animal products in the base recipe. Use vegan cream cheese and plant butter, then replace the eggs with aquafaba or a flax egg. Bake at three hundred twenty-five degrees to keep the filling from drying out. Check that the graham crackers contain no honey or dairy.
Low-carb adaptations focus on the crust and sugar. Replace the graham crumbs with almond flour and a little butter, and swap sugar for a granulated erythritol blend. Keep the cherry swirl small because fruit carries natural sugars. Expect a slightly firmer filling, and check doneness by feel and temperature.
Keto and paleo adaptations push the recipe toward nut-based ingredients. For keto, use almond flour crust, sugar-free sweetener, and a drizzle of sugar-free cherry sauce with monk fruit. For paleo, combine almond flour, coconut oil, and a touch of honey, use a cashew-based cheese alternative, and swirl with unsweetened cherry puree.
Low-FODMAP adaptations help guests with digestive sensitivities. Use lactose-free cream cheese and keep cherry portions modest, since large servings of fruit can bother some people. Swap the graham crust for gluten-free oat crumbs if tolerated. Keep portions small and label the dessert clearly for guests who monitor FODMAPs.
Troubleshooting Guide
Texture issues top the list of common cheesecake bar problems. If the filling turns grainy, the cream cheese was cold or the batter was overmixed. If the base feels soggy, the crust needed par-baking or the bars sat in the refrigerator uncovered. Fix texture by chilling fully and adding a thicker crust next time.
Flavor balance adjustments rescue bars that taste flat or too sweet. If the bars feel cloying, add extra lemon zest or a pinch of salt to the filling. If the cherry flavor disappears, reduce the sugar in the swirl so the fruit shines. Taste the swirl before baking, because the flavor concentrates in the oven.
Temperature problems cause cracks, puffy tops, and underwhelming centers. Ovens often run hot, so use an oven thermometer and reduce heat by twenty-five degrees if needed. Place the pan in the middle of the oven away from the heating element. Shield the top with foil if it browns before the center sets.
Equipment challenges resolve with simple swaps. No electric mixer? A whisk and elbow grease work for soft cream cheese. No food processor? Seal crackers in a bag and crush them with a rolling pin. A slight pan-size difference just shifts the bake time, so watch the jiggle point instead of the clock.
Ingredient substitutions test the recipe against real-world kitchens. Swap cherry preserves for fresh cherries when fruit is scarce. Use a different cookie for the crust if grahams run out. Substitute almonds or pecans when pistachios cost too much. Each swap changes the flavor slightly, yet the bars still work with care.
Timing concerns often stem from underchilled bars that slump when cut. Extend the oven bake two to three minutes if the center still looks liquid. Chill at least four hours, better overnight. The bars slice cleanest when cold and taste best after ten minutes of rest, so plan the timeline backward from serving time.
Recipe Success Stories
Community feedback confirms that these cherry pistachio cheesecake bars win over crowds. Bakers report that the bars vanish first at potlucks, even next to chocolate desserts. Several readers love that the recipe needs no water bath, which removes the biggest barrier to homemade cheesecake. Emails often mention requests for the recipe at family gatherings.
Variation successes show how flexible the recipe remains. One home baker swirled in raspberry jam and pistachios for a pink spring version. Another layered in cooked apples for an autumn take. Readers also share that lemon zest and almond extract tweaks personalize the recipe without breaking the method.
Adaptation stories highlight the recipe’s forgiving nature. Gluten-free cooks praise the crumb substitution, and dairy-free bakers cheer the plant-based swaps. A reader in Texas shared that the bars survived a hot two-hour car ride to a reunion when packed in a cooler with ice packs. The bars arrived ready to serve.
Reader suggestions continue to improve the recipe. Many bakers toast the pistachios longer for deeper flavor. Others make the bars in a nine-inch pan for thinner portions. A popular tip recommends adding a pinch of salt to the cherry swirl to amplify sweetness. The community keeps refining this easy dessert recipe.
Photography tips help fans capture the bars at their best. Natural light near a window flatters the red and green colors. Slice bars on a wooden board for warm contrast. Use a sharp knife dipped in hot water for clean edges. A single cherry and a scatter of pistachios make a simple, elegant prop.
Frequently Asked Questions
Can I use frozen cherries in this recipe? Frozen cherries work beautifully in these cherry pistachio cheesecake bars. Thaw the cherries and drain the excess liquid, because extra juice thins the swirl. Cook the thawed fruit with a little cornstarch and sugar until the mixture thickens, then cool it fully before swirling it into the batter. Your bars will taste just as impressive with frozen fruit as with fresh.
How do I know when the cheesecake bars are done? The bars are done when the edges look set and the center jiggles slightly, like soft gelatin. Start checking at forty minutes and rely on the jiggle test over the timer. An instant-read thermometer near one hundred fifty degrees confirms doneness. The filling firms further as the bars cool and chill.
Why did my bars crack on top? Cracking usually comes from overbaking or overmixing. Heat causes the filling to puff, and when it cools the surface splits. Fix cracks by beating the batter gently, stopping at each egg, and pulling the pan at the first sign of a jiggle. Cool the bars slowly in the pan, and the surface stays smooth.
How long do these cheesecake bars last in the refrigerator? Store the bars in Print
Cherry Pistachio Cheesecake Bars
- Total Time: 45 minutes
- Yield: 4
Description
Creamy cheesecake bars with a pistachio graham cracker crust, topped with cherry pie filling and chopped pistachios.
Ingredients
- 1 1/2 cups graham cracker crumbs
- 1/2 cup finely chopped pistachios
- 1/4 cup granulated sugar
- 1/2 cup unsalted butter, melted
- 16 oz cream cheese, softened
- 1/2 cup granulated sugar
- 2 large eggs
- 1 teaspoon vanilla extract
- 1/4 teaspoon almond extract
- 1 can (21 oz) cherry pie filling
- 1/4 cup chopped pistachios for topping
Instructions
- Preheat oven to 350°F (175°C). Line a 9×13 inch baking pan with parchment paper, leaving overhang for easy removal.
- In a medium bowl, combine graham cracker crumbs, finely chopped pistachios, and 1/4 cup sugar. Stir in melted butter until evenly moistened. Press mixture firmly into the bottom of the prepared pan. Bake for 10 minutes, then set aside to cool slightly.
- In a large bowl, beat cream cheese and 1/2 cup sugar until smooth. Add eggs one at a time, beating well after each addition. Mix in vanilla and almond extracts. Pour filling over crust and spread evenly.
- Drop spoonfuls of cherry pie filling over the filling and swirl with a knife for a marbled effect. Sprinkle chopped pistachios on top.
- Bake for 25-30 minutes, until filling is set and edges are lightly golden. Cool to room temperature, then refrigerate for at least 2 hours before cutting into bars.
Notes
You can customize the seasonings to taste.
- Prep Time: 15 minutes
- Cook Time: 30 minutes
- Method: Main
- Cuisine: American