Soft Peanut Butter Butterfinger Cookies: Irresistibly Easy Recipe
If you crave a cookie that delivers pure comfort in every bite, these Soft Peanut Butter Butterfinger Cookies will quickly become your new favorite treat. This irresistibly easy recipe combines creamy peanut butter, crushed Butterfinger candy bars, and a tender cookie base that stays soft for days. Moreover, the recipe requires just one bowl, basic pantry staples, and about thirty minutes from start to finish, so you can satisfy your sweet tooth without spending hours in the kitchen. Whether you bake them for a family dessert, a potluck, or a holiday cookie exchange, these cookies deliver big flavor with minimal effort, and that is exactly why home bakers across the country keep coming back to this Soft Peanut Butter Butterfinger Cookies recipe.
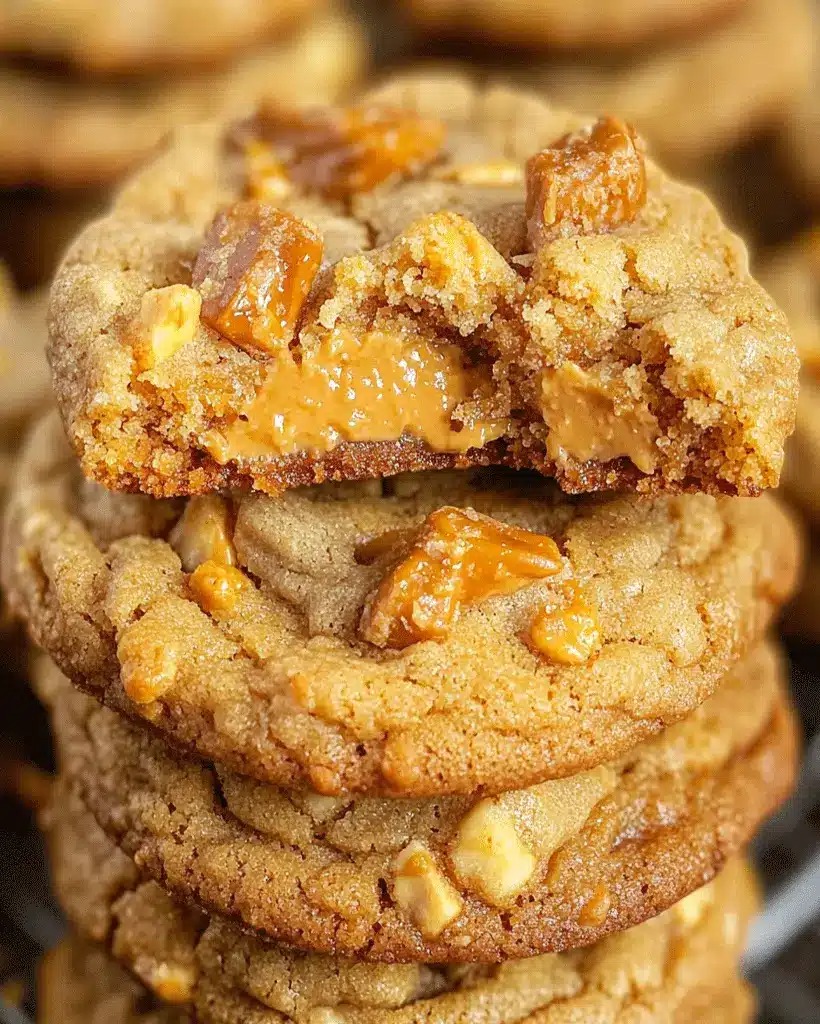
The magic of this Soft Peanut Butter Butterfinger Cookies recipe lives in the balance of textures. Specifically, the cookie itself bakes up pillowy and chewy, while the crushed candy pieces add a satisfying crunch and a burst of butterscotch-chocolate flavor. In addition, a light sprinkle of flaky sea salt on top cuts through the sweetness and makes each bite taste remarkably gourmet. Consequently, you get a bakery-style cookie that looks impressive on a platter yet comes together with everyday ingredients. Best of all, this Soft Peanut Butter Butterfinger Cookies recipe uses melted butter, which means you skip the stand mixer and the waiting game for softened butter, so you can bake on a whim whenever a craving strikes.
Many cookie recipes promise soft results, but this Soft Peanut Butter Butterfinger Cookies recipe actually delivers because it relies on a few smart techniques. For example, pulling the cookies from the oven while the centers still look slightly underbaked guarantees a chewy middle, and pressing extra candy pieces into the warm tops makes them look picture-perfect. Meanwhile, the peanut butter adds richness and moisture that keeps the cookies tender for several days at room temperature, which makes this Soft Peanut Butter Butterfinger Cookies recipe ideal for advance baking. Frankly, once you taste how well peanut butter and Butterfinger candy complement each other, you will want to keep a bag of candy bars in your pantry at all times.
Quick Recipe Highlights
- Flavor Profile: Rich, creamy peanut butter leads the flavor, and crushed Butterfinger candy layers in sweet butterscotch and chocolate notes. A pinch of flaky salt on top balances the sweetness and keeps each bite from tasting cloying.
- Texture: The cookies bake up soft, thick, and chewy, with a tender crumb that holds together beautifully. Crunchy candy shards scattered throughout create a delightful contrast that keeps every bite interesting.
- Aroma: Warm peanut butter and toasted sugar fill the kitchen as the cookies bake. As a result, family members tend to gather near the oven long before the timer goes off.
- Visual Appeal: Golden edges frame slightly pale, soft centers studded with orange and chocolate candy pieces. The cookies look homemade and festive, which makes them ideal for gifting and cookie trays.
- Skill Level Needed: This recipe suits beginners because it uses melted butter and requires no mixer, no chilling, and no tricky techniques. Anyone who can stir batter and scoop dough can master these cookies on the first try.
- Special Equipment: You need only a mixing bowl, a whisk, measuring cups, and a baking sheet lined with parchment paper. In addition, a cookie scoop speeds up portioning, though two spoons work just fine.
Recipe Overview
- Difficulty Level: We rate this recipe easy because every step uses straightforward techniques that require no special training. Specifically, you melt butter, whisk wet ingredients, fold in dry ingredients, and bake. Because the dough needs no chilling, the recipe moves quickly from bowl to oven, which makes it a smart choice for busy weeknights and last-minute guests.
- Category: These cookies shine as a dessert, a snack, or a bake sale offering. Moreover, they travel well, so they suit lunchbox treats, party favors, and holiday gift boxes equally well.
- Cuisine: This recipe draws on classic American peanut butter cookie traditions and updates them with a beloved American candy bar. As a result, it captures a nostalgic, distinctly American flavor profile that appeals to both kids and adults.
- Cost: The ingredients cost roughly eight to ten dollars total and yield two dozen cookies, which works out to less than fifty cents per cookie. Since the recipe uses pantry staples and a single candy bar multipack, it delivers excellent value for home bakers on a budget.
- Season: These cookies work year-round, though they feel especially welcome in autumn and winter when comfort baking peaks. In addition, they make a terrific addition to summer picnics because they hold up well in warm weather.
- Occasion: Bake them for birthdays, potlucks, cookie exchanges, game days, and casual family desserts. Furthermore, their crowd-pleasing flavor makes them a safe bet for school events and fundraisers.
Why You’ll Love This Recipe
The first reason this recipe wins hearts is taste. Peanut butter and butterscotch-chocolate candy create a flavor combination that feels indulgent yet familiar, and every bite delivers creamy richness followed by a crunchy candy finish. Because the cookie dough itself carries deep peanut butter flavor rather than relying on candy alone, the cookies taste balanced and never overly sweet. In addition, a touch of vanilla extract rounds out the flavor and adds warmth. Consequently, tasters often describe these cookies as the best peanut butter cookies they have ever tried, and they rarely stop at one. For anyone building a Soft Peanut Butter Butterfinger Cookies recipe into their regular rotation, the taste alone justifies the effort.
Convenience sets this recipe apart from typical cookie projects. Since melted butter replaces softened butter, you skip the softening wait and the heavy mixer, and because the dough requires no chilling, you bake immediately after mixing. Moreover, the entire process takes about thirty minutes, including baking and cooling time. As a result, this recipe fits neatly into busy afternoons and spontaneous baking urges. Cleanup also stays minimal because one bowl handles the whole job, which means fewer dishes and more time enjoying warm cookies with a cold glass of milk.
Nutritionally, these cookies offer more than empty calories. Peanut butter contributes plant-based protein, healthy fats, and vitamin E, and it helps the cookies stay satisfying so one or two feel sufficient. Meanwhile, the recipe uses a modest amount of added sugar compared with many commercial cookies, and it contains no preservatives or artificial additives. Because you control the ingredients, you know exactly what goes into each batch. In short, this recipe balances indulgence with a bit of nutritional substance, so you can enjoy a treat without abandoning your broader eating goals.
Socially, these cookies perform beautifully. They look festive on a platter, they transport easily to parties, and they spark conversation because the Butterfinger pieces are instantly recognizable. In addition, they make thoughtful homemade gifts when packaged in a cellophane bag tied with ribbon. Because the recipe yields two dozen cookies, you always have extras to share. Consequently, neighbors, coworkers, and teachers all become instant fans, and the cookies build a reputation that keeps you invited back to every gathering, and this social appeal explains much of the lasting popularity behind this Soft Peanut Butter Butterfinger Cookies recipe.
Finally, cost-effectiveness makes this recipe accessible to nearly every household. The ingredient list relies on pantry staples like flour, sugar, butter, peanut butter, and eggs, plus one affordable candy bar multipack. Because each batch costs under ten dollars, the recipe delivers gourmet flavor at a fraction of bakery prices. Additionally, the cookies freeze well, which stretches the value even further. For families watching their budgets, this recipe proves that homemade treats can taste luxurious without breaking the bank, and that combination of affordability and quality keeps this Soft Peanut Butter Butterfinger Cookies recipe in constant rotation.
Historical Background and Cultural Significance
The story of these cookies begins with two American icons: peanut butter and Butterfinger candy. Peanut butter cookies rose to popularity in the early twentieth century, and shortly after, bakers began experimenting with candy additions during the Great Depression and World War II, when home cooks stretched ingredients creatively. Because candy bars were affordable and widely available, home bakers folded crushed candy into cookie dough to add flavor and texture without extra cost. Consequently, the combination of creamy peanut butter and crunchy candy became a natural pairing in American home kitchens, laying the groundwork for the recipe you make today.
Butterfinger itself dates back to 1923, when the Curtiss Candy Company introduced the bar with its signature flaky, crisp peanut butter core coated in chocolate. Over the decades, the candy became a cultural touchstone, appearing in advertising, pop culture, and even a famous animated character named Bart Simpson. Because Butterfinger carries such strong nostalgic associations, recipes that feature it evoke childhood memories for many American bakers. As a result, these cookies connect people to feelings of simpler times, and that emotional resonance gives the recipe significance beyond its ingredients.
Over time, home bakers evolved the recipe into the soft, thick cookie style popular today. Earlier versions produced thin, crisp cookies, but the modern preference leans toward chewy centers and tall, bakery-style shapes. Accordingly, bakers migrated toward melted butter, extra flour, and higher butter or peanut butter ratios to achieve a softer texture. Furthermore, the rise of food blogs and social media accelerated these evolutions, since photos of thick, candy-studded cookies spread quickly and inspired copycat bakes across the country.
Regional variations exist across the United States. For instance, Southern bakers sometimes add a pinch of cinnamon or use chunky peanut butter, while Midwestern versions often include extra chopped candy on top for drama. Moreover, some bakers pair the recipe with chocolate drizzle, and others freeze the dough in advance for holiday baking marathons. Regardless of the tweak, the core combination of peanut butter and Butterfinger candy remains constant, and this shared heritage keeps the recipe alive in kitchens from coast to coast.
Ingredient Deep Dive
Peanut butter forms the backbone of this recipe. Americans have enjoyed peanut butter since the late 1800s, when developers first ground roasted peanuts into a spreadable paste. Today, peanut butter supplies protein, healthy fats, and vitamin E, and it contributes moisture that keeps cookies tender. When choosing peanut butter, look for creamy commercial brands with a smooth texture and consistent oil, such as Jif or Skippy, because natural varieties with separated oil can alter the dough’s consistency. Store peanut butter at room temperature and use it within the freshness window on the jar, and if you need a substitution, sunflower seed butter works for nut-free households, though it will shift the flavor slightly.
Butterfinger candy bars bring crunch and flavor to the mix. Originally launched in 1923, the bar features a flaky, crisp peanut butter core wrapped in chocolate, and its distinctive texture holds up well in baked goods. Nutritionally, the candy adds sugar and a small amount of protein, and it delivers the butterscotch and chocolate notes that define these cookies. When selecting bars, choose fresh candies and check that they crumble rather than bend, since stale bars taste flat. Store leftover candy in a sealed bag at room temperature, avoid refrigeration, and remember that Heath bars or crushed toffee bits make solid substitutes in a pinch.
King Arthur All-Purpose Flour provides structure and works reliably in this recipe. Flour has anchored baked goods for millennia, and all-purpose flour rose in the twentieth century as a versatile blend. Nutritionally, flour contributes carbohydrates, some protein, and small amounts of B vitamins. When selecting flour, check the label for protein content between ten and twelve percent, and prefer unbleached flour for consistent results. Store flour in a cool, dry place or in the freezer for long-term keeping, and if you need a gluten-free version, choose a tested one-to-one gluten-free flour blend rather than a single alternative flour.
Dark brown sugar deepens the flavor and boosts moisture. Brown sugar, a staple of American baking since colonial times, contains molasses that keeps baked goods soft longer. Nutritionally, brown sugar offers trace minerals like calcium and potassium, though the amounts remain small. When selecting brown sugar, choose packages that feel soft and free of hardened clumps, and store it in an airtight container with a slice of bread to maintain moisture. If you run out, combine white sugar with molasses as a quick substitution, using one tablespoon of molasses per cup of sugar.
Eggs bind the dough and add structure. Eggs have supported baking traditions globally for thousands of years, and they supply quality protein plus vitamin D. When selecting eggs, choose clean, uncracked shells, and store them in the refrigerator, though many bakers use room-temperature eggs for better mixing. If you need an egg substitute, use a flax egg, and if you want a richer result, an extra egg yolk makes the cookies even more tender. Always check the carton date and use eggs within the recommended window.
Vanilla extract rounds out the flavor. Vanilla has a rich history rooted in Mexican and South American cultivation, and it remains one of the most beloved baking flavorings. Nutritionally, vanilla contributes negligible calories yet adds perceived sweetness. When selecting vanilla, choose pure extract over imitation for the best flavor, and store it tightly capped in a cool, dark cabinet where it keeps for years. If you run low, maple syrup or a small splash of rum works as a substitute in many cookie recipes.
Common Mistakes to Avoid
- Overbaking the cookies is the top mistake. Because cookies continue to set on the hot pan, pulling them when the centers still look soft guarantees chewy results, while an extra two minutes dries them out.
- Using cold butter that you melt but then mix with cold eggs can cause the dough to seize. Therefore, whisk warm melted butter with sugar first, then add eggs gradually so the mixture stays smooth.
- Packing the flour too densely throws off the flour-to-fat ratio and produces dry, crumbly cookies. Instead, spoon flour into the measuring cup and level it with a knife for accurate amounts.
- Skipping the candy integration step leaves bare spots and uneven flavor. You should fold most of the crushed candy into the dough while reserving a handful to press into the warm baked tops.
- Baking on an unlined dark pan often causes overbrowned bottoms. Use parchment paper on a light or medium baking sheet, and avoid dark nonstick pans that conduct too much heat.
- Placing dough on a hot baking sheet for a second batch melts the dough before baking. Always allow the pan to cool, or rotate two pans so each has a working partner.
- Flattening the dough balls too much removes the thick, soft center characteristic of these cookies. Keep the dough tall and slightly domed, and let the oven do the work.
- Using natural peanut butter straight from a separated jar without stirring creates uneven fat distribution. Stir natural peanut butter thoroughly, or choose creamy commercial peanut butter for consistency.
- Adding candy pieces to the dough when it is too warm causes the chocolate to smear. Therefore, fold the candy in gently after the dough comes together, and work quickly.
- Skipping the flaky salt finish leaves the cookies tasting flat and overly sweet. A small pinch of flaky salt right after baking elevates the flavor and delivers that bakery touch.
Essential Techniques
Melting butter and whisking it with sugar properly sets the foundation for soft cookies. This step matters because melted butter creates a chewier texture than creamed butter, and whisking the sugar into warm butter begins dissolving the crystals, which boosts moisture. To master it, melt the butter until just melted and slightly warm rather than sizzling, then whisk in both sugars until the mixture looks glossy and smooth. Common pitfalls include overheating the butter or adding cold eggs too quickly, which can cause the mixture to look curdled. The visual cue for success is a smooth, shiny, caramel-colored mixture with no greasy sheen.
Measuring flour accurately prevents dense cookies. This technique matters because flour compacts easily and small errors compound across the batch. To master it, stir the flour in its container, spoon it into the measuring cup, and level the top with a knife. Common pitfalls include scooping directly with the measuring cup or tapping the cup mid-measure, both of which pack extra flour into the dough. The visual cue for success is a measuring cup that looks light and level rather than rounded and heavy.
Folding candy into the dough gently protects its crunch. This matters because aggressive mixing breaks the candy into dust and warms the chocolate, causing smears and lost texture. To master it, add crushed pieces in two additions and fold with a spatula using broad, sweeping strokes until just combined. Common pitfalls include overmixing the dough or folding the candy in while the dough remains too warm. The visual cue for success is a dough studded with distinct candy clusters and a clean bowl bottom.
Scooping consistent portions guarantees even baking. This matters because uneven dough balls bake at different rates, leaving small cookies overdone and large ones raw. To master it, use a two-tablespoon cookie scoop and pack the dough loosely, then roll balls between your palms. Common pitfalls include compressing the dough too firmly or making giant spheres that spread unevenly. The visual cue for success is uniform balls about the size of a golf ball with slightly textured surfaces.
Judging doneness by appearance rather than the clock yields the best texture. This matters because ovens vary and cookies finish quickly, so visual cues matter more than exact minutes. To master it, watch for edges that turn light golden while the centers still look soft, matte, and slightly puffed. Common pitfalls include relying only on the timer or waiting until the centers look firm. The visual cue for success is a cookie with set edges, a soft middle, and a few small cracks near the center.
Pro Tips for Perfect Soft Peanut Butter Butterfinger Cookies
Pull the cookies from the oven two minutes before they look finished. Because carryover heat continues cooking the cookies on the warm pan, this small head start preserves the soft center that defines the recipe.
Press extra candy pieces into the tops right after baking. Since the warm surface grips the candy, the pieces stay in place and create a polished, professional look without extra effort.
Measure the dough with a scoop for uniform cookies. Consequently, every cookie bakes evenly, and the batch looks consistent for photos, gifting, and portion planning.
Let the baking sheet cool between batches. Specifically, a hot pan melts the dough before it enters the oven, which leads to flat cookies and uneven browning, so rotate pans or wait a few minutes.
Chill the baked cookies on the sheet for five minutes. During this rest, the cookies firm up slightly and develop stronger flavor, and they release cleanly from the parchment.
Add a pinch of flaky salt to each warm cookie. Furthermore, the salt enhances the peanut butter and tempers the candy’s sweetness, so one pinch transforms the entire flavor balance.
Use fresh Butterfinger bars and crush them by hand. Additionally, hand-crushing creates varied shard sizes that deliver pleasant texture surprises, whereas a food processor often creates uneven powder.
Store cookies with a slice of white bread in the container. As a result, the bread releases moisture and keeps the cookies soft for several days, and the trick costs almost nothing.
Variations and Adaptations
Regional variations offer fun ways to adapt the recipe. Southern bakers sometimes add a quarter teaspoon of cinnamon or swap in chunky peanut butter for extra texture, while Midwestern cooks press extra candy into the tops and drizzle melted chocolate across the finished cookies. West Coast bakers occasionally fold in miniature marshmallows for a s’mores-style twist. In addition, some bakers brush the dough balls with milk before baking to encourage browning. These regional touches reflect local preferences, and they prove how flexible this recipe truly is.
Seasonal adaptations keep the recipe feeling fresh throughout the year. During autumn, add a pinch of pumpkin pie spice and serve the cookies alongside hot cider. For winter holidays, roll the dough in red and green sprinkles before baking, and for summer, skip the salt and pair the cookies with ice cream sandwiches. Spring versions benefit from a drizzle of white chocolate and a few chopped pretzels. Because the base recipe stays constant, seasonal tweaks require almost no extra effort.
Dietary modifications make the recipe accessible to more households. Gluten-free bakers can substitute a tested one-to-one gluten-free flour blend and add a quarter teaspoon of xanthan gum if the blend lacks it. Dairy-free bakers should use plant-based butter and dairy-free candy alternatives. Vegan bakers replace the egg with a flax egg and confirm that the candy contains no milk. Each swap changes texture slightly, yet the core flavor survives, so more people can enjoy a Soft Peanut Butter Butterfinger Cookies recipe at their own tables.
Flavor variations let bakers play with the profile. For a chocolate lover’s version, substitute cocoa powder for two tablespoons of flour and add extra chopped chocolate. A coffee version benefits from a teaspoon of espresso powder, while a maple version swaps in maple sugar for part of the brown sugar. Nut lovers can fold in chopped peanuts for crunch, and spice fans can add a pinch of cayenne for warmth. Since peanut butter pairs well with many flavors, experimentation usually rewards the curious baker.
Texture modifications change the cookie’s character. Crisp-cookie fans should flatten the dough slightly and bake an extra two minutes, while extra-soft fans should keep the dough tall and reduce the bake time by one minute. For a chewier version, swap one egg white for a yolk and use bread flour. Cakey versions benefit from an extra tablespoon of flour and a shorter bake. Each adjustment shifts the outcome predictably, which makes the recipe a great teaching tool.
Presentation alternatives lift the cookies from everyday to special. Sandwich two cookies with peanut butter frosting for a decadent treat, or dip half of each cookie in melted chocolate for a bakery-style finish. Crumbled cookies over vanilla ice cream create an easy sundae, and cookie pops on sticks work wonderfully at parties. Because the cookies hold their shape, they support these presentation upgrades beautifully, and hosts can tailor the look to any event.
Serving and Presentation Guide
Plating techniques influence how guests perceive homemade cookies. Stack cookies on a simple white platter with parchment between layers, and leave gaps so the colors show. Arrange the stack in a loose pyramid rather than a flat row, because height makes the presentation look abundant. A few crumbs and a couple of broken pieces scattered nearby add an inviting, rustic touch. Avoid crowding, since crowded platters look messy, and rotate the arrangement so every cookie faces slightly outward.
Garnishing ideas range from simple to celebratory. A light dusting of powdered sugar creates a snowy finish, while a drizzle of melted chocolate adds drama. Chopped peanuts or extra crushed candy on top reinforce the flavor story, and a tiny sprig of mint adds color contrast. For holidays, sprinkle a few colored sanding sugars across the platter. Each garnish should complement rather than overwhelm, so choose one or two touches at most.
Traditional accompaniments keep the serving simple and nostalgic. A tall glass of cold milk remains the classic pairing, and hot coffee pairs beautifully with the butterscotch notes. For gatherings, place cookies beside vanilla ice cream and let guests build sundaes. A small bowl of extra crushed candy invites guests to add their own topping. Because these cookies suit casual settings, uncomplicated accompaniments feel right and keep the focus on the cookies themselves.
Modern serving suggestions bring contemporary flair. Crumbled cookies over Greek yogurt with honey create an elegant breakfast parfait, and cookie pieces folded into softened vanilla ice cream make a quick gelato-style dessert. Layer cookies with whipped cream and banana slices for a simple trifle. For a party dessert board, place cookies alongside fruit, nuts, and small chocolate squares. These contemporary touches show the recipe’s versatility and encourage repeat baking.
Temperature considerations matter more than many bakers realize. Serve the cookies slightly warm for maximum softness, or at room temperature when you need clean edges and tidy presentation. If the cookies chilled in the refrigerator, let them sit for ten minutes so the texture relaxes. Pair warm cookies with cold milk, and pair room-temperature cookies with coffee or tea. Because temperature changes the perceived texture, choose the serving temperature that fits your occasion.
Portion control tips help hosts manage the dessert table. Offer smaller cookies when serving a buffet, and cut a few in half so guests can sample without committing. Provide a small sign listing the ingredients, especially for allergy awareness, and place the platter toward the middle rather than beside other desserts to prevent cluttered grazing. Finally, keep a small supply of napkins nearby, since buttery cookies leave fingerprints and guests appreciate the courtesy.
Wine and Beverage Pairing
Wine pairings can elevate these cookies into an adult dessert course. A glass of tawny port complements the butterscotch and chocolate notes beautifully, since port’s caramel flavors mirror the candy. For a lighter option, a Moscato d’Asti brings sweetness and bubbles that cleanse the palate between bites. Cream sherry offers nutty notes that echo the peanut butter, and a small pour of bourbon pairs surprisingly well with the candy’s toffee flavors. In short, sweet dessert wines and fortified wines make the most reliable companions.
Non-alcoholic alternatives keep the pairing accessible for every guest. Cold whole milk remains the gold standard, and chocolate milk intensifies the candy flavor for a playful treat. Iced coffee brings bitterness that balances the sweetness, while chai tea adds warm spice that echoes the cookie’s cozy character. Sparkling apple cider provides festive bubbles, and a vanilla milkshake turns dessert into an event. Because each drink offers a different contrast, the options suit every age and preference.
Coffee and tea pairings deserve special attention, since these cookies welcome caffeine. Medium-roast coffee with nutty notes complements the peanut butter, while a dark roast cuts the sugar effectively. Espresso shots served alongside the cookies create a café-style moment, and a caramel latte doubles down on the butterscotch profile. On the tea side, English breakfast adds maltiness, and vanilla rooibos brings sweetness without caffeine. For best results, serve the drinks hot and let guests sip between bites.
Temperature considerations improve the pairing experience. Serve milk and milkshakes very cold to contrast with the warm cookies, and serve dessert wines slightly chilled to keep them refreshing. Coffee should stay hot but not scalding, since scorching heat masks the cookie’s flavor. If you serve iced tea, add plenty of ice and skip the sugar to let the cookie’s sweetness lead. A thoughtful temperature balance makes the pairing feel intentional rather than random.
Serving suggestions round out the beverage plan. Set up a small drink station with milk, coffee, and tea so guests can self-serve, and label each option with a short flavor note. Offer small glasses rather than large ones, since dessert drinks accompany rather than dominate. Add a bowl of ice and a pitcher of cold milk for easy refills. Finally, place a few cookies beside the drink station so guests understand the intended pairing at a glance.
Storage and Shelf Life
Storage methods determine how long these cookies stay fresh. Place completely cooled cookies in an airtight container and separate layers with parchment to prevent sticking. Add a slice of white bread to the container because it releases moisture and keeps the cookies soft. Store the container at room temperature away from direct sunlight and heat. Under these conditions, the cookies stay fresh for about five days, and the flavor actually deepens after the first day.
Temperature requirements matter for food safety and texture. Room temperature storage suits these cookies best, and refrigeration dries them out while altering the texture. Freeze any portion you will not eat within five days, and keep baked goods away from humid areas like above the stove. During hot summer months, store them in a cool cabinet or a climate-controlled room. If your kitchen runs warm, choose the coolest spot available and check the cookies daily for freshness.
Container recommendations protect both texture and flavor. Use a sturdy container with a tight lid, and line the bottom with parchment for easy cleanup. For gift boxes, choose rigid tins lined with parchment and packed snugly so cookies do not shift. For daily storage, a glass or plastic container with a locking lid works well. Avoid open bowls and flimsy bags, since both allow the cookies to dry out and absorb surrounding odors.
Signs of spoilage tell you when to discard the batch. Stale cookies taste dry and hard, though they remain safe to eat for several days beyond peak freshness. Mold, however, signals spoilage, and any visible discoloration or off odor means the batch should go. Because the candy pieces can absorb moisture, check for a soggy candy texture. When in doubt, discard the batch, and always date the container when you store the cookies.
Reheating instructions restore freshly baked flavor. Place the cookies on a parchment-lined sheet and warm them at 300 degrees Fahrenheit for three to four minutes. Alternatively, microwave a single cookie for ten seconds to soften it. Because overheating dries the cookies, keep the time short and watch closely. A quick warm-up with a glass of milk makes day-old cookies taste nearly new, and this trick encourages you to bake extra.
Freezing guidelines extend shelf life dramatically. Freeze baked cookies in a single layer on a sheet until firm, then transfer them to a freezer bag with parchment between layers. Freeze the dough in scooped balls for even more convenience, and bake from frozen with two extra minutes of bake time. Frozen baked cookies keep for up to three months, while frozen dough keeps for up to two months. Label everything with the date, and thaw baked cookies at room temperature for about an hour.
Make Ahead Strategies
A prep timeline makes baking smoother on busy days. Measure dry ingredients the night before and store them in a sealed container, and let the butter and eggs come to room temperature shortly before mixing. Preheat the oven twenty minutes ahead so it reaches a steady temperature. Because the dough requires no chilling, you can mix and bake in one session, yet this small advance prep saves time and reduces stress. Write the timeline on your phone or a notepad for easy reference.
Storage between steps protects quality if you pause mid-process. Freeze raw dough balls on a sheet, then transfer them to a bag for later baking. If the dough waits at room temperature, use it within an hour to avoid excess softening. Once baked, store cooled cookies at room temperature for several days. Simply label each stage with the date, and keep the dough and baked cookies separate to preserve freshness.
Quality impact assessment helps you decide what to prep ahead. Dough prepped a day ahead bakes up almost identically to fresh dough, and the rest actually improves flavor slightly. Baked cookies also hold up well for several days. Meanwhile, crushing the candy too far in advance can chewily soften it, so crush just before mixing for the best crunch. Overall, most steps tolerate advance prep gracefully, which makes this recipe excellent for busy bakers.
Assembly tips keep the process smooth when you bake ahead. Bring frozen dough balls directly to room temperature for a few minutes, then bake slightly longer than usual. Press extra candy onto the tops after baking, which reinforces the flavor and appearance even after freezing. Stack cooled cookies with parchment for storage, and store extra crushed candy separately to add freshness at the last moment. Finally, bake one test cookie to verify oven temperature before sliding the full batch in.
Reheating guidelines preserve the make-ahead investment. Warm frozen baked cookies in a 300-degree Fahrenheit oven for five to six minutes, or microwave them individually for ten to fifteen seconds. Because the candy softens in the microwave, use the oven when texture matters most. Serve warm cookies immediately with milk or coffee for the best experience. The result tastes nearly identical to freshly baked, which justifies the planning effort.
Fresh element additions bring make-ahead cookies back to life. Right before serving, drizzle melted chocolate across the tops and sprinkle a pinch of flaky salt. Arrange the cookies on a fresh platter with extra candy pieces around the edges. Add a small bowl of whipped cream for dipping, and pair with cold milk. These last-minute touches cost almost nothing and make pre-baked cookies feel like a fresh-baked event.
Scaling Instructions
Halving the recipe suits small households and test batches. Divide every ingredient by two, which means using one egg instead of two and reducing the candy to about a cup of crushed pieces. Adjust the baking time only slightly, since smaller batches generally bake the same. Because batches freeze well, consider making the full recipe and freezing half the dough instead. Either approach works, and the choice depends on how many cookies you plan to eat.
Doubling or tripling the recipe works easily because the ingredients scale linearly. Multiply each ingredient by the factor you choose, and mix in a larger bowl or a stockpot to prevent overflow. Bake times stay almost identical because cookie size does not change, but you should rotate pans evenly and allow longer between batches for sufficient cooling. For a party, tripling yields six dozen cookies, which covers most gatherings, and storing the extra dough in the refrigerator between batches keeps the process organized.
Equipment adjustments matter when scaling up. A stand mixer helps with large batches, though the recipe still works by hand in a very large bowl. Use multiple baking sheets to bake more cookies per round, and check that they fit the oven racks without touching. If your oven racks are crowded, bake one sheet at a time to maintain even heat circulation. Finally, measure larger quantities carefully, since doubling errors compound quickly.
Timing modifications keep large batches manageable. Scoop the dough onto sheets first so each batch moves quickly into the oven. While one batch bakes, scoop the next batch on a second cool sheet, which keeps the production line moving. Allow cookies to rest on the pan, then transfer them to a rack while the next batch bakes. Because scaling up multiplies the hands-on time, pacing yourself through these steps prevents fatigue and mistakes.
Storage considerations grow with batch size. The refrigerator holds large dough batches well for several hours, and the freezer handles rectangular containers efficiently. Gently press dough balls into freezer bags, and store them flat to save space. For baked cookies, choose large airtight containers with room for parchment layers. Label everything with the batch date and quantity, and store baked and raw products separately.
Nutritional Deep Dive
The macro breakdown for these cookies shows a balanced treat. One cookie supplies roughly two hundred calories, with about twenty-four grams of carbohydrate, eleven grams of fat, and four grams of protein. Peanut butter contributes most of the fat Print
Soft Peanut Butter Butterfinger Cookies
- Total Time: 27 minutes
- Yield: 24 cookies
Description
Chewy peanut butter cookies loaded with crunchy Butterfinger pieces for an irresistible sweet and salty treat.
Ingredients
- 1/2 cup unsalted butter, softened
- 1/2 cup creamy peanut butter
- 1/2 cup granulated sugar
- 1/2 cup packed brown sugar
- 1 large egg
- 1 teaspoon vanilla extract
- 1 1/4 cups all-purpose flour
- 1/2 teaspoon baking soda
- 1/4 teaspoon salt
- 1 cup crushed Butterfinger candy bars (about 3 fun-size bars)
Instructions
- Preheat oven to 350°F (175°C). Line baking sheets with parchment paper.
- In a large bowl, cream together butter, peanut butter, granulated sugar, and brown sugar until light and fluffy.
- Beat in egg and vanilla extract until well combined.
- In a separate bowl, whisk together flour, baking soda, and salt. Gradually add to the wet ingredients and mix until just combined.
- Fold in crushed Butterfinger pieces.
- Roll dough into 1-inch balls and place on prepared baking sheets, spacing 2 inches apart. Flatten slightly with the back of a fork.
- Bake for 10-12 minutes, or until edges are lightly golden. Centers will be soft.
- Allow cookies to cool on baking sheet for 5 minutes before transferring to a wire rack to cool completely.
Notes
You can customize the seasonings to taste.
- Prep Time: 15 minutes
- Cook Time: 12 minutes
- Method: Dessert
- Cuisine: American