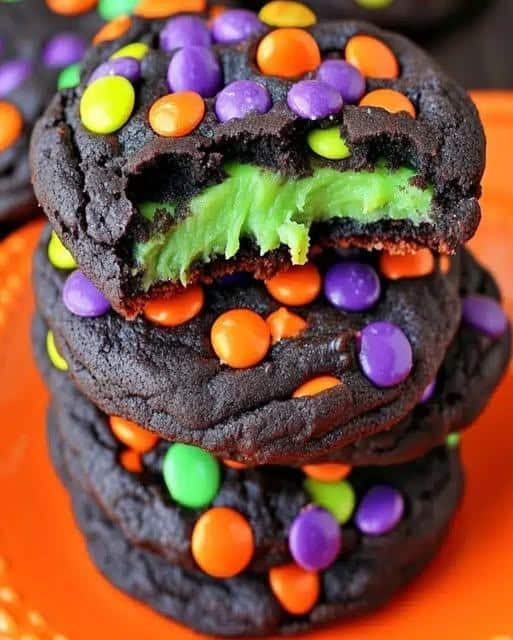
Hocus Pocus Halloween Cookies: A Spellbinding Treat for Your Party
Hocus Pocus Halloween Cookies bring the beloved Sanderson Sisters right into your kitchen with every colorful bite. If you grew up watching the classic Halloween film, you already know the magic those three witches stir up each October. These cookies capture that same playful spirit in a simple sugar cookie recipe that anyone can master. Moreover, the bright purple, green, and orange colors make them an instant hit at any spooky gathering.
When you bake a batch of Hocus Pocus Halloween Cookies, the aroma of vanilla and butter fills your home and sets the perfect mood for the season. The soft, chewy center gives way to a lightly crisp edge, and the royal icing adds a sweet finish that balances the buttery cookie base. In addition, the vivid colors and playful designs turn a basic dessert into a centerpiece that guests cannot stop photographing. Whether you host a movie night or a classroom party, these cookies deliver charm and flavor in equal measure.
Furthermore, this recipe works beautifully for bakers of every skill level because it relies on straightforward techniques and pantry staples. You do not need professional decorating skills to create something impressive. Consequently, even beginners can produce Hocus Pocus Halloween Cookies that look like they came from a boutique bakery. The dough comes together in one bowl, and the icing sets quickly so you can stack and serve without worry.
Quick Recipe Highlights
- Flavor Profile: These cookies deliver a rich vanilla and butter taste with a hint of almond. The royal icing adds a light sweetness that never overwhelms the palate. Overall, the flavor stays classic and crowd-pleasing.
- Texture: Each cookie offers a soft, tender crumb with a slightly crisp outer edge. The icing dries to a smooth, glossy finish that adds a gentle snap. Therefore, you get a satisfying contrast in every bite.
- Aroma: Butter and vanilla dominate the fragrance as the cookies bake. A subtle note of almond extract deepens the warmth. Consequently, your kitchen smells like a cozy autumn bakery.
- Visual Appeal: Bright purple, lime green, and pumpkin orange icing make these cookies pop. Playful shapes like stars, cauldrons, and witch hats add festive charm. As a result, they look stunning on any dessert table.
- Skill Level Needed: Basic baking skills and simple piping are all you need. The dough requires no chilling and the icing comes together in minutes. Thus, new bakers can succeed on the first try.
- Special Equipment: You need a stand or hand mixer, baking sheets, and parchment paper. Cookie cutters in Halloween shapes and piping bags help with decorating. However, a simple zip-top bag works fine as a substitute.
Recipe Overview
- Difficulty Level: This recipe earns an easy rating because the dough uses the creaming method, which most home bakers already know. The dough rolls out without chilling, which saves time and effort. Decorating requires only basic piping lines and flood icing. Therefore, both children and adults can join the fun.
- Category: These cookies fall into the dessert and treat category, perfect for parties and holidays. They also work as edible gifts or bake sale items. Additionally, you can serve them as a sweet snack alongside warm cider.
- Cuisine: The recipe draws from American home baking traditions with a focus on decorative sugar cookies. Royal icing techniques come from European confectionery, while the playful colors reflect modern American holiday baking. Consequently, the result blends classic and contemporary influences.
- Cost: A full batch costs roughly eight to twelve dollars depending on your pantry. Butter, sugar, flour, and eggs make up most of the expense. Food coloring and extracts add a small amount more. Overall, each cookie costs less than fifty cents.
- Season: Fall and early winter suit these cookies best because Halloween anchors the theme. October is the obvious peak season for baking them. Nevertheless, you can enjoy them at any autumn gathering or themed party.
- Occasion: Halloween parties, movie nights, school events, and neighborhood gatherings all welcome these treats. They also shine at costume parties and trunk-or-treat events. Furthermore, you can adapt the colors for other holidays with ease.
Why You’ll Love This Recipe
First and foremost, the taste of Hocus Pocus Halloween Cookies wins people over instantly. The buttery base carries real vanilla flavor, and the almond extract adds a subtle warmth that keeps things interesting. Because the icing stays light and glossy, it complements rather than covers the cookie. As a result, every bite tastes balanced and fresh instead of overly sweet.
Secondly, the convenience factor makes this recipe a weeknight favorite. The dough needs no chilling time, so you can mix, roll, cut, and bake in under an hour. Cleanup stays minimal since everything comes together in one bowl. In addition, the cookies freeze beautifully, which means you can bake ahead and decorate later.
Thirdly, these cookies offer surprising nutritional upsides compared to many store-bought treats. You control the sugar, the butter quality, and the absence of preservatives. Each cookie provides a modest amount of protein and calcium from the eggs and butter. Meanwhile, you avoid the artificial additives found in commercial cookies.
Fourthly, the social and entertaining value of this recipe is enormous. Decorating cookies gives kids and adults a shared activity that sparks conversation and laughter. Guests love customizing their own designs with different colors and sprinkles. Consequently, the cookies become part of the party rather than just another item on the table.
Finally, the cost-effectiveness keeps this recipe in heavy rotation all season. Basic pantry ingredients deliver bakery-quality results without a premium price tag. You can feed a crowd of twenty-four for the price of a single specialty dessert. Moreover, the recipe scales up easily for larger events without complicating the process.
Historical Background and Cultural Significance
The Hocus Pocus Halloween Cookies concept grew from the 1993 cult classic film Hocus Pocus, which gained a massive following over the decades. The movie tells the story of three witches resurrected in Salem on Halloween night. Fans began creating themed treats to celebrate the film during October viewings. Over time, colorful Sanderson Sisters inspired cookies became a staple of Halloween baking.
Culturally, these cookies connect to the broader American tradition of decorating sugar cookies for holidays. German immigrants brought decorative cookie traditions to the United States in the eighteenth and nineteenth centuries. Royal icing techniques followed through European baking influence. As a result, modern bakers inherited a rich toolkit for creating festive designs.
The evolution of this recipe reflects how social media transformed home baking. Platforms like Pinterest and Instagram turned themed cookies into shareable art. Bakers began experimenting with vibrant gel colors to match the film’s aesthetic. Meanwhile, food bloggers simplified royal icing so beginners could join in. Consequently, the recipe moved from niche fan creation to mainstream Halloween fare.
Regional variations appear across the country as bakers add their own twists. Some Southern bakers favor a softer, cake-like cookie base. New England bakers often lean toward crisper textures and stronger spice notes. On the West Coast, tropical flavors like coconut and citrus sometimes appear. Regardless of region, the playful spirit of Hocus Pocus Halloween Cookies remains constant.
Ingredient Deep Dive
Unsalted butter forms the backbone of these cookies and delivers rich flavor and tender texture. Butter has a long history in European baking dating back centuries. Nutritionally, it provides vitamin A and healthy fats in moderation. When selecting butter, choose a reputable brand with high fat content for best results. Store it wrapped in the fridge for up to two months, and substitute plant butter for a dairy-free version.
Butter also controls how the dough spreads during baking. Room temperature butter creams properly with sugar and traps air for lift. If the butter is too warm, the cookies spread too thin. Therefore, let it soften on the counter for about thirty minutes before mixing.
Granulated sugar sweetens the dough and helps create that crisp edge. Historically, sugar was a luxury ingredient before global trade made it common. Today it provides quick energy and enhances browning. Choose fresh, free-flowing sugar without clumps. Keep it in an airtight container, and swap in coconut sugar for a deeper flavor.
Granulated sugar also plays a structural role in the recipe. It dissolves during mixing and helps the cookies hold shape after baking. Furthermore, it contributes to the golden color on the edges. Therefore, measure it carefully rather than eyeballing the amount.
Large eggs bind the dough and add moisture, richness, and structure. Eggs have nourished humans for thousands of years across many cultures. They supply complete protein along with vitamins B12 and D. Select clean, uncracked eggs and store them in the refrigerator. For an egg-free option, use flax eggs or commercial egg replacers.
Eggs also help the cookies rise slightly and stay tender after cooling. The proteins coagulate during baking and set the final texture. Without eggs, the dough becomes crumbly and harder to roll. Consequently, do not skip them unless you use a tested substitute.
All-purpose flour provides the structure that holds everything together. Wheat flour has been a dietary staple since ancient agricultural societies. It offers carbohydrates, some protein, and small amounts of iron. Pick a fresh bag with no off smell, and store it cool and dry. For gluten-free baking, use a one-to-one blend with xanthan gum.
Flour also determines how the dough handles during rolling and cutting. Too much flour makes the cookies dry and tough. Too little leaves the dough sticky and hard to shape. Therefore, spoon the flour into the measuring cup and level it off gently.
Pure vanilla extract deepens the flavor and adds warmth to the dough. Vanilla originated in Mexico and Central America and later spread worldwide. It contains antioxidants, though the amounts in baking are small. Choose pure extract over imitation for the best taste. Store it in a cool, dark cabinet, and try almond or maple extract for variety.
Common Mistakes to Avoid
- Using cold butter straight from the fridge prevents proper creaming. The sugar cannot dissolve, and the dough turns out lumpy. Therefore, always soften the butter for thirty minutes first.
- Overmixing the dough after adding flour develops too much gluten. This makes the cookies tough instead of tender. Stop mixing the moment the flour disappears.
- Skipping the chill on cutouts leads to spreading and lost shapes. If your dough feels soft, rest it in the fridge for fifteen minutes. This small step protects your witch hats and stars.
- Rolling the dough too thin causes brittle cookies that crack during decorating. Aim for a quarter inch thickness for the best balance. A ruler or rolling pin rings help you stay consistent.
- Baking on a hot sheet from a previous batch causes uneven browning. Always cool your baking sheets between batches. Otherwise, the bottom cookies scorch before the tops set.
- Mixing royal icing too thin makes it run off the cookie edges and pool. Keep a thicker outline consistency for borders and a thinner one for flooding. This two-step method prevents messy drips.
- Adding too much food coloring can change the icing texture and taste. Gel colors work better than liquid because they add intense color with few drops. Start small and build the shade gradually.
- Storing decorated cookies before the icing fully dries ruins the design. Wait at least six hours for a hard set. Patience here protects all your careful work.
- Using expired leavening agents like baking powder leads to flat cookies. Test yours by dropping a pinch in warm water. If it fizzes, it still works.
- Measuring flour by scooping directly from the bag packs it down. This adds up to twenty percent extra flour and dry cookies. Spoon and level instead for accurate results.
Essential Techniques
Creaming butter and sugar ranks as the most important step in this recipe. This technique traps air in the mixture and creates a light, tender crumb. Cream for two to three minutes until the mixture looks pale and fluffy. Common pitfalls include under-creaming, which leaves the cookies dense. Look for a visible lightening in color as your cue for success.
Rolling dough evenly ensures every cookie bakes at the same rate. Uneven thickness leads to burnt edges on thin pieces and raw centers on thick ones. Use rolling pin guides or two dowels on either side of the dough. Additionally, rotate the dough a quarter turn between passes to prevent sticking. A smooth, uniform surface signals you are ready to cut shapes.
Outlining and flooding with royal icing gives these cookies their polished look. The outline creates a dam that holds the flood icing in place. Pipe the border first, then fill the center with thinner icing. Use a toothpick to spread the flood into corners. A smooth, glassy surface after drying shows you nailed the technique.
Pro Tips for Perfect Hocus Pocus Halloween Cookies
- Weigh your ingredients with a kitchen scale for consistent results every time. Cups vary in volume, which throws off the flour to butter ratio. A scale removes the guesswork permanently.
- Use gel food coloring instead of liquid drops for vivid purple, green, and orange. Gel delivers intense color without thinning the icing. Consequently, your Sanderson Sisters palette stays bold.
- Add a quarter teaspoon of almond extract alongside the vanilla for depth. The nutty note pairs beautifully with the sweet icing. However, skip it if anyone at your party has a nut allergy.
- Bake one test cookie before filling your sheet. This reveals how much your dough spreads and how fast your oven runs. Adjust the time or add flour based on the result.
- Press cookie cutters straight down without twisting. Twisting distorts the edges and ruins sharp shapes. Dip the cutter in flour between cuts to prevent sticking.
- Let cookies cool completely before decorating. Warm cookies melt the icing and cause colors to bleed. Therefore, use a wire rack and wait at least twenty minutes.
- Store royal iced cookies in a single layer with parchment between rows. Stacking too soon cracks the icing and smears the design. Once fully dry, gentle stacking becomes safe.
- Make extra dough and freeze half for a busy week ahead. The dough keeps for three months when wrapped tightly. Then you can bake fresh cookies on short notice.
Variations and Adaptations
Regional variations let bakers across the country put their own stamp on these cookies. Southern bakers often add a touch of cornstarch for a softer, melt-in-your-mouth texture. New Englanders sometimes include pumpkin pie spice for a warmer flavor. Meanwhile, Southwestern bakers occasionally add a hint of cinnamon and cayenne for a gentle kick. Each region brings its own pantry staples and preferences to the recipe.
Seasonal adaptations keep the recipe fresh throughout the year. In fall, orange and black icing with candy corn decorations suit the theme perfectly. Winter versions use red and green with snowflake shapes for holiday trays. Spring brings pastel colors and flower cutters. Therefore, one recipe serves every celebration on your calendar.
Dietary modifications make the recipe accessible to more guests. Gluten-free flour blends with xanthan gum work as a direct swap. Dairy-free butter and plant milk replace the traditional versions without much change. Vegan bakers use flax eggs and a dairy-free royal icing made with aquafaba. As a result, nearly everyone at your party can enjoy a cookie.
Flavor variations expand the possibilities far beyond vanilla. Lemon zest and juice add bright citrus energy. Cocoa powder turns the dough into a chocolate lover’s dream. Maple extract and browned butter create a cozy autumn profile. Consequently, you can bake a different version every week.
Texture modifications suit different preferences as well. For crispier cookies, roll the dough thinner and bake a minute longer. For softer cookies, pull them from the oven a minute early and store with a slice of bread. Either way, the flavor stays excellent.
Presentation alternatives help you match any party theme. Skip the royal icing and dip the cookies in melted white chocolate. Then add sprinkles and edible glitter for a quick, elegant finish. Alternatively, use stencils and powdered sugar for a minimalist look.
Serving and Presentation Guide
Plating these colorful cookies makes a huge visual impact at any gathering. Arrange them in concentric circles on a black cake stand to echo the Halloween theme. Group similar colors together for a bold, graphic effect. Alternatively, scatter them among other treats for a varied dessert table. Height and contrast make the display memorable.
Garnishing ideas range from simple to elaborate. A dusting of edible glitter adds sparkle without much effort. Small candy eyes on cauldron shapes bring the theme to life. Fresh mint leaves can mimic witchy herbs on a platter. Additionally, a drizzle of white chocolate ties the colors together.
Traditional accompaniments include warm apple cider, spiced chai, and hot chocolate. These cozy drinks complement the buttery vanilla flavor. A glass of cold milk remains a timeless pairing for kids and adults alike. Overall, warm beverages enhance the seasonal mood.
Modern serving suggestions elevate the experience further. Crumble a cookie over vanilla ice cream for a quick Halloween sundae. Sandwich two cookies with cream cheese frosting for a decadent treat. Moreover, a cookie milkshake with purple sprinkles delights younger guests.
Temperature considerations matter for texture and flavor. These cookies taste best at room temperature where the butter flavor shines. Chilled cookies firm up and lose some aroma. Therefore, pull them from the fridge fifteen minutes before serving.
Portion control tips help guests enjoy without overdoing it. Serve two cookies per person alongside fruit and nuts for balance. Pre-bag cookies for party favors to control portions naturally. As a result, the treats last longer and waste stays low.
Wine and Beverage Pairing
Wine pairings for these sweet, buttery cookies lean toward lighter, fruitier bottles. A glass of Moscato d’Asti brings gentle sweetness and bubbles that match the icing. Riesling with slight residual sugar balances the vanilla notes beautifully. For something different, a ruby port adds richness that suits the almond undertone. Consequently, adult guests enjoy a sophisticated pairing.
Non-alcoholic alternatives keep the party inclusive and festive. Sparkling apple cider with a cinnamon stick feels seasonal and fun. Cream soda offers vanilla notes that echo the cookie flavor. Chilled milk remains the classic choice for a reason since it cuts the sweetness perfectly.
Coffee and tea pairings work surprisingly well with these cookies. A medium roast coffee with caramel notes complements the butter and vanilla. Earl Grey tea adds citrus and bergamot that brighten each bite. Chai latte brings warm spice that amplifies the autumn mood.
Temperature considerations guide the best drinking experience. Serve white wines and ciders well chilled for contrast with the sweet cookie. Port and coffee taste best slightly warm or at room temperature. Therefore, plan your beverage station with these details in mind.
Serving suggestions tie everything together at your event. Set up a self-serve beverage bar with labeled options for guests. Add cinnamon sticks, star anise, and orange slices as garnishes. This small touch makes the pairing experience feel intentional and polished.
Storage and Shelf Life
Storage methods determine how long your cookies stay fresh and pretty. Undecorated cookies keep well in an airtight container at room temperature. Once you add royal icing, the clock starts on quality. Therefore, plan your baking and decorating schedule accordingly.
Temperature requirements stay simple for these cookies. Room temperature between sixty-five and seventy-five degrees works best. Avoid warm spots near the stove or direct sunlight. Heat softens the icing and shortens shelf life.
Container recommendations include airtight tins, plastic containers, and zip-top bags. Line containers with parchment to protect the icing design. For gift boxes, use single layers with wax paper between. Consequently, your cookies arrive looking bakery fresh.
Signs of spoilage include a stale smell, soft or sticky icing, and any visible mold. Discard cookies that show these signs immediately. Fresh cookies smell buttery and sweet with a firm, dry icing surface. Check stored batches every few days.
Reheating instructions are rarely needed because these cookies taste best at room temperature. If they soften from humidity, a minute in a low oven restores crispness. Let them cool fully before serving again. However, avoid reheating iced cookies since the icing will melt.
Freezing guidelines extend shelf life dramatically. Undecorated baked cookies freeze well for up to three months. Wrap them tightly and place them in a freezer bag. Thaw at room temperature, then decorate as usual for fresh results.
Make Ahead Strategies
A prep timeline removes stress from your party day. Bake the cookies up to three days ahead and store them undecorated. Mix the royal icing the night before and cover it tightly. Then decorate the morning of your event with calm confidence.
Storage between steps protects quality at every stage. Keep dough wrapped in plastic in the fridge for up to three days. Store baked cookies in airtight containers away from strong odors. Icing holds in the fridge for a week when covered directly with plastic wrap.
Quality impact assessment helps you decide what to make ahead. Dough actually improves after a short rest because the flour hydrates fully. Baked cookies hold well for days without noticeable loss. Royal icing performs best when used within a few days of mixing.
Assembly tips keep the final product looking fresh. Decorate on a clean parchment lined surface with all colors ready. Work in batches so icing does not dry in the bags. This rhythm keeps your designs sharp and consistent.
Reheating guidelines stay minimal for this recipe. There is no need to warm the cookies before serving. If anything, a brief chill firms the icing for cleaner handling. Therefore, focus your energy on presentation instead.
Fresh element additions bring last minute sparkle. Add sprinkles or edible glitter right before serving for maximum shine. A few fresh mint leaves or candy pumpkins refresh the platter. Consequently, guests never guess the cookies were made days earlier.
Scaling Instructions
Halving the recipe works well for small households or test batches. Cut every ingredient by half, including the eggs, which means using one egg and one yolk. Mixing times stay the same, but baking time may drop by a minute. Therefore, watch the first batch closely.
Doubling or tripling the recipe suits large parties and bake sales. Multiply all ingredients evenly, but cream the butter and sugar in batches if your mixer is small. Bake in waves and keep dough cool between rounds. As a result, you can produce seventy-two cookies without chaos.
Equipment adjustments matter when you scale up. You need extra baking sheets, cooling racks, and containers. A second mixer bowl speeds up the process considerably. Planning ahead prevents bottlenecks at the oven.
Timing modifications keep quality high at any size. Larger batches take longer overall but each tray still bakes in about twelve minutes. Rotate trays halfway through for even color. Consequently, every cookie comes out golden and consistent.
Storage considerations grow with volume as well. Use stackable airtight containers and label them by date. Freeze extra undecorated cookies for future events. This strategy keeps your freezer stocked for spontaneous gatherings.
Nutritional Deep Dive
The macro breakdown of each cookie reveals a balanced treat in moderation. One decorated cookie provides roughly one hundred fifty calories. It contains about two grams of protein, eight grams of fat, and twenty grams of carbohydrates. These numbers shift slightly with icing thickness and cookie size.
Micronutrient analysis shows meaningful contributions from real ingredients. Butter supplies vitamin A and small amounts of vitamin D. Eggs add B12, selenium, and choline. Flour contributes iron and B vitamins. Consequently, these cookies offer more than empty calories.
Health benefits exist within a balanced diet when you choose quality ingredients. Real butter contains no trans fats, unlike many processed spreads. Homemade cookies avoid preservatives and artificial additives entirely. Additionally, you control the sugar level to suit your preferences.
Dietary considerations matter for guests with restrictions. The standard recipe contains gluten, dairy, and eggs. However, simple swaps make it accessible to nearly everyone. Always label your cookies at parties so guests know the ingredients.
Portion analysis helps you enjoy these treats without overindulging. Two cookies fit comfortably into most daily eating plans. Pair them with protein or fiber to slow sugar absorption. Therefore, you stay satisfied longer.
Weight management tips center on mindfulness rather than restriction. Serve cookies on small plates to make portions feel generous. Sip water or tea between bites to pace yourself. As a result, you enjoy the treat without guilt.
Dietary Adaptations
Gluten-free versions work beautifully with a one-to-one flour blend that includes xanthan gum. Measure the blend the same way you measure wheat flour. The dough may feel slightly softer, so chill it briefly before rolling. Consequently, the cookies bake up tender with no grittiness.
Dairy-free modifications swap butter for plant based sticks and use oat or almond milk in the icing. Choose a butter alternative with high fat content for proper creaming. The flavor stays rich and buttery. Therefore, dairy sensitive guests enjoy the same experience.
Vegan adaptations replace eggs with flax eggs made from ground flax and water. Use aquafaba based royal icing or a simple powdered sugar glaze instead. The cookies turn out slightly denser but still delicious. Moreover, the colors remain just as vibrant.
Low-carb versions use almond flour and a sugar substitute like erythritol. The texture becomes more crumbly, so add a binder like psyllium husk. Keep the dough chilled for easier handling. As a result, carb conscious guests can join the fun.
Keto adaptations follow similar rules with strict attention to sweeteners and flour choices. Use monk fruit blend and almond flour for the base. Skip traditional royal icing in favor of a cream cheese based frosting. Consequently, the cookies fit keto macros.
Paleo versions rely on almond and coconut flour with honey or maple syrup as sweetener. Coconut oil replaces butter for a dairy free option. The flavor takes on a subtle tropical note. Furthermore, these cookies taste naturally wholesome.
Low-FODMAP adaptations avoid high lactose ingredients and excess sweeteners. Use lactose free butter and a modest amount of powdered sugar. Keep servings small to stay within tolerance. Therefore, sensitive guests can enjoy a cookie safely.
Troubleshooting Guide
Texture issues often trace back to measuring errors or mixing times. Tough cookies usually mean too much flour or overmixing after the flour goes in. Crumbly dough often needs a splash of milk or an extra egg yolk. Fix small problems before baking for the best results.
Flavor balance problems arise from strong extracts or flat ingredients. If the dough tastes too sweet, add a pinch of salt to round it out. If the vanilla disappears, increase it slightly next time. Always taste a test cookie before decorating the whole batch.
Temperature problems affect both dough and icing. Warm dough spreads in the oven, so chill it briefly. Warm icing runs off the cookie edge, so let it thicken for a few minutes. Room temperature control solves most of these headaches.
Equipment challenges rarely stop a determined baker. No stand mixer means using a hand mixer or even a sturdy spoon. No piping bags means using zip-top bags with a corner snipped off. No cookie cutters means cutting shapes with a knife and paper template.
Ingredient substitutions require small adjustments for success. Butter substitutes with high water content need less liquid elsewhere. Gluten free flours often need extra rest time to hydrate. Egg replacers may need added binding agents like xanthan gum.
Timing concerns come down to knowing your oven. Every oven runs slightly hot or cool, so test with one cookie first. Set a timer for the low end of the range and check early. Consequently, you never overshoot the perfect bake.
Recipe Success Stories
Community feedback for these cookies has been overwhelmingly positive. Readers report that the dough handles beautifully even for first time bakers. Many say the cookies disappeared within an hour at their parties. Parents especially love how kids can help with decorating.
Variation successes include a reader who swapped in pumpkin spice and orange icing for a Thanksgiving tray. Another baker used the dough for sandwich cookies with cream cheese filling. A third added crushed candy canes for a winter version. Each twist brought new fans to the base recipe.
Adaptation stories highlight the recipe’s flexibility for dietary needs. One reader made a fully vegan batch for a school event and received zero complaints. Another created a gluten free version for a family member with celiac disease. These stories show how one recipe can serve everyone.
Reader suggestions often improve the process for others. Many recommend chilling the cutouts for ten minutes before baking. Others suggest using a fan to speed icing drying. Collectively, these tips make the recipe even more reliable.
Photography tips from the community help bloggers and home bakers capture great shots. Natural light near a window works best for vibrant colors. A simple black or white backdrop makes the cookies pop. Shooting from a forty five degree angle shows both the icing shine and cookie thickness.
Frequently Asked Questions
Can I make the dough ahead of time? Yes, the dough keeps in the refrigerator for up to three days when wrapped tightly. You can also freeze it for three months. Just thaw overnight in the fridge before rolling.
Why did my cookies spread in the oven? Warm dough and warm baking sheets cause spreading. Chill the dough for fifteen minutes and cool your sheets between batches. Also check that your butter was not too soft.
How long does royal icing take to dry? A thin flood layer dries in about six hours at room temperature. Humid days may stretch that to twelve hours. A small fan speeds the process without cracking the surface.
Can I use liquid food coloring instead of gel? Liquid coloring works in a pinch but thins the icing. You may need extra powdered sugar to restore consistency. Gel colors deliver better results with less product.
How do I store decorated cookies? Keep them in a single layer in an airtight container at room temperature. Use parchment between layers if you must stack. Properly stored cookies stay fresh for up to two weeks.
Can I freeze decorated cookies? Yes, but freeze them uncovered first so the icing hardens fully. Then wrap gently and store in a rigid container. Thaw at room temperature without unwrapping to prevent condensation.
What if I do not have cookie cutters? Cut shapes with a sharp knife using a paper template. Simple shapes like circles, stars, and moons work best. You can also roll the dough into balls and flatten them for round cookies.
Is royal icing safe for children to eat? Yes, royal icing made with pasteurized egg whites or meringue powder is safe. Most grocery stores carry meringue powder in the baking aisle. Always supervise young children during decorating.
Why is my icing cracking after it dries? Cracking usually means the icing was too thick or dried too fast. Add a few drops of water to thin the flood consistency. Also avoid using a hot hair dryer directly on the surface.
Can I add sprinkles before the icing dries? Yes, add sprinkles immediately after flooding while the surface is wet. They will adhere as the icing sets. Waiting too long causes sprinkles to roll off.
How many cookies does this recipe make? This recipe yields about twenty four medium cookies depending on cutter size. Smaller cutters produce more cookies. Adjust baking time slightly for size differences.
Can I use this dough for a cookie cake? Absolutely, press the dough into a greased round pan and bake until the center sets. Then decorate with icing and sprinkles for a festive cookie cake. Adjust the baking time to about eighteen minutes.
Additional Resources
Related recipes that pair well with this one include classic sugar cookies, chocolate crinkle cookies, and pumpkin snickerdoodles. Each builds on similar techniques and expands your holiday baking repertoire. Trying several recipes helps you master dough handling and icing skills. Consequently, your dessert table gains variety.
Technique guides on royal icing consistency, piping basics, and cookie decorating offer deeper learning. Many reputable baking sites provide free tutorials with photos. Practicing on parchment paper before decorating saves cookies. As a result, your skills improve quickly.
Ingredient information about flour types, butter brands, and natural food colorings helps you make informed choices. Knowing how each ingredient behaves prevents common problems. Reading labels ensures quality and dietary safety. Therefore, your baking becomes more predictable.
Equipment recommendations include a sturdy stand mixer, half sheet pans, and a set of Halloween cookie cutters. Piping bags with small round tips make decorating easier. A cooling rack and an offset spatula round out the essentials. These tools last for years and pay for themselves quickly.
Seasonal variations keep this recipe relevant all year long. Spring pastels, summer brights, fall oranges, and winter reds each bring fresh energy. The base recipe stays the same while the colors and shapes change. Consequently, Hocus Pocus Halloween Cookies remain a favorite in every season.
PrintHocus Pocus Halloween Cookies
- Total Time: 25 minutes
- Yield: 24 cookies
Description
These spellbinding Halloween cookies are packed with colorful M&Ms and dark chocolate chips, making them a festive treat for your spooky celebrations.
Ingredients
- 2 1/4 cups all-purpose flour
- 1 teaspoon baking soda
- 1/2 teaspoon salt
- 1 cup unsalted butter, softened
- 3/4 cup granulated sugar
- 3/4 cup packed brown sugar
- 2 large eggs
- 1 teaspoon vanilla extract
- 1 cup Halloween-themed M&Ms
- 1/2 cup dark chocolate chips
Instructions
- Preheat oven to 375°F (190°C). Line baking sheets with parchment paper.
- In a medium bowl, whisk together flour, baking soda, and salt.
- In a large bowl, cream butter, granulated sugar, and brown sugar until light and fluffy.
- Beat in eggs one at a time, then stir in vanilla extract.
- Gradually blend the dry ingredients into the wet mixture until just combined.
- Fold in the Halloween M&Ms and dark chocolate chips.
- Drop rounded tablespoons of dough onto prepared baking sheets, spacing about 2 inches apart.
- Bake for 9-11 minutes, or until edges are lightly golden.
- Allow cookies to cool on baking sheets for 5 minutes before transferring to wire racks to cool completely.
Notes
You can customize the seasonings to taste. For extra spookiness, add a few drops of orange food coloring to the dough.
- Prep Time: 15 minutes
- Cook Time: 10 minutes
- Method: Dessert
- Cuisine: American