Black Forest Cookie Dough Brownie Bombs: An Irresistible Dessert Mashup
Imagine the rich, fudgy decadence of a brownie, the nostalgic charm of edible cookie dough, and the classic elegance of a Black Forest cake. Now, picture all those flavors rolled into one stunning, bite-sized dessert. That is the magic of these Black Forest Cookie Dough Brownie Bombs. This recipe creates a show-stopping treat that will become the star of any dessert table. Moreover, it combines three beloved desserts into a single, unforgettable experience.
These bombs feature a moist, dark chocolate brownie base, a layer of cherry-studded edible cookie dough, and a luxurious chocolate shell. Finally, a drizzle of white chocolate and a fresh cherry crown each piece. Consequently, every bite delivers a complex symphony of textures and tastes. Ultimately, this recipe is perfect for anyone who loves to push the boundaries of traditional baking. In fact, it is a guaranteed conversation starter at parties and gatherings.
Creating these Black Forest Cookie Dough Brownie Bombs is a fun and rewarding kitchen project. The process involves several simple stages, resulting in a professional-looking dessert. Importantly, you do not need any special equipment beyond a muffin tin and a little patience. The final product looks like it came from a high-end chocolatier. Therefore, you can impress your guests with minimal fuss. Truly, this recipe proves that stunning desserts can come from your own kitchen.
Quick Recipe Highlights
- Flavor Profile: These bombs deliver an intense dark chocolate flavor balanced by sweet, tart cherries and the creamy, vanilla-kissed taste of edible cookie dough. The combination is sophisticated yet deeply comforting.
- Texture: Experience a fantastic contrast: a crisp chocolate shell gives way to a soft, fudgy brownie and a dense, chewy cookie dough center. The occasional pop of a cherry piece adds a juicy surprise.
- Aroma: The scent of rich cocoa and melted chocolate fills your kitchen, followed by the sweet, inviting fragrance of vanilla and the subtle, fruity note of cherries.
- Visual Appeal: Each bomb is a miniature masterpiece with a glossy chocolate coating, elegant white chocolate drizzle, and a bright red cherry on top. They look both rustic and refined.
- Skill Level Needed: This is an intermediate recipe due to the multi-step process involving baking, mixing, and tempering chocolate. However, each individual step is straightforward and well-explained.
- Special Equipment: You will need a standard 12-cup muffin tin, a saucepan for melting chocolate, and a piping bag or zip-top bag for the drizzle. A small cookie scoop helps portion the dough evenly.
Recipe Overview
- Difficulty Level: We rate this recipe as intermediate. The individual techniques are simple, but successfully combining them requires organization. You must bake and cool brownies, prepare a safe-to-eat cookie dough, and handle melted chocolate for coating. Following the steps in order is key to success.
- Category: This recipe falls squarely into the dessert category, specifically under festive treats, no-bake desserts (partially), and chocolate confections. It is ideal for special occasions, holiday gift boxes, or an impressive weekend baking project.
- Cuisine: While inspired by the German Black Forest gateau, this is a modern American fusion dessert. It takes the core flavor components of the classic cake—chocolate, cherries, and cream—and reinterprets them in a novel, handheld format popular in contemporary dessert trends.
- Cost: The cost is moderate, as it uses common baking staples like flour, sugar, and eggs. The primary expenses are quality chocolate and cherry preserves. You can make about 18 impressive bombs for less than the cost of a store-bought specialty dessert.
- Season: These bombs are perfect for the holiday season, especially Christmas, due to their festive red and white appearance. However, their rich chocolate flavor makes them a year-round hit for birthdays, dinner parties, or Valentine’s Day.
- Occasion: Serve these at potlucks, birthday celebrations, as a homemade gift, or as the grand finale to a dinner party. They are also a fantastic project for a baking date or a fun activity with older kids.
Why You’ll Love This Recipe
First and foremost, the taste and texture of these Black Forest Cookie Dough Brownie Bombs are utterly divine. Each component complements the others perfectly. The deep, fudgy brownie provides a robust chocolate base. Meanwhile, the edible cookie dough adds a creamy, sweet contrast studded with bursts of cherry. Finally, the smooth chocolate shell ties everything together with a satisfying snap. Consequently, every single bite is a journey through multiple dessert worlds. You get the comfort of cookie dough, the sophistication of a brownie, and the festive flair of Black Forest, all in one.
Furthermore, this recipe offers incredible convenience despite its impressive appearance. You can break the process into stages. For example, bake the brownies one day and assemble the bombs the next. The edible cookie dough requires no baking, which simplifies the process significantly. Additionally, the recipe uses a standard muffin tin instead of specialized molds. Therefore, you likely already have the necessary equipment in your kitchen. This approach makes a seemingly complex dessert very accessible for home bakers.
From a social perspective, these bombs have tremendous entertaining value. They are individual servings, which eliminates the need for slicing and plating. Simply arrange them on a beautiful platter and watch them disappear. Guests will be amazed that you made such professional-looking treats. Moreover, they are excellent conversation starters. People will ask about the layers and flavors, giving you a chance to share your baking process. Ultimately, they make you look like a pastry pro with minimal stress.
Regarding cost-effectiveness, creating these Black Forest Cookie Dough Brownie Bombs at home saves a significant amount of money. A similar confection from a gourmet chocolatier could cost three or four times as much. By sourcing ingredients yourself, you control the quality and the budget. You can also customize them to your taste, perhaps using a higher-cocoa chocolate or a specific brand of cherry preserves. This level of customization is simply not available with store-bought versions.
Finally, the recipe is highly adaptable, which increases its appeal. Once you master the basic technique of layering and coating, you can invent endless flavor variations. The brownie base is a blank canvas. Similarly, you can flavor the cookie dough with different extracts or mix-ins. The chocolate coating can be dark, milk, or white. This adaptability means you can make the recipe over and over again without it ever becoming boring. It is a foundational technique that unlocks a world of creative dessert possibilities.
Historical Background and Cultural Significance
The story of these bombs begins with the legendary Black Forest cake, or Schwarzwälder Kirschtorte. This iconic German dessert originated in the Black Forest region in the early 1900s. Traditionally, it consists of several layers of chocolate sponge cake soaked in kirschwasser, a clear cherry brandy. Bakers then sandwich the layers with whipped cream and tart cherries. Finally, they decorate the cake with more cream, chocolate shavings, and cherries. The dessert’s name likely references the region’s specialty liquor and the traditional costume of women there, which features black (chocolate), red (cherries), and white (cream).
American culture enthusiastically embraced the Black Forest cake throughout the 20th century. However, bakers often adapted it to local tastes, sometimes using cherry pie filling instead of fresh cherries and omitting the alcohol. This adaptation laid the groundwork for the flavor profile we know today: the quintessential pairing of chocolate and cherry. The evolution from a layered cake to a handheld bomb reflects a broader trend in modern desserts. Consumers now seek portable, individual treats that deliver maximum flavor impact without the formality of slicing a cake.
The other key component, edible cookie dough, has its own fascinating cultural journey. For generations, home bakers secretly nibbled raw dough despite warnings about raw flour and eggs. Then, the early 2000s saw the rise of “safe-to-eat” cookie dough sold for consumption without baking. This trend exploded with dedicated dessert shops and ice cream flavors featuring cookie dough. Incorporating this beloved, nostalgic element into a gourmet chocolate confection is a distinctly modern innovation. It merges childhood comfort with adult dessert sophistication.
Ultimately, the Black Forest Cookie Dough Brownie Bombs represent a delicious fusion of culinary history. They honor the classic European pastry tradition while incorporating a uniquely American dessert phenomenon. This fusion creates something entirely new and exciting. The recipe respects its origins but is not bound by them. It is a testament to how global food culture continuously evolves, borrowing and blending ideas to create the next generation of beloved treats.
Ingredient Deep Dive
Dark Chocolate: The quality of your chocolate directly defines the entire dessert. Culturally, chocolate has a long history as a luxury item, dating back to Mesoamerican civilizations. For this recipe, choose a bar with 60-70% cocoa solids for a balanced flavor that is rich but not bitter. This type of chocolate melts smoothly and sets with a firm snap. Store chocolate in a cool, dark place. If you need a substitution, a high-quality semi-sweet chocolate chip can work, but the flavor will be sweeter and less complex.
Cherry Preserves or Jam: This ingredient provides the essential “Black Forest” cherry flavor and juicy pockets in the cookie dough. Unlike pie filling, preserves contain whole or large pieces of fruit, offering better texture. Cherries symbolize good fortune and celebration in many cultures. Opt for a preserve with a high fruit content and minimal added sugar for the best tart-sweet balance. You can store an opened jar in the refrigerator for months. As an alternative, finely chopped maraschino cherries or even a high-quality cherry compote can work well.
Heat-Treated Flour: This is the crucial step that makes the cookie dough safe to eat. Raw flour can harbor harmful bacteria like E. coli. To heat-treat it, spread all-purpose flour on a baking sheet and bake at 350°F for about 5-7 minutes. Let it cool completely before using. This process eliminates pathogens while preserving the flour’s functionality in the dough. Do not skip this step. For a gluten-free version, you can heat-treat a 1-to-1 gluten-free flour blend using the same method.
Sweetened Condensed Milk: This ingredient acts as the primary wet binder in the edible cookie dough, replacing raw eggs. It was invented in the 19th century as a way to preserve milk. Its thick, sticky sweetness provides the classic cookie dough texture and helps the dough hold its shape when formed into balls. Once opened, store any leftover condensed milk in an airtight container in the refrigerator for up to two weeks. There is no perfect substitute that replicates its unique texture, so it is best to use the real thing.
Common Mistakes to Avoid
- Using Untreated Flour: Never use raw flour in edible cookie dough. Always heat-treat your flour first to kill any potential bacteria. This is a non-negotiable food safety step.
- Overbaking the Brownies: The brownie layer should be fudgy and moist, not cakey. Overbaking will make the bombs dry. Always check for doneness a few minutes before the timer goes off.
- Adding Wet Cookie Dough to Hot Chocolate: Ensure your cookie dough balls are very cold before dipping. If they are warm, they will melt the chocolate shell and create a messy, uneven coating.
- Melting Chocolate Too Quickly: Always melt chocolate gently using a double boiler or in short bursts in the microwave. High heat will cause the chocolate to seize, becoming grainy and unusable.
- Not Tapping Off Excess Chocolate: After dipping a bomb, gently tap your hand or fork on the side of the bowl to remove extra chocolate. Otherwise, you will get a thick, uneven base or “foot” on your bombs.
- Rushing the Cooling Process: Allow each layer to cool completely before proceeding. Warm brownies will melt the dough, and warm coated bombs will not set properly. Patience is key.
- Using Thinned-Out Preserves: Avoid runny jam or jelly. Thicker cherry preserves provide better texture and flavor without making the cookie dough soggy.
- Skipping the Chill Time for the Dough: Chilling the mixed cookie dough is essential. It firms up the dough, making it easier to roll into neat balls that hold their shape during dipping.
Essential Techniques
Heat-Treating Flour: This technique is vital for food safety. Spread the flour evenly on a parchment-lined baking sheet. Bake it at 350°F (175°C) for 5-7 minutes. Use a food thermometer to ensure the flour’s internal temperature reaches 165°F (74°C). This temperature is sufficient to kill pathogens. After baking, let the flour cool completely before using it in your dough. A common pitfall is using warm flour, which can melt the other ingredients and create a greasy dough.
Creating the Brownie Base: The goal is a dense, fudgy brownie that can support the layers above. Do not overmix the batter once you add the flour; mix just until no dry streaks remain. Overmixing develops gluten, leading to a tough, cakey texture. Bake until the edges are set and a toothpick inserted near the center comes out with a few moist crumbs, not completely clean. Visual cues for success include a shiny, crackly top and the brownie pulling away slightly from the pan’s edges.
Tempering Chocolate (Simplified Method): For a glossy, firm shell that doesn’t melt in your hands, you need to temper the chocolate. A simple method is “seeding.” Melt two-thirds of your chocolate until smooth and reaches 115°F (46°C) for dark chocolate. Then, remove from heat and stir in the remaining one-third of unmelted chocolate until it fully melts and the mixture cools to about 88-90°F (31-32°C). This process stabilizes the cocoa butter crystals. The common pitfall is getting water or steam in the chocolate, which causes it to seize.
Dipping and Coating: Use a fork or a specialty dipping tool. Place a chilled dough ball on the fork and submerge it in the tempered chocolate. Lift it out, gently tap the fork to remove excess chocolate, and then slide the bomb onto a parchment-lined tray. Use a toothpick to help nudge it off the fork cleanly. The key is to work quickly before the chocolate sets. For a perfect finish, avoid re-dipping, as this creates a thick, uneven coating.
Pro Tips for Perfect Black Forest Cookie Dough Brownie Bombs
First, use a small cookie scoop to portion the brownie batter and the cookie dough. This ensures every bomb is uniform in size, which leads to even baking and a professional appearance.
Second, freeze the assembled cookie dough balls for at least 30 minutes before dipping. A very cold center is crucial; it prevents the dough from softening and falling apart in the warm chocolate.
Third, if your chocolate coating becomes too thick, you can thin it with a tiny amount of food-grade coconut oil. Add only half a teaspoon at a time and stir well until it reaches a dipping consistency.
Fourth, for the cleanest white chocolate drizzle, place the melted white chocolate in a small zip-top bag. Then, snip a tiny corner off the bag and use it as a makeshift piping bag for control.
Fifth, place your parchment-lined tray of dipped bombs in the refrigerator for 5-10 minutes to set the chocolate quickly. This prevents the drizzle from blending into the shell when you add it.
Sixth, garnish with the fresh cherry immediately after drizzling, while the chocolate is still wet. This ensures the cherry adheres securely and does not roll off.
Seventh, for an extra flavor dimension, add a teaspoon of kirsch or a cherry liqueur to the cherry preserves before mixing them into the cookie dough.
Eighth, always taste your cherry preserves before using. If they are overly sweet, you can balance the cookie dough by slightly reducing the added brown sugar.
Variations and Adaptations
For regional variations, you can draw inspiration from other desserts. A “Boston Cream” version could use a vanilla custard-filled dough and a chocolate ganache coating. A “Key Lime” adaptation might incorporate lime zest into the dough and use a white chocolate coating with graham cracker crumbs.
Seasonal adaptations are easy and fun. In autumn, replace the cherry preserves with spiced apple butter and roll the coated bombs in crushed pecans. For winter holidays, add peppermint extract to the cookie dough and crush candy canes for garnish.
Dietary modifications are straightforward with a few swaps. Use a gluten-free flour blend (heat-treated) and ensure your chocolate is certified gluten-free. For a dairy-free version, use dairy-free condensed milk, plant-based butter, and vegan chocolate.
Flavor variations let your creativity shine. Substitute the cherry preserves for raspberry jam, orange marmalade, or even salted caramel. You can also add different mix-ins to the dough, like toasted coconut, chopped nuts, or mini chocolate chips.
Texture modifications can cater to personal preference. For a crunchier element, mix finely chopped toasted almonds into the cookie dough. For a smoother experience, blend the cherry preserves into a puree before adding it to the dough.
Presentation alternatives include rolling the chocolate-coated bombs in sprinkles, crushed freeze-dried cherries, or cocoa powder before the shell sets. You can also present them in mini paper candy cups for a polished look.
Serving and Presentation Guide
Plating techniques can elevate these bombs from simple treats to a dessert centerpiece. Arrange them on a tiered cake stand for height and visual interest. Alternatively, place each bomb in a gold or black foil candy cup on a sleek slate board. For a rustic look, use a wooden serving tray lined with parchment paper.
Garnishing ideas extend beyond the classic cherry. After drizzling with white chocolate, immediately sprinkle with shaved dark chocolate or edible gold dust. A tiny mint leaf beside each cherry adds a fresh, colorful touch. You can also use a stencil to dust the tops with powdered sugar or cocoa.
Traditional accompaniments might include a small glass of kirschwasser or a cherry liqueur on the side for adults. A dollop of lightly sweetened whipped cream or a scoop of vanilla bean ice cream complements the rich chocolate perfectly.
Modern serving suggestions involve deconstruction. Serve a bomb alongside a smear of cherry compote and a quenelle of chocolate mousse. For a party, create a “bomb bar” with different coatings and toppings, allowing guests to customize their own.
Temperature considerations are important. Serve these bombs at cool room temperature for the best texture. If they are too cold from the fridge, the chocolate shell can be overly hard. Let them sit out for 10-15 minutes before serving to soften slightly.
Portion control is built-in, as each bomb is a rich, individual serving. Typically, one bomb per person is sufficient after a meal. For a dessert-focused gathering, you might plan for two per guest. Always provide small plates or napkins, as they can be messy to eat.
Wine and Beverage Pairing
Wine pairings should complement the rich chocolate and bright cherry notes. A classic Brachetto d’Acqui, a lightly sparkling red Italian wine with berry flavors, is a delightful match. Alternatively, a Port, such as a Ruby Port, has the sweetness and body to stand up to the dense chocolate. For a less sweet option, a Zinfandel with jammy berry notes can work beautifully.
Non-alcoholic alternatives are just as important. A tart cherry sparkling water or a black cherry soda provides a refreshing, fruity contrast. A glass of cold milk is always a classic pairing with chocolate and cookie dough. For a more sophisticated option, try a chilled cherry or pomegranate tea.
Coffee and tea pairings are excellent with these bombs. A medium-roast coffee with chocolatey notes enhances the dessert’s depth. A black tea like Earl Grey, with its citrusy bergamot, can cut through the richness. For a direct flavor match, a cherry-infused herbal tea is a wonderful choice.
Temperature considerations vary by beverage. Serve sparkling wines and sodas well-chilled. Port and other dessert wines are best at slightly cool room temperature. Coffee should be hot, while iced coffee offers a refreshing contrast. Always provide options for both hot and cold drinks.
Serving suggestions include offering a small flight of paired beverages. For instance, serve a small glass of Port, a cup of coffee, and a glass of cherry soda alongside a bomb. This allows guests to experiment and discover their favorite combination.
Storage and Shelf Life
Storage methods are simple but crucial for maintaining quality. Store the completely set bombs in a single layer in an airtight container. Place parchment paper between layers if you must stack them. This prevents them from sticking together and protects the delicate chocolate shell.
Temperature requirements are specific. The best place to store them is in the refrigerator. The cool temperature keeps the cookie dough firm and prevents the chocolate from blooming (developing white streaks). They will keep for up to 5-7 days when refrigerated.
Container recommendations include plastic or glass containers with tight-fitting lids. You can also use a baking sheet tightly wrapped with plastic wrap, but a container offers better protection from odors and moisture.
Signs of spoilage are usually obvious. Look for any off smells, particularly a rancid odor from the fats. The chocolate may develop mold in humid conditions, which appears as fuzzy spots. If the cherry pieces begin to ferment, they may create bubbles or an alcoholic smell.
Reheating instructions are generally not needed, as these are served cool. However, if they become too cold and hard, let them sit at room temperature for 15-20 minutes to soften to the ideal texture.
Freezing guidelines allow for long-term storage. Place the bombs on a parchment-lined tray and freeze until solid. Then, transfer them to a heavy-duty freezer bag or airtight container. They can be frozen for up to 2 months. Thaw overnight in the refrigerator before serving.
Make Ahead Strategies
Prep timeline can be spread over two days for convenience. On day one, bake the brownies, let them cool, and then crumble them. Also, prepare the edible cookie dough, cover it tightly, and refrigerate. On day two, assemble the dough balls, freeze them, and complete the dipping and decorating process.
Storage between steps is easy. Keep the cooled brownie crumbs in an airtight container at room temperature. Store the prepared cookie dough in the refrigerator for up to 3 days before assembling. This staged approach makes the final assembly much quicker.
Quality impact assessment shows that making components ahead has no negative effect. In fact, chilling the cookie dough improves its flavor and makes it easier to handle. The brownie crumbs may dry out slightly, but this is actually beneficial for the texture of the final bomb base.
Assembly tips for make-ahead include portioning and rolling all the cookie dough balls. Then, place them on a parchment-lined tray, cover with plastic wrap, and freeze. You can freeze the uncoated balls for up to a month, dipping them straight from the freezer when needed.
Reheating guidelines do not apply, but you must account for thawing time if you freeze the assembled, uncoated balls. Dip them while they are still frozen solid for the best results.
Fresh element additions should always be done last. Add the white chocolate drizzle and the fresh cherry garnish right before serving, especially if you have stored the coated bombs. This keeps the garnish looking vibrant and fresh.
Scaling Instructions
Halving the recipe is simple if you need a smaller batch. Precisely halve all the ingredient quantities. Use a 9×9 inch pan for the brownie base instead of a 9×13. The assembly process remains the same. You will yield approximately 9 bombs, which is perfect for a small family treat.
Doubling or tripling the recipe is great for events or gift-giving. Double all ingredients. You may need to bake the brownies in two separate pans or in batches. Mix the cookie dough in a very large bowl or in two separate batches to ensure even mixing. The dipping process will take longer, so work in stages to keep the chocolate at the right temperature.
Equipment adjustments are necessary when scaling up. Ensure you have enough muffin tins or parchment-lined trays to hold all the assembled balls. You may need to use a larger pot for melting bigger quantities of chocolate. Having multiple forks or dipping tools can speed up the coating process.
Timing modifications are minimal when scaling. The brownie bake time may increase slightly if the pan is more full. The chilling and setting times remain constant. The main difference is the hands-on time for rolling and dipping, which will increase proportionally.
Storage considerations become more important with larger batches. Ensure you have enough airtight containers or refrigerator space to store all the finished bombs. Label containers with the date if you are making them well in advance of an event.
Nutritional Deep Dive
Macro breakdown for one bomb is approximately: 280-320 calories, with 15-18g of fat (mostly from chocolate and butter), 35-40g of carbohydrates (from sugar and flour), and 3-4g of protein. The majority of the calories come from the dense combination of sugars and fats, which is typical for a rich, celebratory dessert.
Micronutrient analysis reveals some benefits. Dark chocolate provides flavonoids, which are antioxidants. Cherries offer vitamin C and potassium. However, these are present in relatively small amounts per serving due to the treat’s indulgent nature. The primary purpose of this recipe is pleasure, not nutrition.
Health benefits are secondary but worth noting. The antioxidants in dark chocolate may support heart health. The enjoyment of a well-made dessert also contributes to mental well-being and the social pleasure of sharing food. Practicing mindful eating with one bomb can be part of a balanced approach to sweets.
Dietary considerations are important for those with restrictions. This recipe contains gluten, dairy, eggs, and refined sugar. It is not suitable for most restrictive diets in its standard form. However, the adaptation section provides guidance for modifying it to meet various needs.
Portion analysis is built into the recipe. Each bomb is designed to be a single, satisfying serving. The rich nature of the ingredients means one is usually enough to satisfy a sweet craving. This built-in portion control can help prevent overindulgence compared to slicing a larger cake.
Weight management tips involve integrating this treat thoughtfully. Enjoy one bomb as a planned dessert, not an impulsive snack. Balance it with lighter meals throughout the day. Most importantly, savor it slowly to maximize enjoyment from a single serving.
Dietary Adaptations
Gluten-free adaptation requires a reliable 1-to-1 gluten-free flour blend. You must heat-treat this flour just as you would regular flour. Ensure all other ingredients, like chocolate and preserves, are certified gluten-free. The texture may be slightly more crumbly but will still be delicious.
Dairy-free adaptation involves several swaps. Use plant-based butter and dairy-free sweetened condensed milk (available online or in specialty stores). Choose a high-quality vegan dark chocolate for both the brownies and the coating. This version can be just as rich and satisfying as the original.
Vegan adaptation builds on the dairy-free changes and also removes the egg. For the brownie layer, use a flax egg (1 tbsp ground flaxseed mixed with 2.5 tbsp water per egg) or a commercial egg replacer. Ensure all chocolate is vegan, as some dark chocolate contains milk solids.
Low-carb or keto adaptation is challenging but possible. Use an almond flour or coconut flour-based brownie recipe sweetened with erythritol or monk fruit. The cookie dough can be made with almond flour, sugar-free sweetened condensed milk alternative, and a sugar-free cherry syrup for flavor. The coating would require sugar-free chocolate.
Paleo adaptation follows similar principles to keto but uses approved sweeteners like honey or maple syrup in moderation. The brownie base would use almond flour, and the coating would be a paleo-friendly dark chocolate. Finding a paleo substitute for sweetened condensed milk is the biggest hurdle.
Low-FODMAP adaptation is complex due to the presence of wheat flour and sweetened condensed milk (lactose). A potential path is using a gluten-free flour blend and lactose-free condensed milk if tolerated. Cherries are low-FODMAP in a 10-berry serving, so the small amount per bomb may be acceptable for some.
Troubleshooting Guide
Texture issues often stem from temperature. If your cookie dough is too soft to roll, chill it for longer. If the chocolate coating is thick and clumpy, it may be too cool or have seized. Gently re-warm it with a teaspoon of coconut oil to restore fluidity. If the brownie base is dry, you likely overbaked it; next time, check for doneness earlier.
Flavor balance problems can be corrected. If the bombs taste too sweet, use a darker chocolate (70% or higher) next time and reduce the sugar in the cookie dough slightly. If the cherry flavor is lacking, add a drop of almond extract (which enhances cherry flavor) or use a higher-quality, fruit-intensive preserve.
Temperature problems during dipping are common. If the cookie dough ball melts into the chocolate, it was not cold enough. Always freeze them solid. If the chocolate sets too quickly on the bomb, creating streaks, your chocolate may be too cool. Maintain it within its working temperature range (88-90°F for dark).
Equipment challenges are easily solved. If you don’t have a double boiler, use a heatproof bowl set over a pot of simmering water. If you lack a piping bag for the drizzle, a small spoon works—just flick your wrist quickly for a fine stream. No muffin tin? Simply roll the base mixture into a flat disc by hand.
Ingredient substitutions sometimes cause issues. If you substitute the sweetened condensed milk, the cookie dough may not hold its shape. If you use a runny jam, the dough will be sticky; add a bit more heat-treated flour to compensate. Always test substitutions on a small scale first.
Timing concerns usually involve the chocolate setting. Work in small batches when dipping. Only melt a portion of your coating chocolate at a time. Keep the rest unmelted so you can use it for “seeding” to maintain temper if the first batch gets too warm or begins to thicken.
Recipe Success Stories
Community feedback on this recipe has been overwhelmingly positive. Many home bakers report that these bombs were the hit of their holiday party. One reader mentioned they brought them to a work potluck and received three requests for the recipe before the dessert table was even fully set. Another common comment is about the surprise element—guests are delighted to discover the cookie dough center.
Variation successes from readers are inspiring. One baker created a “Tropical” version using mango preserves and coconut in the dough, then rolling the coated bombs in toasted coconut. Another made a “Cookies and Cream” adaptation by adding crushed Oreos to the dough and using white chocolate for the coating. These creative twists show how versatile the base recipe truly is.
Adaptation stories for dietary needs are particularly heartening. A parent of a child with celiac disease shared how thrilled their child was to have a “fancy” dessert that was safe to eat. They used a gluten-free flour blend and were meticulous about cross-contamination. The result was a treat that made their child feel included and special.
Reader suggestions have improved the recipe over time. One baker suggested adding a pinch of salt to the cookie dough to enhance all the flavors, which we now include. Another recommended using a melon baller to scoop the brownie mixture for perfectly round bases. We love incorporating these practical tips from the community.
Photography tips from successful bakers include using natural light and a simple, dark background to make the red cherries and white drizzle pop. Several have noted that photographing the bombs cut in half to show the layers gets the most engagement on social media. A sprinkle of powdered sugar just before shooting can add a festive, finished look.
Frequently Asked Questions
Q: Can I use regular cookie dough that you bake?
A: No, this recipe specifically calls for edible cookie dough, which is designed to be eaten raw. It uses heat-treated flour and no eggs. Baking this particular dough would not yield a good cookie texture and could alter the intended experience of the bomb.
Q: How long do I need to heat-treat the flour?
A: Spread the flour on a baking sheet and bake at 350°F for 5-7 minutes. The goal is to reach an internal temperature of 165°F. Use a food thermometer to be sure. Let it cool completely before using it in the dough.
Q: My chocolate coating is not smooth and glossy. What went wrong?
A: This usually means the chocolate was not properly tempered or got too hot. It may have “bloomed.” For a simple method, try the seeding technique described in the Essential Techniques section. Also, ensure no water gets into the chocolate, as this causes seizing.
Q: Can I make these bombs without a muffin tin?
A: Absolutely. For the base, you can simply press the brownie mixture into flat, round discs about 1.5 inches wide on a parchment-lined tray. The rest of the process is the same. The shape will be slightly different but just as tasty.
Q: How far in advance can I make these
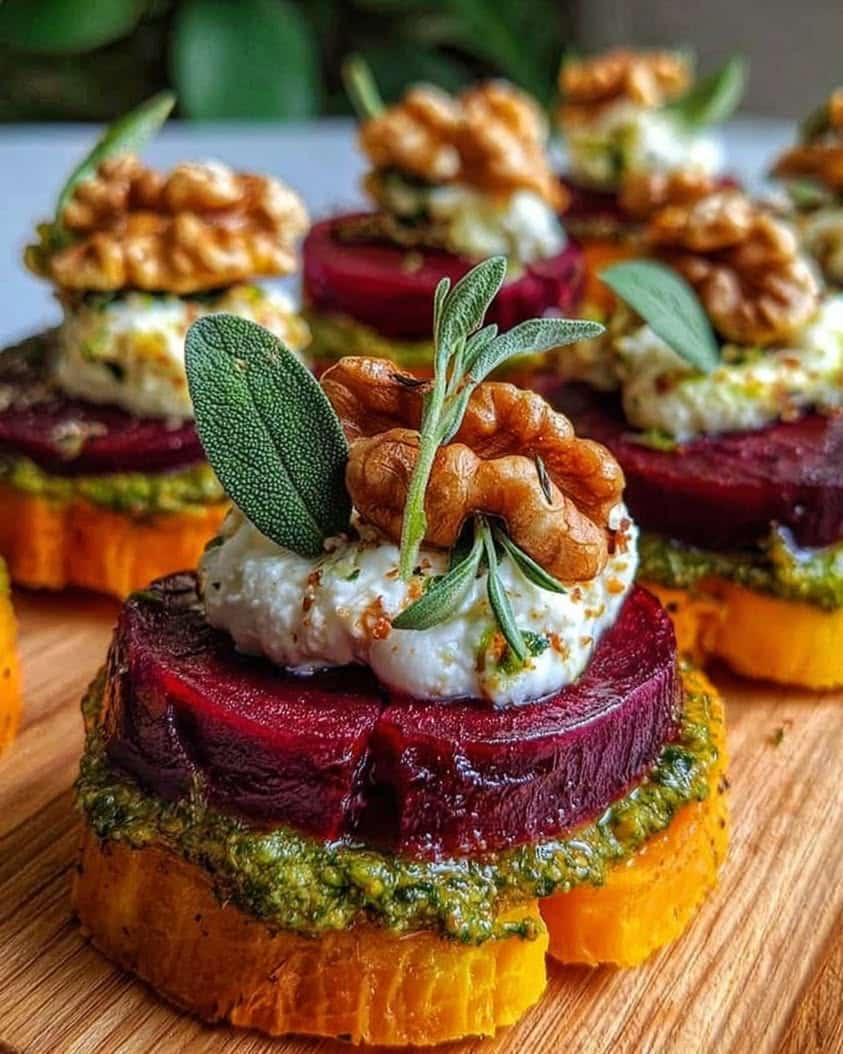
Print Decadent brownie bites stuffed with cherry-infused cookie dough and coated in dark chocolate, inspired by the classic Black Forest flavors. You can customize the seasonings to taste.Black Forest Cookie Dough Brownie Bombs
Description
Ingredients
Instructions
Notes