Greek Loaded Hummus: A Vibrant Mediterranean Appetizer Recipe
This Greek Loaded Hummus recipe is the ultimate party appetizer. It transforms a simple, creamy base into a stunning and flavorful masterpiece. The best part is its incredible simplicity. You can create this impressive dish in just fifteen minutes. It is perfect for any gathering, from casual game days to elegant dinner parties. Everyone will think you spent hours in the kitchen. This dish is a guaranteed crowd-pleaser.
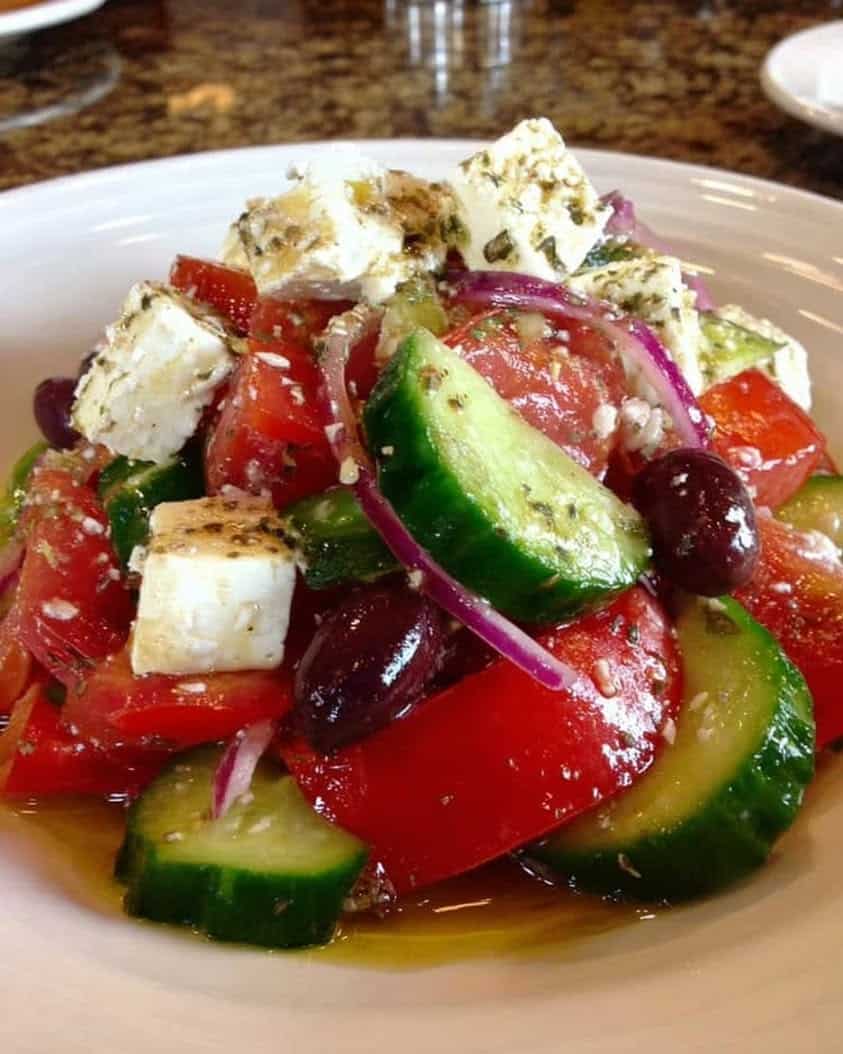
The magic of this Greek Loaded Hummus lies in its layers of texture and taste. You start with a smooth, rich hummus base. Then, you pile on a colorful array of classic Greek salad ingredients. The result is a dip that is as beautiful as it is delicious. Each scoop delivers a perfect bite. You get the cool, crisp vegetables, the briny olives and feta, and the creamy hummus all at once. It is a true celebration of Mediterranean flavors.
Moreover, this recipe is incredibly versatile. You can easily customize it based on what you have on hand. It is also a fantastic make-ahead option. Simply prepare the components and assemble them just before serving. This Greek Loaded Hummus is more than just a dip. It is a vibrant, shareable centerpiece that brings the sunny flavors of the Aegean Sea right to your table.
Quick Recipe Highlights
- Flavor Profile: This Greek Loaded Hummus bursts with bright, tangy, and savory notes. The creamy hummus provides a mild, nutty foundation. Meanwhile, the toppings add sharp feta, briny Kalamata olives, and a zesty lemon-oregano dressing.
- Texture: You will experience a wonderful contrast of textures. The base is luxuriously smooth and creamy. In contrast, the toppings offer a delightful crunch from cucumbers and bell peppers, plus a juicy pop from cherry tomatoes.
- Aroma: Fresh herbs like oregano and parsley create an instantly inviting, garden-fresh scent. Additionally, the garlic in the hummus and dressing adds a warm, savory depth that makes your mouth water.
- Visual Appeal: This dish is a feast for the eyes with its rainbow of colors. The red tomatoes, green cucumbers, purple onions, and white feta create a stunning mosaic against the pale hummus. It looks almost too beautiful to eat.
- Skill Level Needed: This is a beginner-friendly, no-cook recipe. You only need basic knife skills for chopping. Furthermore, you can use store-bought hummus to make assembly even faster and easier.
- Special Equipment: No special tools are required. You just need a good knife, a cutting board, and a mixing bowl. A food processor is helpful only if you are making your hummus from scratch.
Recipe Overview
- Difficulty Level: This Greek Loaded Hummus recipe is rated “Easy” for very good reason. It involves zero cooking and primarily requires assembly. The most complex task is chopping vegetables. Even a kitchen novice can achieve spectacular results with this straightforward guide.
- Category: This dish fits perfectly into several categories. It is an ideal appetizer or snack. It also works wonderfully as part of a mezze platter. For a light lunch, you can serve it with a side of grilled pita or chicken.
- Cuisine: This recipe is firmly rooted in Mediterranean and Greek culinary traditions. It combines the Levantine staple of hummus with the classic ingredients of a Greek salad. The result is a delicious fusion that honors both food cultures.
- Cost: This is a very cost-effective recipe, especially if you use seasonal produce. Chickpeas and tahini are inexpensive pantry staples. The fresh vegetables and block feta offer great value for the visual and flavorful impact they provide.
- Season: This Greek Loaded Hummus is perfect for spring and summer. That is when tomatoes, cucumbers, and peppers are at their peak freshness and flavor. However, it is a year-round favorite because the ingredients are readily available.
- Occasion: It is incredibly versatile for entertaining. Serve it at potlucks, barbecues, book clubs, or holiday parties. It is also a fantastic quick snack for movie nights or a healthy after-school option for the family.
Why You’ll Love This Recipe
You will adore the taste and texture appeal of this Greek Loaded Hummus. Every single bite delivers a complex symphony of flavors and sensations. First, your spoon dips through the cool, crisp vegetables. Then, it hits the creamy, garlicky hummus base. The combination is utterly addictive. The salty feta and olives balance the fresh veggies perfectly. Meanwhile, the lemon-oregano dressing ties everything together with a bright, herbal zing. This is not a boring dip. It is a full sensory experience that will have your guests coming back for more.
The convenience and preparation benefits are another major win. This entire stunning dish comes together in about fifteen minutes. There is no oven to preheat and no complicated techniques to master. You can use high-quality store-bought hummus to save even more time. Consequently, you can spend less time in the kitchen and more time with your guests. The assembly is simple and even fun. You get to create a beautiful, edible work of art with minimal effort.
From a health perspective, this recipe packs a powerful nutritional punch. Chickpeas are an excellent source of plant-based protein and fiber. They help keep you full and satisfied. The fresh vegetables are loaded with vitamins, minerals, and antioxidants. Olive oil provides heart-healthy monounsaturated fats. This Greek Loaded Hummus is a delicious way to eat well. You are nourishing your body with whole, real ingredients without sacrificing any flavor.
The social and entertaining value of this dish is through the roof. It is designed for sharing. Placing this colorful, generous bowl in the center of the table instantly creates a festive atmosphere. It encourages conversation and interaction as people gather around to dig in. It is a universal crowd-pleaser that appeals to almost every dietary preference. Therefore, it takes the stress out of hosting. You can be confident you have served something impressive and delicious.
Finally, this recipe is wonderfully cost-effective and accessible. The ingredients are common and affordable. You do not need any expensive or hard-to-find items. You can easily find everything at a standard grocery store. Additionally, the recipe is very forgiving. You can swap ingredients based on what is in season or on sale. This Greek Loaded Hummus delivers restaurant-quality presentation and taste on a very modest home kitchen budget.
Historical Background and Cultural Significance
The origin story of this dish is a beautiful fusion of two distinct culinary traditions. Hummus, meaning “chickpea” in Arabic, has roots that stretch back centuries across the Levant. Historians believe a precursor was eaten in ancient Egypt. Meanwhile, the combination of tomatoes, cucumbers, olives, and feta is the hallmark of the Greek salad, or “horiatiki.” This salad originated in rural Greece. Modern chefs and home cooks brilliantly merged these two iconic dishes. The result is the contemporary masterpiece we know as Greek Loaded Hummus.
The cultural importance of each component is deep. In Greek culture, the horiatiki salad represents simplicity and the bounty of the land. It uses fresh, local ingredients. Sharing a meal is a cornerstone of Greek social life. Similarly, hummus holds immense cultural significance across the Middle East. It is a symbol of hospitality and community. By combining them, this recipe celebrates a shared love for fresh, vibrant food meant to be enjoyed together. It bridges culinary cultures in a delicious and respectful way.
The evolution of the loaded hummus recipe is a testament to global food trends. The basic concept of topping hummus is not new. However, the specific “Greek” variation gained massive popularity with the rise of food blogging and social media. Its visual appeal made it perfect for platforms like Instagram and Pinterest. Home cooks began experimenting with their favorite salad toppings. Consequently, the Greek version became a standout favorite for its color and flavor contrast.
Regional variations of this concept are endless. In the Levant, you might find hummus topped with spiced ground lamb, pine nuts, and parsley. An Italian version could include sun-dried tomatoes, basil, and mozzarella. A Mexican-inspired take might use black beans, corn, jalapeños, and cilantro. The Greek Loaded Hummus, however, remains one of the most popular and recognizable versions. Its clean, bright flavors and stunning presentation have secured its place as a modern classic in appetizer cuisine.
Ingredient Deep Dive
Chickpeas (Garbanzo Beans): Chickpeas are one of the oldest cultivated legumes, with a history spanning over 7,000 years in the Middle East. They are a nutritional powerhouse, packed with plant-based protein, fiber, and essential minerals like iron and folate. For the best hummus base, use canned chickpeas for convenience, but be sure to rinse them well. If you have time, peeling the chickpeas after rinsing creates an unbelievably smooth texture. You can store dried chickpeas in your pantry for years, while cooked or canned chickpeas last 3-4 days in the fridge.
Tahini: Tahini is a paste made from ground sesame seeds and is crucial for authentic hummus flavor. It adds a rich, nutty depth and helps create a creamy emulsion. Rich in healthy fats, calcium, and antioxidants, it is a nutrient-dense ingredient. Always stir your tahini well before using, as the oil naturally separates. Look for tahini made from 100% hulled sesame seeds for the best flavor. Store it in the refrigerator after opening to prevent rancidity. It can last for several months when chilled properly.
Extra Virgin Olive Oil: The cornerstone of Greek and Mediterranean cooking, high-quality olive oil is non-negotiable. It provides fruity, peppery notes and a luxurious mouthfeel. It is rich in monounsaturated fats and antioxidants linked to heart health. For this recipe, use a good-quality oil for both the hummus and the dressing. Reserve your finest, fruitiest oil for drizzling on top just before serving. Store olive oil in a cool, dark place away from the stove to preserve its flavor and health benefits.
Feta Cheese: Authentic Greek feta is a Protected Designation of Origin (PDO) product, meaning it must be made in Greece from sheep’s milk or a sheep/goat milk blend. It offers a tangy, salty punch that is essential to the Greek flavor profile. Feta is a good source of calcium and protein. For the best texture and flavor, buy a block of feta packed in brine, not pre-crumbled. Crumble it yourself just before assembling. Store leftover feta in its brine in the refrigerator.
Kalamata Olives: These distinctive purple-black olives are named after the city of Kalamata in Greece. They are rich, fruity, and have a meaty texture. They are a great source of healthy fats and antioxidants. Always choose olives with pits if possible, as they retain more flavor. You can pit them easily by crushing them with the flat side of a knife. Their briny flavor is a key component that should not be substituted with standard black olives.
Common Mistakes to Avoid
- Using Watery Vegetables: Do not add chopped vegetables that have not been drained. Cucumbers and tomatoes release a lot of water. If you place them directly on the hummus, they will make it soggy. Always pat your chopped veggies very dry with a paper towel before assembling.
- Over-blending Store-Bought Hummus: If you are doctoring up store-bought hummus, be careful not to over-process it when adding lemon or garlic. Over-blending can sometimes make it gummy or thin. Instead, fold in extra ingredients gently by hand for the best texture.
- Using Pre-Crumbled Feta: Pre-crumbled feta is often coated with anti-caking agents that can make it dry and less flavorful. For the best taste and creamy texture, always buy a block of feta in brine and crumble it yourself just before using.
- Skipping the Herb Dressing: Do not just scatter dry herbs on top. The simple lemon-olive oil-oregano dressing is what brings all the toppings together and makes them shine. It seasons the vegetables and adds a cohesive layer of flavor.
- Assembling Too Early: This dish is best assembled right before serving. If you let it sit for hours, the vegetables will weep moisture into the hummus and the colors can bleed. Prepare all components ahead, but layer them together at the last minute.
- Not Tasting as You Go: Hummus brands vary in seasoning. Your vegetables and feta have salt. Always taste your hummus base before assembling. Adjust with a pinch of salt, a squeeze of lemon, or a drizzle of olive oil if needed.
- Forgetting the Garnish: The final drizzle of olive oil and sprinkle of fresh parsley or paprika is not just for looks. It adds the last hit of flavor and freshness. Do not skip this simple but impactful finishing step.
- Using a Dull Knife: A dull knife will crush your tomatoes and bruise your herbs instead of making clean cuts. Use a sharp chef’s knife for neat, even vegetable pieces that look professional and taste better.
Essential Techniques
Chopping Vegetables Uniformly: Uniform chopping is crucial for both visual appeal and ensuring every bite has a balanced mix of flavors. Aim for a small, consistent dice on your cucumbers, tomatoes, and red onion. This technique allows the vegetables to mingle and creates a cohesive topping layer. Use a sharp knife and a stable cutting board. The common pitfall is rushing and creating uneven pieces. Take your time for a beautiful, restaurant-quality result.
Creating an Emulsified Dressing: A proper emulsion means the oil and acid (lemon juice) are fully combined into a smooth, unified dressing. To achieve this, whisk your lemon juice, dried oregano, salt, and pepper together first. Then, slowly drizzle in the olive oil while whisking constantly. This gradual incorporation creates a temporary emulsion that coats the vegetables perfectly. If you just dump the oil and lemon together, they will separate quickly.
Spreading the Hummus Base: How you plate the hummus sets the stage. Use the back of a spoon to create a wide, shallow well in the center of your serving dish. Spread the hummus out to the edges, leaving a slight lip to contain the toppings. This creates a perfect canvas and makes scooping easier. Avoid just dumping the hummus in a mound; spreading it thin ensures the perfect hummus-to-topping ratio in every scoop.
Layering for Visual Impact: Strategic layering turns this from a dip into a centerpiece. After spreading the hummus, start with the larger, sturdier items like cucumbers and peppers. Then, add the tomatoes and onions. Finally, scatter the olives and feta. This method prevents the smaller items from sinking and creates distinct pockets of color. Finish with the herb drizzle and a final garnish for a professional presentation.
Pro Tips for Perfect Greek Loaded Hummus
Peel Your Chickpeas: If you are making hummus from scratch, take the extra five minutes to peel the chickpeas after rinsing. Simply rub them between your fingers or a clean kitchen towel. The skins will slip right off. This results in an incredibly silky, smooth hummus texture that is worth the effort.
Chill Your Serving Platter: For an extra-refreshing dip, place your empty serving bowl or platter in the freezer for 10-15 minutes before assembling. A cold base helps keep the hummus and toppings cool and crisp, especially on a warm day.
Marinate the Onions: To mellow the sharp bite of raw red onion, soak the diced pieces in a small bowl of ice water with a splash of vinegar or lemon juice for 10 minutes. Then, drain and pat dry. This quick pickle step removes the harshness while keeping the crunch and color.
Use Ice Water in Hummus: When blending homemade hummus, add a few tablespoons of ice-cold water instead of tap water. The cold water helps create a fluffier, lighter texture as it blends with the tahini and oil.
Garnish with Whole Items: After scattering your chopped toppings, add a few whole Kalamata olives, a wedge of lemon, and a sprig of fresh oregano or dill on top. This tells guests exactly what is in the dip and elevates the presentation instantly.
Toast Your Pita: Do not serve your loaded hummus with soft, cold pita bread. Lightly toast or grill pita wedges until warm and slightly crispy. The warmth and texture contrast beautifully with the cool, creamy dip.
Reserve Some Toppings: Keep a small bowl of each topping component aside when assembling. As the dip gets eaten down, you can refresh the top layer to keep it looking abundant and fresh throughout your party.
Variations and Adaptations
Regional Variations: Explore other Mediterranean flavors with ease. For a Turkish twist, top your hummus with spiced ground beef (çig köfte style), chopped pistachios, and sumac. An Italian version could feature chopped sun-dried tomatoes, fresh basil, roasted artichoke hearts, and shaved Parmesan. Let your favorite cuisines inspire your toppings.
Seasonal Adaptations: Adapt the vegetable toppings to what is fresh. In fall, use roasted cubes of butternut squash, pomegranate arils, and chopped kale. For winter, try roasted Brussels sprout leaves, diced apples, and candied walnuts. Spring welcomes asparagus tips, fresh peas, and radishes.
Dietary Modifications: This recipe is easily made vegan by omitting the feta cheese. Use a vegan feta alternative or add extra olives and capers for saltiness. For a lower-carb option, serve the loaded hummus with endive leaves, cucumber slices, or bell pepper strips instead of pita bread.
Flavor Variations: Infuse your hummus base with different flavors before topping. Blend in roasted red peppers, a handful of fresh spinach, or a spoonful of harissa paste for a spicy kick. You can also mix za’atar or dukkah directly into the hummus for an herby, nutty depth.
Texture Modifications: If you prefer more texture in your base, do not over-blend the hummus. Leave it slightly coarse. You can also mix whole chickpeas into the spread before topping. For extra crunch in the topping, add toasted pine nuts or slivered almonds.
Presentation Alternatives: Instead of one large platter, create individual servings in small bowls or on appetizer plates. You can also deconstruct it into a “hummus bar.” Set out a bowl of hummus and separate bowls of all the toppings so guests can build their own perfect bite.
Serving and Presentation Guide
Plating Techniques: Choose a wide, shallow bowl or a rimmed platter for serving. Use the back of a spoon to swirl the hummus, creating grooves and ridges that will catch the dressing and herbs. This adds visual texture even before you add the toppings. Ensure the hummus layer is thick enough to support the toppings but thin enough to scoop easily.
Garnishing Ideas: Beyond the standard parsley, consider edible flowers, microgreens, or a sprinkle of smoked paprika or sumac for a pop of color. A final, generous drizzle of high-quality olive oil just before serving adds a beautiful sheen. Place a few whole lemon wedges around the edge for both decor and function.
Traditional Accompaniments: Warm, grilled pita bread is the classic and perfect vehicle. Cut pitas into wedges before toasting. You can also offer crunchy vegetable crudités like carrot sticks, celery, and radishes. For a truly Greek experience, include dolmades (stuffed grape leaves) and spanakopita triangles on the side.
Modern Serving Suggestions: Serve the loaded hummus as a hearty topping for a grain bowl. Spoon it over a base of quinoa or farro and add grilled chicken or shrimp for a complete meal. It also makes an incredible spread for wraps and sandwiches, adding moisture and flavor.
Temperature Considerations: All components should be cold. Take the hummus, vegetables, and feta out of the refrigerator just before assembling. The contrast between the cool dip and the warm, toasted pita is part of the magic. Avoid letting the assembled platter sit out for more than two hours for food safety.
Portion Control Tips: As an appetizer, this recipe serves 6-8 people generously. If it is part of a larger mezze spread with 4-5 other dishes, it can easily serve 10-12. To control portions for a smaller group, simply halve the recipe or reserve half of the prepared toppings for another use.
Wine and Beverage Pairing
Wine Pairings: The bright acidity and herbal notes in this dish call for equally vibrant wines. A crisp, dry Greek white like Assyrtiko or Moschofilero is a perfect regional match. Their citrus and mineral notes complement the lemon and olives beautifully. A New Zealand Sauvignon Blanc with its grassy, grapefruit character is another excellent choice. For a red option, choose a light-bodied, low-tannin wine like a Beaujolais or a Greek Xinomavro rosé.
Non-Alcoholic Alternatives: Sparkling water with a squeeze of lemon or lime is a classic, refreshing choice. For something more special, try a homemade cucumber-mint cooler or a pomegranate spritzer. Iced herbal teas, like lemon verbena or mint, also pair wonderfully without competing with the dish’s flavors.
Coffee/Tea Pairings: While not a typical pairing for the meal itself, a strong Greek coffee or a pot of mint tea served after enjoying this appetizer is a wonderful way to extend the Mediterranean experience. The bitter notes of coffee or the soothing mint provide a pleasant finish.
Temperature Considerations: White and rosé wines should be well-chilled, around 45-50°F. Sparkling non-alcoholic drinks should be ice-cold. Iced teas are best brewed strong and then poured over plenty of ice. Serving beverages at the correct temperature ensures they refresh the palate between bites.
Serving Suggestions: Offer a variety of beverages to cater to all guests. Set up a small station with a carafe of water infused with citrus and herbs, a bottle of chilled white wine, and a pitcher of a non-alcoholic spritzer. This allows everyone to choose their perfect pairing.
Storage and Shelf Life
Storage Methods: Store leftover assembled Greek Loaded Hummus with great care. It is best to scoop the leftover hummus and soggy toppings into one container, and store any remaining fresh, dry toppings separately. This preserves the texture of the vegetables for another use. The hummus base alone will keep much longer than the assembled dish.
Temperature Requirements: All components must be refrigerated promptly. Do not leave the assembled dip at room temperature for more than two hours. Store in airtight containers in the coldest part of your refrigerator, usually the main body, not the door.
Container Recommendations: Use shallow, airtight glass or BPA-free plastic containers. Shallow containers allow the hummus to cool quickly and evenly, which is crucial for food safety. For the dressing, a small jar with a tight-fitting lid is perfect.
Signs of Spoilage: Discard the hummus if you notice an off or sour smell, significant liquid separation that stirring cannot fix, or any signs of mold. Vegetables on top will wilt and become slimy when they are past their prime. Always trust your senses.
Reheating Instructions: This is a cold dish and should not be reheated. If the hummus base alone is too cold and firm straight from the fridge, let it sit at room temperature for 15-20 minutes before serving to soften slightly and allow the flavors to bloom.
Freezing Guidelines: Freezing is not recommended for the assembled dish. However, you can freeze plain homemade hummus successfully for up to 4 months. Store it in a freezer-safe container, leaving some headspace for expansion. Thaw overnight in the refrigerator and stir well before using. The texture may be slightly grainier but will still taste good.
Make Ahead Strategies
Prep Timeline: You can prepare almost every component 1-2 days in advance. Make or open your hummus. Chop all vegetables (except tomatoes, which are best chopped day-of) and store them in separate airtight containers. Make the lemon-oregano dressing and crumble the feta. This leaves only quick assembly for party day.
Storage Between Steps: Store chopped cucumbers and bell peppers in containers lined with a paper towel to absorb excess moisture. Keep red onions in a separate small container. Store the dressing in its own jar. Keep the feta in brine in a small container to prevent drying out.
Quality Impact Assessment: Pre-chopping vegetables may cause a minimal loss of crispness in peppers and cucumbers after 24 hours, but it is barely noticeable. The flavors of the hummus and dressing actually improve as they meld. The overall time savings far outweighs any tiny textural sacrifice.
Assembly Tips: On the day of serving, chop your tomatoes and pat all vegetables dry one final time. Spread the hummus on your platter. Toss the vegetables with about half of the dressing in a bowl, then pile them on. This ensures even flavor distribution. Top with olives and feta, then drizzle with the remaining dressing.
Reheating Guidelines: No reheating is needed. Simply take the prepped components out of the refrigerator about 10-15 minutes before assembling. This takes the chill off the hummus, making it easier to spread and allowing its flavors to be more pronounced.
Fresh Element Additions: Always add the final garnishes after assembly. A last-minute sprinkle of fresh parsley or dill, a final drizzle of olive oil, and a crack of black pepper make all the difference. These fresh touches revive the prepped ingredients and make the dish look freshly made.
Scaling Instructions
Halving the Recipe: Halving this Greek Loaded Hummus recipe is straightforward for a smaller gathering. Use half a can of chickpeas or half a container of store-bought hummus. Simply reduce all topping ingredients by half. A smaller, more intimate serving dish will make the scaled-down version look just as abundant and inviting.
Doubling or Tripling: For a large party, doubling or tripling works perfectly. Use a very large platter or consider setting up two separate platters to avoid a single overcrowded, difficult-to-scoop mountain. Mix the dressing in a larger bowl or jar to ensure even distribution across all the increased vegetables.
Equipment Adjustments: When scaling up, your standard food processor may be too small for a triple batch of homemade hummus. Blend in batches to avoid overfilling and ensure a smooth consistency. You will also need a very large bowl for tossing the vegetable toppings with the dressing.
Timing Modifications: The prep time will increase linearly when you scale up. Chopping double or triple the vegetables will take more time. Factor this in and start earlier. Assembly time for a larger platter also increases slightly as you carefully distribute the greater volume of toppings.
Storage Considerations: Leftovers will be more plentiful when you scale up. Have enough shallow, airtight containers ready to store components separately. Remember that the assembled dip does not keep as well, so try to scale based on a realistic estimate of your guests’ appetites.
Nutritional Deep Dive
Macro Breakdown: This Greek Loaded Hummus is a well-balanced dish. The chickpeas and tahini provide a substantial amount of plant-based protein and healthy fats, primarily from the olive oil and sesame seeds. The fresh vegetables contribute complex carbohydrates and fiber. The feta adds a modest amount of additional protein and fat. It is a satisfying snack that provides sustained energy.
Micronutrient Analysis: This dish is a micronutrient powerhouse. Chickpeas are rich in folate, iron, and phosphorus. The vegetables deliver vitamins A, C, and K, along with potassium. Olive oil is packed with antioxidants and vitamin E. Tahini offers a good dose of calcium and B vitamins. Together, they support overall health from immune function to bone strength.
Health Benefits: The combination of ingredients promotes heart health through healthy fats and fiber. The fiber aids in digestion and helps maintain stable blood sugar levels. The antioxidants in the vegetables and olive oil combat inflammation. This recipe is a delicious example of how the Mediterranean diet contributes to longevity and well-being.
Dietary Considerations: This recipe is naturally vegetarian and can be made vegan. It is also gluten-free if served with gluten-free dippers. It is high in fiber and contains no refined sugars. Those monitoring sodium should be mindful of the feta, olives, and any added salt, but these can be adjusted to taste.
Portion Analysis: A standard serving (about ½ cup of the loaded dip) is a satisfying portion that provides a good mix of macros without being overly heavy. When paired with 2-3 pieces of pita bread or a large plate of vegetables, it can easily serve as a light lunch or a substantial snack.
Weight Management Tips: This is an excellent food for weight management due to its high protein and fiber content, which promote satiety. To reduce calories, be mindful of the amount of olive oil and pita bread served alongside. Loading up your scoop with the vegetable toppings and using cucumber slices as dippers can create a very low-calorie, nutrient-dense bite.
Dietary Adaptations
Gluten-free: This Greek Loaded Hummus is naturally gluten-free in its core form. The only potential source of gluten is the pita bread or crackers served alongside. Simply swap for certified gluten-free pita, crackers, or use vegetable crudités like bell pepper strips, cucumber rounds, and carrot sticks for dipping.
Dairy-free: To make this recipe dairy-free, simply omit the feta cheese. The dish will still be incredibly flavorful from the olives, dressing, and herbs. For a cheesy element, you can sprinkle on a dairy-free feta alternative or add a handful of nutritional yeast to the hummus base for a savory, umami depth.
Vegan: Follow the dairy-free instructions above. Ensure the store-bought hummus you use does not contain any dairy-based additives (most do not). The recipe then becomes fully plant-based, offering a complete source of protein and healthy fats from the chickpeas, tahini, and olive oil.
Low-carb/Keto: The hummus base contains chickpeas, which are higher in carbs, so a strict keto version would require a different base. However, for a lower-carb approach, serve the Greek topping mixture over a base of whipped feta or full-fat Greek yogurt. Use it as a salad topper or dip with celery, endive, and cucumber.
Paleo: Traditional hummus is not Paleo due to the legumes (chickpeas). Create a similar experience by using a base of mashed roasted cauliflower or eggplant dip (baba ganoush). Top it with the same Greek salad ingredients for a Paleo-friendly, flavor-packed appetizer.
Low-FODMAP: Chickpeas are high in FODMAPs. For a Low-FODMAP version, use a base made from canned, well-rinsed lentils (which are lower in FODMAPs in smaller servings) or a lactose-free Greek yogurt. Use only the green tops of scallions instead of red onion, and limit the portion size of the garlic-infused oil used in the hummus.
Troubleshooting Guide
Texture Issues (Hummus is Grainy): Grainy hummus usually means under-blending or not using enough liquid. If using canned chickpeas, try peeling them for ultimate smoothness. Ensure you are blending long enough—up to 5 minutes in a food processor. Add ice water, one tablespoon at a time, while the processor is running until it becomes creamy and smooth.
Flavor Balance (Dip Tastes Bland): Blandness is often a lack of salt or acid. Season in layers. First, ensure your hummus base is well-seasoned. Then, make sure your vegetable dressing has enough lemon juice and salt. Finally, the salty feta and olives will add another layer. Taste at each stage and adjust before assembling.
Temperature Problems (Toppings Making Hummus Watery): This is the most common issue. The solution is moisture management. Always pat chopped vegetables bone-dry with paper towels. Assemble the dish as close to serving time as possible. If making ahead, store the hummus and the dressed vegetables separately and combine at the last minute.
Equipment Challenges (No Food Processor): You can make smooth hummus without a food processor. Use a potato masher for a chunkier texture, or for a smoother result, use a high-powered blender. You may need to stop and scrape down the sides more frequently and add a bit more liquid to get it moving.