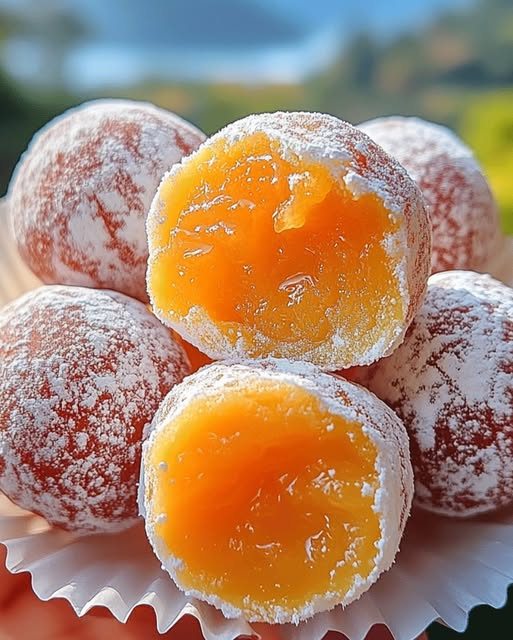
Orange Creamsicle Truffles: Easy Citrus Chocolate Treats You Will Crave
Orange Creamsicle Truffles bring back the nostalgic flavor of a childhood ice cream treat in a bite-sized chocolate package. If you love the combination of bright citrus and creamy vanilla, then these easy citrus chocolate treats will become your new favorite homemade candy. Moreover, this recipe requires only a handful of ingredients and no special culinary training. As a result, even beginner candy makers can create impressive truffles that look and taste like they came from a professional chocolatier.
The moment you bite into one of these orange creamsicle truffles, you experience a burst of fresh orange flavor wrapped in smooth white chocolate. Subsequently, the creamy interior melts on your tongue and delivers a velvety texture that feels luxurious. Meanwhile, the outer chocolate shell adds a satisfying snap that contrasts beautifully with the soft center. Without a doubt, these truffles deliver a multisensory experience that keeps people reaching for more.
Furthermore, these easy citrus chocolate treats fit almost any occasion, whether you need a quick dessert for a weeknight dinner or a stunning addition to a holiday candy platter. Because the recipe uses simple pantry staples, you can whip up a batch on short notice. Additionally, the truffles store beautifully in the refrigerator, so you can make them ahead of time and serve them whenever you need a sweet treat. Consequently, this recipe offers both convenience and elegance in one delicious package.
Quick Recipe Highlights
- Flavor Profile: These truffles combine tangy orange zest with sweet white chocolate and a hint of vanilla. The result is a bright, creamy taste that reminds you of a creamsicle popsicle. Furthermore, the flavor stays balanced because the citrus cuts through the richness of the chocolate.
- Texture: The interior of each truffle offers a soft, smooth, and creamy mouthfeel. Meanwhile, the outer shell provides a delicate crunch when you bite into it. Additionally, the contrast between the two textures makes every bite satisfying.
- Aroma: Fresh orange zest releases an uplifting citrus scent that fills your kitchen as you work. Moreover, the sweet aroma of melting white chocolate adds warmth and comfort. Together, these notes create an inviting fragrance that draws people into the kitchen.
- Visual Appeal: These truffles look like little snowballs with a pop of orange color. Additionally, you can drizzle them with orange tinted chocolate or roll them in powdered sugar for extra visual interest. Consequently, they photograph beautifully and make an impressive gift.
- Skill Level Needed: This recipe suits beginners because it requires no tempering or complex candy techniques. Furthermore, the steps are straightforward and forgiving. Even if you have never made candy before, you can achieve excellent results on your first try.
- Special Equipment: You need only a mixing bowl, a saucepan, a whisk, and a baking sheet. Moreover, a small cookie scoop helps you form uniform truffles, but you can also use a spoon. Therefore, you likely already own everything required to make this recipe.
Recipe Overview
- Difficulty Level: This recipe earns an easy rating because it involves simple mixing and chilling rather than tempering or candy thermometers. Additionally, the ingredients are forgiving, so small mistakes will not ruin the final product. Furthermore, the steps move quickly and require minimal supervision. As a result, both new and experienced cooks can succeed.
- Category: These truffles fall into the dessert and candy categories. Moreover, they work as a sweet snack, a party favor, or a homemade gift. Additionally, you can serve them as part of a holiday cookie tray or a dessert buffet.
- Cuisine: This recipe draws from American confectionery traditions, specifically the fondant and cream cheese truffle style popular in home kitchens. Meanwhile, the creamsicle flavor profile traces back to the classic American ice cream bar introduced in the early twentieth century. Furthermore, the combination of orange and cream reflects a uniquely American taste that has endured for generations. Consequently, these truffles represent a modern twist on a beloved classic.
- Cost: The total cost for this recipe ranges from six to ten dollars depending on the brand of white chocolate you choose. Furthermore, orange zest and vanilla extract cost very little per batch. Additionally, cream cheese and powdered sugar are inexpensive pantry staples. Therefore, each truffle costs roughly thirty to forty cents to make.
- Season: These truffles shine brightest during spring and summer when citrus fruit reaches peak freshness. Moreover, the bright orange flavor feels refreshing during warm months. Additionally, you can make them during winter holidays because the white chocolate and citrus combination adds cheer to cold days. Consequently, this recipe works year round.
- Occasion: Serve these truffles at baby showers, bridal showers, Easter celebrations, and holiday parties. Furthermore, they make excellent homemade gifts for neighbors, teachers, and coworkers. Additionally, you can package them in decorative boxes for Valentine’s Day or Mother’s Day. Therefore, this recipe suits countless special occasions.
Why You’ll Love This Recipe
First and foremost, the taste of these orange creamsicle truffles delivers pure nostalgia in every bite. The combination of sweet white chocolate and tangy orange zest creates a flavor that immediately transports you to summer days and childhood treats. Moreover, the creamy filling melts smoothly on your tongue, while the chocolate shell adds a delightful crunch. Consequently, you get a candy that satisfies both your sweet tooth and your craving for something bright and refreshing.
In addition to amazing flavor, this recipe offers incredible convenience. Because you need only five main ingredients, you can start making these truffles without a trip to a specialty store. Furthermore, the entire process takes about forty minutes from start to finish, including chilling time. Additionally, you can prepare the filling ahead of time and roll the truffles whenever you have a free moment. As a result, this recipe fits easily into a busy schedule.
From a nutritional standpoint, these truffles provide a few benefits alongside their indulgent taste. For instance, orange zest delivers vitamin C and antioxidants that support immune health. Moreover, the cream cheese adds a small amount of protein and calcium. Additionally, you control the portion size because each truffle is bite sized. Therefore, you can enjoy a treat without overindulging.
Furthermore, these easy citrus chocolate treats excel as a social food. They look impressive on a dessert platter, so guests always comment on their beautiful appearance. Meanwhile, the familiar flavor appeals to both adults and children, which makes them a safe choice for mixed crowds. Additionally, you can package them as party favors or gifts that guests take home. Consequently, these truffles help you entertain with confidence and style.
Finally, this recipe proves remarkably cost effective compared to buying artisan truffles from a candy shop. A single batch yields twenty four truffles for under ten dollars, while a comparable store bought box often costs twenty dollars or more. Moreover, homemade truffles taste fresher because you control the quality of every ingredient. Additionally, you can customize the flavor and presentation to match your personal preferences. Therefore, this recipe delivers outstanding value for your time and money.
Historical Background and Cultural Significance
The creamsicle flavor combination originated in the United States during the early 1900s when ice cream makers began experimenting with fruit and cream blends. Specifically, the Popsicle company introduced the Creamsicle bar in the 1930s, and it quickly became a summertime staple. Moreover, the iconic orange and vanilla pairing represented a clever way to combine two popular flavors into one convenient treat. Consequently, the creamsicle became embedded in American food culture as a symbol of warm weather and childhood joy.
Over the decades, home cooks began translating the creamsicle flavor into other desserts. For example, bakers created creamsicle cakes, cookies, and fudge that captured the same orange and vanilla magic. Additionally, candy makers developed truffle recipes that used white chocolate as a creamy base for citrus flavors. Meanwhile, the rise of social media baking communities helped these variations spread rapidly across the country. As a result, the creamsicle truffle emerged as a modern favorite among home candy makers.
The evolution of this recipe reflects broader trends in American home cooking. Specifically, home cooks increasingly value recipes that deliver impressive results with minimal effort. Furthermore, the no bake nature of truffles appeals to people who want homemade treats without turning on the oven. Additionally, the widespread availability of quality white chocolate chips made truffle making accessible to everyone. Consequently, the orange creamsicle truffle represents the perfect marriage of nostalgia and modern convenience.
Regional variations of this recipe appear across the United States. In Florida, cooks often use fresh juice from local oranges to intensify the citrus flavor. Meanwhile, bakers in the Midwest favor a higher ratio of cream cheese for an extra creamy texture. Additionally, some Southern versions incorporate a touch of orange liqueur for an adult twist. Therefore, this recipe adapts beautifully to local ingredients and regional tastes while maintaining its essential character.
Ingredient Deep Dive
White chocolate serves as the backbone of these orange creamsicle truffles. Historically, white chocolate emerged in Switzerland during the 1930s when confectioners discovered how to use cocoa butter as a standalone ingredient. Nutritionally, white chocolate provides fat and sugar that give the truffles their rich, creamy texture. When selecting white chocolate, choose a brand that lists cocoa butter as the primary fat rather than vegetable oil. Additionally, store white chocolate in a cool, dark place and use it within six months for the best flavor. If you need a substitute, use high quality white melting wafers for the coating.
Cream cheese contributes the tangy, creamy element that defines the truffle filling. This ingredient has deep roots in American cuisine, dating back to the late 1800s when New York dairy farmers began producing it commercially. Furthermore, cream cheese adds protein and calcium to the recipe while creating a smooth, scoopable texture. When you shop, choose full fat block cream cheese rather than the whipped tub variety because it holds its shape better. Store cream cheese in the refrigerator and use it within ten days of opening. For a dairy free version, substitute a plant based cream cheese alternative.
Fresh orange zest provides the bright citrus punch that makes these truffles unforgettable. Oranges originated in Southeast Asia and spread through trade routes to the Mediterranean and eventually the Americas. Moreover, orange zest contains concentrated essential oils that deliver far more flavor than juice alone. Nutritionally, orange zest offers vitamin C, fiber, and beneficial plant compounds. When selecting oranges, pick fruit that feels heavy for its size and has bright, unblemished skin. Store oranges at room temperature for up to a week or in the refrigerator for up to three weeks. If fresh oranges are unavailable, use two teaspoons of orange extract as a substitute.
Powdered sugar sweetens the filling and helps bind the ingredients together. This fine sugar has been a staple in American baking since the late 1800s when manufacturers developed industrial milling techniques. Additionally, powdered sugar contains a small amount of cornstarch that prevents clumping and adds structure. From a nutritional standpoint, powdered sugar provides quick energy but no significant vitamins or minerals. When buying, choose a brand that is clearly labeled as pure cane sugar for the cleanest flavor. Store powdered sugar in an airtight container in a cool, dry place for up to two years.
Vanilla extract rounds out the flavor profile and enhances the creamsicle taste. This ingredient comes from vanilla orchids native to Mexico and Central America, and it has been prized since ancient times. Furthermore, vanilla adds warmth and depth that balances the sharp citrus notes. Nutritionally, vanilla extract contributes trace amounts of antioxidants but exists primarily for flavor. When selecting vanilla, choose pure extract rather than imitation for the richest taste. Store vanilla extract in a dark bottle away from heat and light, and it will keep indefinitely.
Common Mistakes to Avoid
- Using warm cream cheese causes the filling to become too soft and sticky. Therefore, always let your cream cheese soften at room temperature for about thirty minutes before mixing. Additionally, avoid microwaving it because uneven heat creates hot spots that melt the chocolate.
- Melting white chocolate over high heat scorches it and turns it grainy. Consequently, always use low heat and stir constantly until the chocolate melts smoothly. Furthermore, you can melt chocolate in a double boiler or microwave in short bursts for the best results.
- Skipping the chilling step leads to truffles that fall apart when you roll them. Therefore, chill the filling for at least two hours or until it feels firm enough to scoop. Moreover, overnight chilling produces the best texture and easiest handling.
- Adding too much orange juice makes the filling runny and difficult to work with. Consequently, stick to zest and extract for flavor rather than large amounts of liquid. Additionally, if you want more citrus punch, add extra zest instead of juice.
- Using chocolate chips instead of melting wafers for the coating creates a thick, dull shell. Therefore, choose couverture chocolate or melting wafers that contain a high percentage of cocoa butter. Furthermore, these products melt more smoothly and produce a glossy finish.
- Rolling truffles with warm hands melts the filling and creates a mess. Consequently, keep your hands cool by running them under cold water and drying them before shaping each truffle. Additionally, work in small batches and return the filling to the refrigerator between batches.
- Storing truffles at room temperature causes them to soften and lose their shape. Therefore, always keep these truffles in the refrigerator until you are ready to serve them. Moreover, place them in a single layer or use parchment paper between layers to prevent sticking.
- Coating truffles in chocolate that is too thick creates a shell that overwhelms the filling. Consequently, use a fork to lift each truffle and tap off the excess chocolate before placing it on the parchment. Additionally, work quickly so the chocolate does not set before you finish coating.
- Forgetting to chill the coated truffles means the chocolate shell stays soft and smears. Therefore, return the coated truffles to the refrigerator for at least fifteen minutes before serving. Furthermore, this final chill sets the shell and gives the truffles their signature snap.
- Doubling the recipe without adjusting chilling time leads to soft centers. Consequently, increase the chilling time by at least thirty minutes when you make a double batch. Additionally, use a larger bowl and mix in smaller increments for even distribution.
Essential Techniques
Zesting citrus properly unlocks the full flavor potential of these truffles. The goal is to remove only the colored outer layer of the peel while leaving the bitter white pith behind. First, hold a microplane or fine grater against the orange and drag it downward with light pressure. Subsequently, rotate the fruit as you work so you zest the entire surface evenly. Additionally, avoid pressing too hard because you will dig into the pith and introduce bitterness. You will know you succeeded when the zest looks fluffy and brightly colored with no white patches.
Mixing the filling to the right consistency ensures smooth, creamy truffles every time. Start by beating the softened cream cheese and powdered sugar together until no lumps remain. Then, add the melted white chocolate, orange zest, and vanilla extract, and stir until the mixture looks uniform. Furthermore, scrape down the sides of the bowl with a spatula to incorporate every bit of ingredients. The filling should feel thick, smooth, and slightly sticky. If it looks greasy or separated, the chocolate was too warm when you added it.
Rolling truffles evenly requires cool hands and a gentle touch. Begin by scooping a tablespoon of chilled filling onto a parchment lined sheet. Then, cup the filling between your palms and roll it in a circular motion until it forms a smooth ball. Moreover, if the filling starts to soften, place it back in the refrigerator for ten minutes. Additionally, keep a small bowl of cold water nearby to dip your fingers if the mixture sticks. Perfectly round truffles come from patience and consistent technique.
Coating truffles in chocolate demands smooth melted chocolate and quick movements. First, melt your white chocolate until it drips off a spoon in a steady stream. Then, drop one chilled truffle into the chocolate and use a fork to turn it until fully coated. Subsequently, lift the truffle with the fork and tap the handle against the bowl to remove excess chocolate. Finally, slide the truffle onto parchment paper and let it set. If the chocolate thickens as you work, reheat it gently for a few seconds.
Pro Tips for Perfect Orange Creamsicle Truffles
Use room temperature cream cheese for the smoothest filling. Cold cream cheese creates lumps that never fully blend, even with vigorous mixing. Therefore, set your cream cheese on the counter at least thirty minutes before you plan to start. Additionally, you can speed up the process by cutting the block into small cubes before letting it sit.
Chill your bowl and beaters before mixing the filling for an extra creamy result. A cold bowl keeps the ingredients from warming too quickly during mixing. Consequently, the filling stays firm and easier to handle. Moreover, this small step makes a noticeable difference in the final texture.
Toast the orange zest briefly in a dry pan to deepen the citrus flavor. Toasting releases the essential oils and mellows the sharp edges. Furthermore, this technique adds a subtle caramel note that complements the white chocolate. However, watch the zest carefully because it burns quickly.
Add a pinch of salt to the filling to balance the sweetness. Salt enhances the orange flavor and prevents the truffles from tasting flat. Additionally, you can use flaky sea salt in the filling or sprinkle a few grains on top of each coated truffle for a gourmet touch.
Dip your scoop in hot water before forming each truffle for cleaner release. The warm metal slides through the chilled filling without sticking. Consequently, you get uniform truffles with less effort. Remember to dry the scoop between dips so water does not enter the filling.
Let coated truffles set in the refrigerator rather than the freezer. The freezer causes chocolate to develop condensation and bloom, which creates a white film on the surface. Therefore, always use the refrigerator for a smooth, glossy finish. Additionally, refrigerated truffles develop a better snap when you bite into them.
Store truffles in an airtight container with parchment paper between layers. This method prevents the truffles from sticking together and preserves their shape. Furthermore, airtight storage keeps the truffles fresh for up to two weeks. Consequently, you can make a batch well ahead of your event.
Gift truffles in small paper cups inside a decorative box for a professional presentation. Paper candy cups protect the chocolate and add a polished look. Moreover, you can tie the box with ribbon and add a handwritten tag. This personal touch makes your homemade gift feel truly special.
Variations and Adaptations
Regional variations of these truffles reflect local ingredient preferences across the country. For instance, Florida cooks often add a tablespoon of fresh orange juice and reduce the cream cheese slightly to compensate for the extra liquid. Meanwhile, California bakers might incorporate a hint of lemon zest alongside the orange for a brighter, more complex citrus profile. Additionally, Southern versions sometimes include a splash of bourbon or orange liqueur for a grown up twist. Consequently, you can adapt this recipe to highlight the flavors of your region.
Seasonal adaptations let you enjoy these truffles all year with fresh flavor twists. During spring, add a teaspoon of lavender extract to the filling for a floral note that pairs beautifully with orange. In summer, fold in finely chopped candied ginger for a spicy kick. Furthermore, autumn versions benefit from a pinch of cinnamon and nutmeg in the filling. During winter, dip the truffles in dark chocolate and top them with crushed peppermint candies.
Dietary modifications make this recipe accessible to more people. For a gluten free version, verify that all packaged ingredients carry a gluten free label. Meanwhile, a dairy free adaptation uses plant based cream cheese and vegan white chocolate. Additionally, a lower sugar version replaces half the powdered sugar with a powdered monk fruit sweetener. Consequently, almost anyone can enjoy these truffles with a few simple swaps.
Flavor variations expand the possibilities beyond the classic creamsicle taste. For a tropical version, substitute lime zest for orange and add a tablespoon of toasted coconut. Meanwhile, a berry twist uses raspberry extract and a few drops of pink food coloring. Additionally, a mocha variation combines espresso powder with the white chocolate for a sophisticated flavor. Therefore, you can create an entire collection of truffle flavors from one base recipe.
Texture modifications change the mouthfeel and add visual interest. For a crunchier truffle, mix crushed graham crackers or toasted nuts into the filling. Furthermore, rolling the coated truffles in finely chopped pistachios or shredded coconut adds a textured exterior. Additionally, a drizzle of dark chocolate over the white shell creates a striking contrast in both appearance and texture.
Presentation alternatives help you match truffles to any event theme. For a formal dinner, pipe a small rosette of orange buttercream on top of each truffle. Meanwhile, a casual party favors a simple dusting of powdered sugar. Additionally, you can skewer three truffles on a stick and dip them in chocolate for a truffle pop. Consequently, the same recipe can look completely different depending on how you present it.
Serving and Presentation Guide
Plating these truffles well elevates them from a simple candy to a stunning dessert. Start by arranging the truffles in a circular pattern on a white or marble platter to let the orange and white colors stand out. Then, tuck small fresh mint leaves or edible flowers between the truffles for a pop of green. Furthermore, a light dusting of powdered sugar adds a snowy effect that looks elegant and festive.
Garnishing ideas range from simple to elaborate depending on your occasion. For everyday serving, drizzle melted dark chocolate over the truffles in thin zigzag lines. Meanwhile, for a holiday platter, roll half the truffles in orange sanding sugar and leave the rest plain for contrast. Additionally, a tiny piece of candied orange peel pressed onto the top of each truffle adds a professional finish.
Traditional accompaniments include a cup of hot tea or coffee alongside the truffles. Moreover, a small dish of whipped cream or vanilla ice cream turns the truffles into a full dessert course. Additionally, fresh orange slices arranged around the platter reinforce the citrus theme and add visual appeal.
Modern serving suggestions encourage creativity with the presentation. For example, serve truffles in individual paper cups inside a wooden crate for a rustic look. Furthermore, a mirrored tray with scattered orange blossoms creates a contemporary and elegant display. Additionally, you can build a truffle tower by stacking them on a tiered stand for a dramatic centerpiece.
Temperature considerations matter because truffles taste best when slightly cool but not ice cold. Therefore, remove them from the refrigerator about ten minutes before serving so the chocolate softens just enough. Moreover, this brief rest allows the orange aroma to release and intensify. Consequently, your guests experience the full flavor profile.
Portion control tips help you serve truffles without overwhelming your guests. Plan on two to three truffles per person for a dessert course. Meanwhile, if truffles accompany a larger dessert spread, one or two per person will suffice. Additionally, pre-arranging individual servings on small plates prevents guests from taking too many at once.
Wine and Beverage Pairing
Wine pairings for these orange creamsicle truffles focus on sweet and sparkling options that complement the citrus and cream flavors. A glass of Moscato d’Asti offers fizzy sweetness and floral notes that echo the orange zest beautifully. Meanwhile, a late harvest Riesling brings honeyed flavors that pair well with white chocolate. Additionally, a cream sherry adds richness that mirrors the creamy filling.
Non-alcoholic alternatives include sparkling apple cider or a glass of cold milk. The effervescence of sparkling cider cuts through the richness of the chocolate. Furthermore, milk complements the creamy texture and enhances the nostalgic creamsicle feeling. Additionally, an orange cream soda makes a playful pairing that doubles down on the theme.
Coffee and tea pairings offer warm and comforting options. A cup of Earl Grey tea brings bergamot notes that harmonize with the orange flavor. Meanwhile, a light roast coffee provides a gentle bitterness that balances the sweetness. Additionally, a vanilla chai latte adds spice and cream that flatter the truffle filling.
Temperature considerations apply to beverages as well. Serve white wine and sparkling options well chilled to refresh the palate between bites. Furthermore, serve coffee and tea hot to create a pleasing contrast with the cool truffles. Consequently, the temperature difference enhances your overall tasting experience.
Serving suggestions for beverage pairings include setting up a self serve station where guests choose their drink. Moreover, offer small tasting glasses so people can try multiple pairings. Additionally, label each beverage with a small card that explains why it pairs well with the truffles.
Storage and Shelf Life
Storage methods for these truffles focus on keeping them cold, dry, and protected from odors. Place the truffles in a single layer inside an airtight container lined with parchment paper. Furthermore, if you must stack them, separate each layer with a sheet of parchment. Additionally, avoid storing truffles near strong smelling foods because chocolate absorbs surrounding odors.
Temperature requirements call for refrigeration at around forty degrees Fahrenheit. At this temperature, the truffles stay firm and fresh for up to two weeks. Moreover, avoid leaving truffles at room temperature for more than two hours because the cream cheese filling can spoil. Additionally, if you transport truffles, use a cooler with an ice pack to maintain a safe temperature.
Container recommendations include airtight plastic containers, glass storage boxes, or metal tins with tight fitting lids. Glass containers work especially well because they do not absorb odors or stain. Furthermore, line the bottom of the container with parchment paper to prevent sticking. Additionally, place a small piece of paper towel under the parchment to absorb any moisture.
Signs of spoilage include a sour smell, visible mold, or a watery texture in the filling. Additionally, if the chocolate coating looks dull or has white streaks, the truffles may have experienced temperature fluctuations. Furthermore, discarding truffles that show any of these signs is the safest choice. When in doubt, throw them out.
Reheating instructions do not apply to these truffles because they are served cold. However, if the chocolate coating looks bloomed from temperature changes, you can re dip the truffles in fresh melted chocolate. Additionally, let them set in the refrigerator for fifteen minutes before serving. This quick fix restores their glossy appearance.
Freezing guidelines allow you to store truffles for up to three months. First, freeze the truffles on a parchment lined sheet until they are solid. Then, transfer them to a freezer safe container with parchment between layers. Furthermore, thaw frozen truffles in the refrigerator overnight before serving. Consequently, you can always have a batch ready for unexpected guests.
Make Ahead Strategies
The prep timeline for these truffles allows you to spread the work across two days. On day one, make the filling and chill it overnight. On day two, roll, coat, and chill the truffles. Furthermore, this schedule breaks the work into manageable steps. Additionally, the overnight chill actually improves the flavor because the orange zest infuses the filling.
Storage between steps keeps each component fresh and ready to use. After making the filling, press plastic wrap directly onto the surface and refrigerate. Moreover, this prevents a skin from forming on top. Additionally, store rolled but uncoated truffle centers in the refrigerator for up to three days before dipping.
Quality impact assessment shows that make ahead truffles taste just as good as fresh ones when stored properly. In fact, the flavor often deepens after a day or two in the refrigerator. However, the chocolate coating may lose some of its shine after several days. Consequently, plan to coat the truffles within two days of serving for the best appearance.
Assembly tips for make ahead truffles include setting up a workstation with all your tools before you begin. Line two baking sheets with parchment paper and have your melted chocolate ready. Furthermore, work in small batches of six to eight truffles at a time. Additionally, return the uncoated truffles to the refrigerator while you coat each batch.
Reheating guidelines for the chocolate coating call for gentle heat and constant stirring. If your coating chocolate thickens while you work, reheat it in ten second bursts in the microwave. Moreover, stir between each burst until the chocolate flows smoothly again. Additionally, avoid overheating because scorched chocolate becomes unusable.
Fresh element additions should wait until serving day for the best results. For example, add fresh mint leaves or orange slices to the platter right before guests arrive. Furthermore, hold off on dusting truffles with powdered sugar until just before serving because the sugar dissolves over time. Consequently, your presentation stays crisp and beautiful.
Scaling Instructions
Halving the recipe works well when you need a smaller batch for an intimate gathering. Simply divide every ingredient by two, which yields twelve truffles. However, keep the chilling times the same because the filling still needs to firm up completely. Furthermore, use a smaller bowl and beat the filling for the same amount of time. Additionally, a half batch takes about the same total time as a full batch.
Doubling or tripling the recipe suits holiday gift making and large parties. When you double the recipe, use a larger mixing bowl and mix the filling in two additions for even distribution. Moreover, doubling yields forty eight truffles, while tripling yields seventy two. Additionally, plan for extra chilling space in your refrigerator when you scale up.
Equipment adjustments become necessary when you work with larger batches. For a double batch, use a stand mixer instead of a hand mixer to save time and effort. Furthermore, you may need two baking sheets for rolling and two more for setting the coated truffles. Additionally, a second double boiler helps you keep the coating chocolate warm throughout the process.
Timing modifications apply to the chilling steps when you scale the recipe. A double batch needs at least three hours to chill thoroughly, while a triple batch may need four hours. Furthermore, rolling and coating take roughly twice or three times as long. Additionally, allow extra time for the coated truffles to set before packaging.
Storage considerations for larger batches require more containers and refrigerator space. Therefore, clear a shelf in advance and gather enough airtight containers. Moreover, label each container with the date and flavor so you can track freshness. Additionally, if refrigerator space is limited, freeze some of the truffles and thaw them as needed.
Nutritional Deep Dive
The macro breakdown for each truffle reveals a balanced treat when enjoyed in moderation. Each truffle contains approximately ninety calories, five grams of fat, ten grams of carbohydrates, and one gram of protein. Furthermore, most of the fat comes from cocoa butter and cream cheese, while the carbohydrates come from powdered sugar and white chocolate. Additionally, the small amount of protein comes from the cream cheese.
Micronutrient analysis shows that orange zest contributes vitamin C, calcium, and small amounts of potassium. Moreover, the cream cheese adds vitamin A and riboflavin. Additionally, white chocolate provides trace amounts of calcium and iron. Consequently, these truffles offer more nutritional value than many candies.
Health benefits of this recipe stem mostly from the orange zest and the portion controlled size. The vitamin C in orange zest supports immune function and skin health. Furthermore, enjoying a small homemade treat can satisfy cravings and prevent overeating later. Additionally, making candy at home lets you avoid preservatives and artificial ingredients found in commercial products.
Dietary considerations include the fact that these truffles contain dairy, sugar, and cocoa butter. Therefore, people with dairy allergies or lactose intolerance should choose plant based alternatives. Moreover, individuals watching their sugar intake can reduce the powdered sugar or use a sugar substitute. Additionally, those on a gluten free diet can enjoy these truffles because the recipe contains no wheat.
Portion analysis suggests that one to two truffles make a reasonable serving. At ninety calories each, two truffles provide a satisfying dessert for under two hundred calories. Furthermore, pairing a truffle with a cup of tea or coffee extends the enjoyment without adding calories. Additionally, serving truffles on small plates helps you stick to appropriate portions.
Weight management tips include making truffles only for special occasions rather than keeping them on hand daily. Moreover, sharing your batch with friends and neighbors prevents temptation. Additionally, freezing half the batch lets you enjoy a few truffles now and save the rest for later. Consequently, you can savor these treats without derailing your health goals.
Dietary Adaptations
Gluten free adaptations require almost no changes because this recipe naturally contains no wheat flour. However, you should verify that your white chocolate, powdered sugar, and vanilla extract carry a gluten free certification. Furthermore, cross contamination during manufacturing can introduce trace gluten. Additionally, reading labels carefully ensures a safe treat for anyone with celiac disease or gluten sensitivity.
Dairy free versions swap the cream cheese for a plant based alternative such as cashew cream cheese or coconut cream cheese. Moreover, replace the white chocolate with a vegan white chocolate that uses cocoa butter and plant based milk. Additionally, check that your powdered sugar contains no dairy based anti caking agents. Consequently, you can create a delicious dairy free version that tastes remarkably close to the original.
Vegan adaptations build on the dairy free swaps and require vegan certified sugar. Additionally, some refined sugars process through bone char, so choose organic sugar if you follow a strict vegan diet. Furthermore, vegan white chocolate chips are now widely available in health food stores and online. As a result, vegans can enjoy these truffles without compromise.
Low carb versions replace powdered sugar with a powdered erythritol or monk fruit blend. Moreover, use sugar free white chocolate or make your own with cocoa butter and sweetener. Additionally, the orange zest remains the same because Print
Orange Creamsicle Truffles
- Total Time: 45 minutes
- Yield: 4
Description
These easy no-bake orange creamsicle truffles capture the nostalgic flavor of a creamsicle in a bite-sized treat. With a creamy orange center coated in white chocolate, they are perfect for parties or a sweet snack.
Ingredients
- 1 cup white chocolate chips
- 1/4 cup heavy cream
- 1 teaspoon orange zest
- 2 tablespoons fresh orange juice
- 1/2 teaspoon vanilla extract
- 1/4 teaspoon salt
- 1 1/2 cups powdered sugar
- 1 cup white chocolate melting wafers, for coating
- Orange food coloring (optional)
Instructions
- In a medium saucepan, combine white chocolate chips and heavy cream. Heat over low heat, stirring constantly, until chocolate is melted and smooth. Remove from heat.
- Stir in orange zest, orange juice, vanilla extract, and salt. Mix until well combined.
- Gradually add powdered sugar, stirring until a thick dough forms. If mixture is too sticky, add more powdered sugar, one tablespoon at a time.
- Cover and refrigerate for at least 1 hour, or until firm enough to roll.
- Roll the chilled mixture into 1-inch balls. Place on a parchment-lined baking sheet and freeze for 15 minutes.
- Melt white chocolate melting wafers in a microwave-safe bowl in 30-second intervals, stirring until smooth. If desired, add a few drops of orange food coloring.
- Dip each frozen truffle into melted white chocolate, allowing excess to drip off. Place back on the baking sheet.
- Refrigerate until coating is set, about 15 minutes. Store in an airtight container in the refrigerator.
Notes
You can customize the seasonings to taste. For a stronger orange flavor, add more zest. If you prefer a darker chocolate coating, use semi-sweet chocolate instead of white chocolate.
- Prep Time: 15 minutes
- Cook Time: 30 minutes
- Method: Main
- Cuisine: American